Saturday 6 May 2017

File Uploads in Angular with a Node and Hapi Backend

In this article, we will talk about how to handle file uploads with Angular. We will create an images uploader that allow user to upload single or multiple images file by drag and drop or select file dialog.We will then upload the selected images and display them accordingly. We will also learn to filter the upload file type, for example, we only allow images, do not allow file type like PDF.
                                     Image uploader

# File Upload UI & API

File upload consists of two parts: the UI (front-end) and the API (back-end). We will be using Angular to handle the UI part. We need a backend application to accept the uploaded files. You may follow the backend tutorials or download and run either one of these server side application to handle file upload for your backend:-
We will be using File upload with Hapi.js as our backend throughout this articles. We will also learn the tricks to enable fake upload on the front-end.

# File Upload Component HTML

Alright, let's start creating our Angular file upload component.
<!-- page-file-upload.component.html -->

<div>
  <!--UPLOAD-->
  <form #f="ngForm" enctype="multipart/form-data" novalidate 
    *ngIf="currentStatus === STATUS_INITIAL || currentStatus === STATUS_SAVING">
    <h1>Upload images</h1>
    <div class="dropbox">
      <input type="file" multiple
        [name]="uploadFieldName" (change)="filesChange($event.target.name, $event.target.files)" 
        [disabled]="currentStatus === STATUS_SAVING" accept="image/*" #photos>
      <p *ngIf="currentStatus === STATUS_INITIAL">
        Drag your file(s) here to begin<br>
        or click to browse
      </p>
      <p *ngIf="currentStatus === STATUS_SAVING">
        Uploading {{ photos.files.length }} files... 
      </p>
    </div>
  </form>
</div>
Notes:-
  1. Our upload form will have a few statuses: STATUS_INITIAL, STATUS_SAVING, STATUS_SUCCESS, STATUS_FAILED, the variable name is pretty expressive themselves.
  2. We will display the upload form when the status is initial or saving.
  3. The form attribute enctype="multipart/form-data" is important. To enable file upload, this attribute must be set. Learn more about enctype here.
  4. We have a file input <input type="file" /> to accept file upload. The property multiple indicate it's allow multiple file upload. Remove it for single file upload.
  5. We will handle the file input change event. Whenever the file input change (someone drop or select files), we will trigger the filesChange function and pass in the control name and selected files $event.target.files, and then upload to server.
  6. We limit the file input to accept images only with the attribute accept="image/*".
  7. The file input will be disabled during upload, so user can only drop / select files again after upload complete.
  8. We set a template variable #photos to the file input. This gives us a reference to the file input control. Later, you can see we use the photos variable in displaying number of files uploading Uploading {{ photos.files.length }} files....

# Style our File Upload Component

Now, that's the interesting part. Currently, our component look like this:
                                  File upload component without styling
We need to transform it to look like this:
                                     File upload component with styling
Let's style it!

/* page-file-upload.component.css */

.dropbox {
    outline: 2px dashed grey; /* the dash box */
    outline-offset: -10px;
    background: lightcyan;
    color: dimgray;
    padding: 10px 10px;
    min-height: 200px; /* minimum height */
    position: relative;
    cursor: pointer;
}

.dropbox:hover {
    background: lightblue; /* when mouse over to the drop zone, change color */
}

input[type="file"] {
    opacity: 0; /* invisible but it's there! */
    width: 100%;
    height: 200px;
    position: absolute;
    cursor: pointer;
}

.dropbox p {
    font-size: 1.2em;
    text-align: center;
    padding: 50px 0;
}
With only few lines of css, our component looks prettier now.
Notes:-
  1. We make the file input invisible by applying opacity: 0 style. This doesn't hide the file input, it just make it invisible.
  2. Then, we style the file input parent element, the dropbox css class. We make it look like a drop file zone surround with dash.
  3. Then, we align the text inside dropbox to center.

# File Upload Component Code

// page-file-upload.component.ts

import { Component } from '@angular/core';
import { FileUploadService } from './file-upload.service'; // we will create this next!

@Component({
  selector: 'page-file-upload',
  templateUrl: './page-file-upload.component.html',
  styleUrls: ['./page-file-upload.component.css']
})
export class PageFileUploadComponent {

  uploadedFiles = [];
  uploadError;
  currentStatus: number;
  uploadFieldName = 'photos';

  readonly STATUS_INITIAL = 0;
  readonly STATUS_SAVING = 1;
  readonly STATUS_SUCCESS = 2;
  readonly STATUS_FAILED = 3;

  constructor(private _svc: FileUploadService) {
    this.reset(); // set initial state
  }

  filesChange(fieldName: string, fileList: FileList) {
    // handle file changes
    const formData = new FormData();

    if (!fileList.length) return;

    // append the files to FormData
    Array
      .from(Array(fileList.length).keys())
      .map(x => {
        formData.append(fieldName, fileList[x], fileList[x].name);
      });

    // save it
    this.save(formData);
  }

  reset() {
    this.currentStatus = this.STATUS_INITIAL;
    this.uploadedFiles = [];
    this.uploadError = null;
  }

  save(formData: FormData) {
    // upload data to the server
    this.currentStatus = this.STATUS_SAVING;
    this._svc.upload(formData)
      .take(1)
      .delay(1500) // DEV ONLY: delay 1.5s to see the changes
      .subscribe(x => {
        this.uploadedFiles = [].concat(x);
        this.currentStatus = this.STATUS_SUCCESS;
      }, err => {
        this.uploadError = err;
        this.currentStatus = this.STATUS_FAILED;
      })
  }
}
Notes:-
  1. Later on, we will call the Hapi.js file upload API to upload images, the API accept a field call photos. That's our file input field name.
  2. We handle the file changes with the filesChange function. FileList is an object returned by the files property of the HTML element. It allow us to access the list of files selected with the element. Learn more [here]((https://developer.mozilla.org/en/docs/Web/API/FileList).
  3. We then create a new FormData, and append all our photos files to it. FormData interface provides a way to easily construct a set of key/value pairs representing form fields and their values. Learn more here.
  4. The save function will call our file upload service (hang on, we will create the service next!). We also set the status according to the result.

# File Upload Service

// file-upload.service.ts

import { Injectable } from '@angular/core';
import { Http, RequestOptionsArgs, Headers } from '@angular/http';

@Injectable()
export class FileUploadService {

    baseUrl = 'http://localhost:3001'; // our local Hapi Js API

    constructor(private _http: Http) { }

    upload(formData) {
        const url = `${this.baseUrl}/photos/upload`;
        return this._http.post(url, formData)
            .map(x => x.json())
            .map((x: any[]) => x
          // add a new field url to be used in UI later
                .map(item => Object
                    .assign({}, item, { url: `${this.baseUrl}/images/${item.id}` }))
            );
    }
}
Nothing much, the code is pretty expressive itself. We upload the files, wait for the result, map it accordingly.
Now wire up your component and service to module, usually app.module.ts, and run it.

# Display Success and Failed Result

We can upload the files successfully now. However, there's no indication in UI. Let's update our HTML.
<!-- page-file-upload.component.html -->
<div>
  <!--UPLOAD-->
  ...

  <!--SUCCESS-->
  <div class="margin-20" *ngIf="currentStatus === STATUS_SUCCESS">
    <h2>Uploaded {{ uploadedFiles.length }} file(s) successfully.</h2>
    <p>
      <a href="javascript:void(0)" (click)="reset()">Upload again</a>
    </p>
    <ul class="list-unstyled">
      <li *ngFor="let item of uploadedFiles">
        <img [src]="item.url" class="img-responsive img-thumbnail" 
          [alt]="item.originalName">
      </li>
    </ul>
  </div>

  <!--FAILED-->
  <div class="margin-20" *ngIf="currentStatus === STATUS_FAILED">
    <h2>Uploaded failed.</h2>
    <p>
      <a href="javascript:void(0)" (click)="reset()">Try again</a>
    </p>
    <pre>{{ uploadError | json }}</pre>
  </div>
</div>
Notes:-
  1. Display the uploaded image when upload successfully.
  2. Display the error message when upload failed.

# Fake the Upload in Front-end

If you are lazy to start the back-end application (Hapi, Express, etc) to handle file upload. Here is a fake service to replace the file upload service.
// file-upload.fake.service.ts

import { Injectable } from '@angular/core';
import { Observable } from 'rxjs/Rx';

@Injectable()
export class FileUploadFakeService {

    upload(formData: any) {
        const photos: any[] = formData.getAll('photos');
        const promises = photos.map((x: File) => this.getImage(x)
            .then(img => ({
                id: img,
                originalName: x.name,
                fileName: x.name,
                url: img
            })));
        return Observable.fromPromise(Promise.all(promises));
    }

    private getImage(file: File) {
        return new Promise((resolve, reject) => {
            const fReader = new FileReader();
            const img = document.createElement('img');

            fReader.onload = () => {
                img.src = fReader.result;
                resolve(this.getBase64Image(img));
            }

            fReader.readAsDataURL(file);
        })
    }

    private getBase64Image(img) {
        const canvas = document.createElement('canvas');
        canvas.width = img.width;
        canvas.height = img.height;

        const ctx = canvas.getContext('2d');
        ctx.drawImage(img, 0, 0);

        const dataURL = canvas.toDataURL('image/png');

        return dataURL;
    }
}
Came across this solution in this Stackoverflow post. Pretty useful. My online demo is using this service.
Basically, what the code do is read the source, draw it in canvas, and save it as data url with the canvas toDataURL function. Learn more about canvas here.
If you realize, our fake service has a same public interface as the real file upload service, both has upload function and return list of files. This is important for the next step, swap the real file upload service with the fake one.

# Swap the Real File Upload with the Fake Service

First you might think that to use the fake service, you need to register the fake service in module, and import it in our file upload component like how we do usually. However, there's a quicker way, with Angular dependency injection (DI). Let's look at our App module.
// app.module.ts

...
import { PageFileUploadComponent, FileUploadFakeService, 
  FileUploadService } from './file-upload';

@NgModule({
  ...
  providers: [
    // FileUploadService, // normally we do this, comment it, we do the below instead
    { provide: FileUploadService, useClass: FileUploadFakeService }, // we can do this instead

  ],
  ...
})
export class AppModule { }
With this, you don't need to change your component code, stop your backend API, refresh the browser, you should see our app is still working, calling fake service instead.
In short, Providers: [FileUploadService] is the short form of Providers: [{ provide: FileUploadService, useClass: FileUploadService }]. Therefore, as long as we have another class with similar interface, we can swap it easily.
Angular DI is powerful. We'll leave that for another post.

Friday 14 April 2017

Upgrading Ionic 2 and Angular 2 to Ionic 3 and Angular 4

Today we will share step by step tutorial on what we are experiencing in the real Ionic project of upgrade Ionic and Angular 4 to Ionic 3 and Angular 4. There's a little different than describe on official guides. We are more comfortable do an upgrade by creating new Ionic 3 and Angular 4 project rather than modify existing Ionic 2 and Angular 2 project.

1. Create new Ionic 3 App

Open terminal or Node.js command line, go to projects folder then type this command.
ionic start appname sidemenu --v2
That command will create new Ionic 3 app with the name "appname", using side menu template and version still same with Ionic 2 by using "--v2" prefix. Use the same template as previous Ionic 2 app.
Check all default plugins that used on the new Ionic 3 app.
ionic plugin list
You should a see result like this.
cordova-plugin-console 1.0.5 "Console"
cordova-plugin-device 1.1.4 "Device"
cordova-plugin-splashscreen 4.0.2 "Splashscreen"
cordova-plugin-statusbar 2.2.1 "StatusBar"
cordova-plugin-whitelist 1.3.1 "Whitelist"
ionic-plugin-keyboard 2.2.1 "Keyboard"


2. Check Old Ionic 2 App Plugins

Do the same thing as previous step.
ionic plugin list
Now, you can see different with default plugin that use by Ionic 3.
cordova-plugin-console 1.0.5 "Console"
cordova-plugin-device 1.1.4 "Device"
cordova-plugin-fcm 2.1.1 "FCMPlugin"
cordova-plugin-inappbrowser 1.6.1 "InAppBrowser"
cordova-plugin-splashscreen 4.0.1 "Splashscreen"
cordova-plugin-statusbar 2.2.1 "StatusBar"
cordova-plugin-whitelist 1.3.1 "Whitelist"
ionic-plugin-keyboard 2.2.1 "Keyboard"
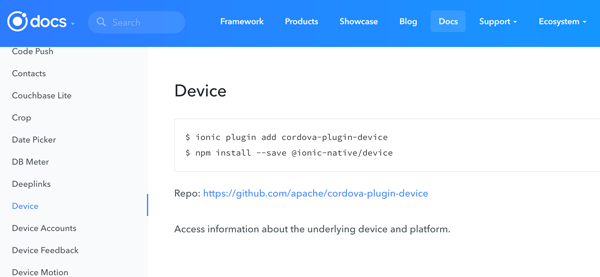
You should check plugin usage in Ionic Native documentation https://ionicframework.com/docs/native/ to make plugin that actually use working smoothly. If you find a different usage of plugin, then you should update or reinstall the plugin. For example, we are using "cordova-plugin-device" then go to Ionic Native docs and find Device.
Upgrading Ionic 2 and Angular 2 to Ionic 3 and Angular 4 - Ionic Native Docs
Now, reinstall that plugin.
ionic plugin rm cordova-plugin-device
ionic plugin add cordova-plugin-device
npm install --save @ionic-native/device

3. Copy Folders and Files from Old Ionic 2 to Ionic 3 app

Not all folders should copy to new Ionic 3 app. Here's the list of folders and files that may copies.
- resources
- src/assets
- src/pages
- src/providers
- src/themes
- config.xml
- src/app/pipes
And also you can copy your modules, directives or services folder and files.


4. Modify Main Module and Component

Open files "src/app/app.module.ts" from both old Ionic 2 and new Ionic 3 app. Copies all pages, providers, pipes and directives from the old Ionic 2 to the new Ionic 3 App Module. Here's imports example.
import { ApiService } from '../providers/api-service';
import { HomePage } from '../pages/home/home';
import { ListPage } from '../pages/list/list';
import { DetailsPage } from '../pages/details/details';
import { OrderByPipe } from './pipes/order-by';
Declare that imported pages to "@NgModule" declarations and entryComponents. Declare pipes and directives in "@NgModule" declarations. Declare providers in "@NgModule" providers.
If you are using Http module for accessing REST API, add this import.
import { HttpModule } from '@angular/http';
Then add in "@NgModule" imports after BrowserModule.
imports: [
  BrowserModule,
  HttpModule,
  IonicModule.forRoot(MyApp, {
    backButtonText: '',
    iconMode: 'ios',
    tabsPlacement: 'top',
    menuType: 'overlay',
  }),
],
If you are using Ionic Native plugins, add the import like this.
import { InAppBrowser } from '@ionic-native/in-app-browser';
import { Device } from '@ionic-native/device';
Then declare in "@NgModule" providers.
providers: [
  StatusBar,
  SplashScreen,
  InAppBrowser,
  Device,
  {provide: ErrorHandler, useClass: IonicErrorHandler},
  ApiService
]
Otherwise, you will face this errors on the browser console log.
ERROR Error: Uncaught (in promise): Error: No provider for Device!
Error
   at Error (native)
   at g (file:///android_asset/www/build/polyfills.js:3:7133)
   at injectionError (file:///android_asset/www/build/main.js:1511:86)
   at noProviderError (file:///android_asset/www/build/main.js:1549:12)
   at ReflectiveInjector_._throwOrNull (file:///android_asset/www/build/main.js:3051:19)
   at ReflectiveInjector_._getByKeyDefault (file:///android_asset/www/build/main.js:3090:25)
   at ReflectiveInjector_._getByKey (file:///android_asset/www/build/main.js:3022:25)
   at ReflectiveInjector_.get (file:///android_asset/www/build/main.js:2891:21)
   at NgModuleInjector.get (file:///android_asset/www/build/main.js:3856:52)
   at resolveDep (file:///android_asset/www/build/main.js:11260:45)
   at createClass (file:///android_asset/www/build/main.js:11128:32)
   at createDirectiveInstance (file:///android_asset/www/build/main.js:10954:37)
   at createViewNodes (file:///android_asset/www/build/main.js:12303:49)
   at createRootView (file:///android_asset/www/build/main.js:12208:5)
   at Object.createProdRootView [as createRootView] (file:///android_asset/www/build/main.js:12786:12) {originalStack: "Error: Uncaught (in promise): Error: No provider f…:///android_asset/www/build/polyfills.js:3:16210)", zoneAwareStack: "Error: Uncaught (in promise): Error: No provider f…:///android_asset/www/build/polyfills.js:3:16210)", rejection: Error: No provider for Device!, promise: t, zone: n…}
That example of error because of Device not declare in "@NgModule" providers.
Next, for "app.component.ts" copy all codes from previous Ionic 2 "app.component.ts". Modify import for Ionic Native to be single import for each other.
import { StatusBar } from '@ionic-native/status-bar';
import { SplashScreen } from '@ionic-native/splash-screen';
import { InAppBrowser } from '@ionic-native/in-app-browser';
Make all modules and plugin injected in the constructor.
constructor(public platform: Platform,
  public statusBar: StatusBar,
  public splashScreen: SplashScreen,
  private iab: InAppBrowser,
  public apiService: ApiService) {}
Change the calls of modules and plugin which have "@Angular" module installed except for plugin that not have like FCM plugin.
Previously:
StatusBar.styleDefault();
Splashscreen.hide();
Now become:
this.statusBar.styleDefault();
this.splashScreen.hide();
FCM plugin or another plugin that not have "@angular" module treat same as previous Ionic 2.

5. Add Platform and Run from Device

Finally, we have to add or remove/add platform before running on devices.
ionic platform rm android
ionic platform add android
ionic platform rm ios
ionic platform add ios
Now, we can run directly on the device.
ionic run android

Saturday 1 April 2017

Ionic 2 Firebase Email Authentication

Ionic 2 Firebase authentication using email and password is one of the authentication methods in firebase. This will be a good practice for Ionic 2 apps since it's supported AngularFire very well.

There are several authentication methods that firebase provided.
  1. Email/Password
  2. Google
  3. Facebook
  4. Twitter
  5. Github
  6. Anonymous
Right now, we just using standard Email/Password method for authenticating to our app and accessing firebase database from our app. Let's start the engine.

1. Setup Projects

For smoother tutorial progress, please update your latest Ionic 2 installation by this command.
sudo npm install -g ionic@latest cordova typescript
Create a new project using this command and give a name (mine is "Ionic2FirebaseEmailAuth").
ionic start Ionic2FirebaseEmail --v2
That command will create a new Ionic project with tab template and run "npm" install automatically, just wait until finished.
Go to the folder that created by Ionic start.
cd Ionic2FirebaseEmail
Install required dependencies and plugins.
npm install @ionic/app-scripts@latest --save-dev
npm install @types/request@latest --save-dev
npm install angularfire2 --save

2. Configure Project

Open src/app/app.module.ts. Add import AngularFireModule in import line under TabsPage.
import { AngularFireModule, AuthProviders, AuthMethods } from 'angularfire2';

Initialize firebase by adding firebase config under import section.

export const firebaseConfig = {
  apiKey: "AIzaSyCrZpORU_czh2oUrAkRrN7TyuZChUNx0B4",
  authDomain: "myionic2firebase.firebaseapp.com",
  databaseURL: "https://myionic2firebase.firebaseio.com",
  storageBucket: "myionic2firebase.appspot.com"
};

const myFirebaseAuthConfig = {
  provider: AuthProviders.Password,
  method: AuthMethods.Password
}

firebase.initializeApp(firebaseConfig);
To fill those configs, go to your console.firebase.google.com. ApiKey is found at Setting (Gear Icon) -> Project Settings -> General Tab, you can pick Web API Key for this. AuthDomain fills with "projectID.firebaseapp.com" where projectId is found above Web API Key. DatabaseURL is found in Database menu. StorageBucket is found in Storage menu. Next, call this firebaseConfig in imports.
imports: [
  IonicModule.forRoot(MyApp),
  AngularFireModule.initializeApp(firebaseConfig, myFirebaseAuthConfig)
],
For connecting between Ionic 2 app with Firebase, we need to create a service. Create a service by this command.
ionic g provider AuthService
Now, register this provider in src/app/app.module.ts. Add import to this new provider.
import { AuthService } from '../providers/auth-service';
Declare in provider section of @NgModule.
providers: [
  {provide: ErrorHandler, useClass: IonicErrorHandler},
  AuthService
]
Next, edit the generated src/providers/auth-service.ts. Import firebase module in the header of the file.
import { Injectable } from '@angular/core';
import firebase from 'firebase';
Add this fields to authentication and hold user data.
public fireAuth: any;
public userData: any;
Initialize them both in the constructor.
constructor() {
  this.fireAuth = firebase.auth();
  this.userData = firebase.database().ref('/userData');
}
Create new function for login.
doLogin(email: string, password: string): any {
  return this.fireAuth.signInWithEmailAndPassword(email, password);
}
Create new function for the register.
register(email: string, password: string): any {
  return this.fireAuth.createUserWithEmailAndPassword(email, password)
    .then((newUser) => {
      this.userData.child(newUser.uid).set({email: email});
    });
}
Create new function for reset password.
resetPassword(email: string): any {
  return this.fireAuth.sendPasswordResetEmail(email);
}
And the last, create the new function for logout from firebase.
doLogout(): any {
  return this.fireAuth.signOut();
}
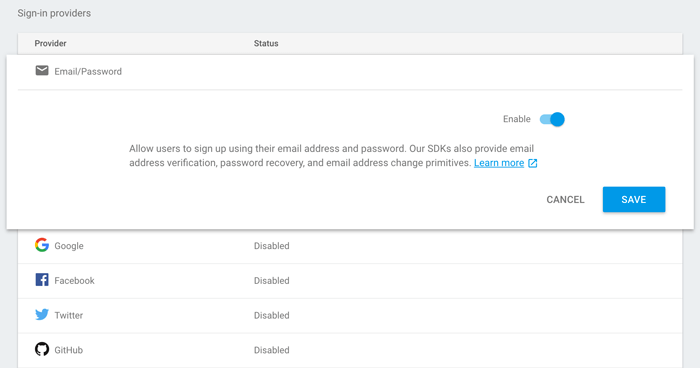
With above configuration in an app, now we should change the configuration in console.firebase.google.com. Go to your app dashboard then choose authentication. Choose sign-in method tab and click Email/Password.
Ionic 2 Firebase Email Authentication - Enable email auth
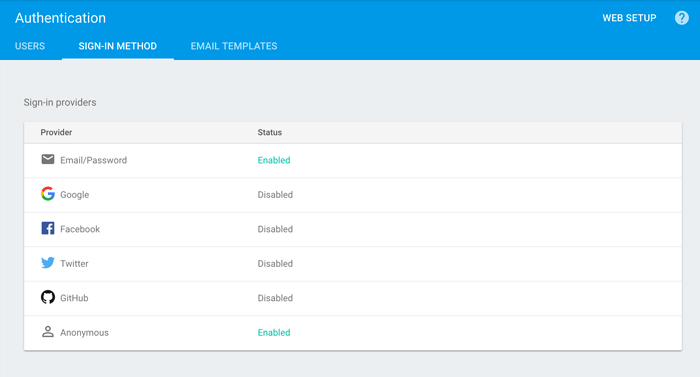
Sign-in Methods
Click save and you will see sign-in method change.

3. Create Login, Register and Reset Password Page

In this tutorial, we need a new login, register and reset password page. Just type this command to generate sets of the login page

ionic g page login
ionic g page register
ionic g page resetpwd
Register this new login page in src/app/app.module.ts. Add the import in this file.
import { LoginPage } from '../pages/login/login';
import { RegisterPage } from '../pages/register/register';
import { ResetpwdPage } from '../pages/resetpwd/resetpwd';
Add this line inside declarations and inside entryComponents of @NgModule.
LoginPage,
RegisterPage,
ResetpwdPage
Next, we have to create a restriction to the landing page (home) for an only authenticated user. We have to import login page and firebase in pages/home/home.ts.
import firebase from 'firebase';
import { LoginPage } from '../login/login';

Then add this filter code inside constructor.

firebase.auth().onAuthStateChanged(function(user) {
  if (!user) {
    navCtrl.setRoot(LoginPage);
  }
});
This code will redirect to Login Page if no user found/login.
Next, open ../pages/login/login.html to add login form. Replace all generated html with this code to login.html.
<ion-content padding>
  <h2>Please, Login</h2>
  <form [formGroup]="loginForm" (submit)="loginUser()" novalidate>
    <ion-item>
      <ion-label stacked>Email</ion-label>
      <ion-input #email formControlName="email" type="email" (change)="elementChanged(email)"
        placeholder="Your email address"
        [class.invalid]="!loginForm.controls.email.valid && (emailChanged || submitAttempt)"></ion-input>
    </ion-item>
    <ion-item class="error-message" *ngIf="!loginForm.controls.email.valid  && (emailChanged || submitAttempt)">
      <p>Please enter a valid email.</p>
    </ion-item>
    <ion-item>
      <ion-label stacked>Password</ion-label>
      <ion-input #password formControlName="password" type="password" (change)="elementChanged(password)"
        placeholder="Your password"
        [class.invalid]="!loginForm.controls.password.valid && (passwordChanged || submitAttempt)"></ion-input>
    </ion-item>
    <ion-item class="error-message" *ngIf="!loginForm.controls.password.valid  && (passwordChanged || submitAttempt)">
      <p>Your password needs more than 6 characters.</p>
    </ion-item>
    <button ion-button block type="submit">
      Login
    </button>
  </form>

  <button ion-button block clear (click)="register()">
    No have an account? Register Now
  </button>
  <button ion-button block clear (click)="resetPwd()">
    Forgot Password
  </button>
</ion-content>
Give a little style to fit the page in pages/login/login.scss.
page-login {
  h2 {
    text-align: center;
    margin: 10px;
  }
  form {
    margin-bottom: 20px;
    button {
      margin-top: 20px !important;
    }
    p {
      font-style: italic;
      color: red;
    }
  }

  .invalid {
    border-bottom: 1px solid #FF6153;
  }

  .error-message .item-inner {
    border-bottom: 0 !important;
  }
}
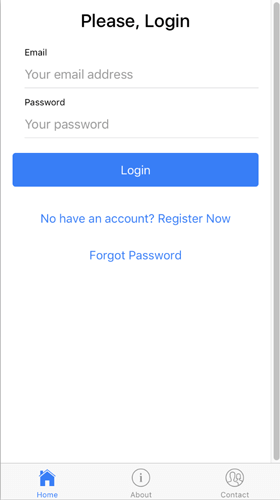
Now, the login page should be like this.
Login Page

Replace all codes in pages/login/login.ts with this codes.
import { Component } from '@angular/core';
import { NavController, AlertController, NavParams, LoadingController } from 'ionic-angular';
import { FormBuilder, Validators } from '@angular/forms';
import { AuthService } from '../../providers/auth-service';
import { HomePage } from '../home/home';
import { RegisterPage } from '../register/register';
import { ResetpwdPage } from '../resetpwd/resetpwd';

/*
  Generated class for the Login page.

  See http://ionicframework.com/docs/v2/components/#navigation for more info on
  Ionic pages and navigation.
*/
@Component({
  selector: 'page-login',
  templateUrl: 'login.html'
})
export class LoginPage {

  public loginForm;
  emailChanged: boolean = false;
  passwordChanged: boolean = false;
  submitAttempt: boolean = false;
  loading: any;

  constructor(public navCtrl: NavController, public authService: AuthService, public navParams: NavParams, public formBuilder: FormBuilder,public alertCtrl: AlertController, public loadingCtrl: LoadingController) {
    let EMAIL_REGEXP = /^[a-z0-9!#$%&'*+\/=?^_`{|}~.-]+@[a-z0-9]([a-z0-9-]*[a-z0-9])?(\.[a-z0-9]([a-z0-9-]*[a-z0-9])?)*$/i;
    this.loginForm = formBuilder.group({
      email: ['', Validators.compose([Validators.required, Validators.pattern(EMAIL_REGEXP)])],
      password: ['', Validators.compose([Validators.minLength(6), Validators.required])]
    });
  }

  elementChanged(input){
    let field = input.inputControl.name;
    this[field + "Changed"] = true;
  }

  register(){
    this.navCtrl.push(RegisterPage);
  }

  resetPwd(){
    this.navCtrl.push(ResetpwdPage);
  }

  loginUser(){
    this.submitAttempt = true;

    if (!this.loginForm.valid){
      console.log(this.loginForm.value);
    } else {
      this.authService.doLogin(this.loginForm.value.email, this.loginForm.value.password).then( authService => {
        this.navCtrl.setRoot(HomePage);
      }, error => {
        this.loading.dismiss().then( () => {
          let alert = this.alertCtrl.create({
            message: error.message,
            buttons: [
              {
                text: "Ok",
                role: 'cancel'
              }
            ]
          });
          alert.present();
        });
      });

      this.loading = this.loadingCtrl.create({
        dismissOnPageChange: true,
      });
      this.loading.present();
    }
  }

}
Inside this code, there is a form validator (Angular 2 built in), login function and navigation to register and reset the password.

Next, we have to modify register page. Open pages/register/register.html and replace with this code.
<ion-header>

  <ion-navbar>
    <ion-title>register</ion-title>
  </ion-navbar>

</ion-header>


<ion-content padding>
  <h2>Register</h2>
  <form [formGroup]="registerForm" (submit)="doRegister()" novalidate>
    <ion-item>
      <ion-label stacked>Email</ion-label>
      <ion-input #email formControlName="email" type="email" (change)="elementChanged(email)"
        placeholder="Your email address"
        [class.invalid]="!registerForm.controls.email.valid && (emailChanged || submitAttempt)"></ion-input>
    </ion-item>
    <ion-item class="error-message" *ngIf="!registerForm.controls.email.valid  && (emailChanged || submitAttempt)">
      <p>Please enter a valid email.</p>
    </ion-item>
    <ion-item>
      <ion-label stacked>Password</ion-label>
      <ion-input #password formControlName="password" type="password" (change)="elementChanged(password)"
        placeholder="Your password"
        [class.invalid]="!registerForm.controls.password.valid && (passwordChanged || submitAttempt)"></ion-input>
    </ion-item>
    <ion-item class="error-message" *ngIf="!registerForm.controls.password.valid  && (passwordChanged || submitAttempt)">
      <p>Your password needs more than 6 characters.</p>
    </ion-item>
    <ion-item>
      <ion-label stacked>Full Name</ion-label>
      <ion-input #fullname formControlName="fullname" type="text" (change)="elementChanged(fullname)"
        placeholder="Your Full Name"
        [class.invalid]="!registerForm.controls.fullname.valid && (fullnameChanged || submitAttempt)"></ion-input>
    </ion-item>
    <ion-item class="error-message" *ngIf="!registerForm.controls.fullname.valid  && (fullnameChanged || submitAttempt)">
      <p>Your full name can't empty.</p>
    </ion-item>
    <button ion-button block type="submit">
      Register
    </button>
  </form>
</ion-content>
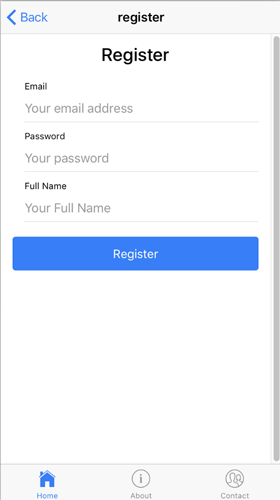
The style for this page is same as the login page, just place same code as login page inside pages/register/register.scss. Now, the register page looks like this.
Register Page

Replace all codes from pages/register/register.ts with this codes.
import { Component } from '@angular/core';
import { NavController, AlertController, NavParams, LoadingController } from 'ionic-angular';
import { FormBuilder, Validators } from '@angular/forms';
import { AuthService } from '../../providers/auth-service';
import { HomePage } from '../home/home';

/*
  Generated class for the Register page.

  See http://ionicframework.com/docs/v2/components/#navigation for more info on
  Ionic pages and navigation.
*/
@Component({
  selector: 'page-register',
  templateUrl: 'register.html'
})
export class RegisterPage {

  public registerForm;
  emailChanged: boolean = false;
  passwordChanged: boolean = false;
  fullnameChanged: boolean = false;
  submitAttempt: boolean = false;
  loading: any;

  constructor(public navCtrl: NavController, public authService: AuthService, public navParams: NavParams, public formBuilder: FormBuilder,public alertCtrl: AlertController, public loadingCtrl: LoadingController) {
    let EMAIL_REGEXP = /^[a-z0-9!#$%&'*+\/=?^_`{|}~.-]+@[a-z0-9]([a-z0-9-]*[a-z0-9])?(\.[a-z0-9]([a-z0-9-]*[a-z0-9])?)*$/i;
    this.registerForm = formBuilder.group({
      email: ['', Validators.compose([Validators.required, Validators.pattern(EMAIL_REGEXP)])],
      password: ['', Validators.compose([Validators.minLength(6), Validators.required])]
    });
  }

  elementChanged(input){
    let field = input.inputControl.name;
    this[field + "Changed"] = true;
  }

  doRegister(){
    this.submitAttempt = true;

    if (!this.registerForm.valid){
      console.log(this.registerForm.value);
    } else {
      this.authService.register(this.registerForm.value.email, this.registerForm.value.password).then( authService => {
        this.navCtrl.setRoot(HomePage);
      }, error => {
        this.loading.dismiss().then( () => {
          let alert = this.alertCtrl.create({
            message: error.message,
            buttons: [
              {
                text: "Ok",
                role: 'cancel'
              }
            ]
          });
          alert.present();
        });
      });

      this.loading = this.loadingCtrl.create({
        dismissOnPageChange: true,
      });
      this.loading.present();
    }
  }

}
This codes almost same as login.ts, but this only for the register. Next, we have to modify reset the password. Edit pages/resetpwd/resetpwd.html and replace all with this codes.
<ion-header>

  <ion-navbar>
    <ion-title>resetpwd</ion-title>
  </ion-navbar>

</ion-header>


<ion-content padding>
  <h2>Reset Password</h2>
  <form [formGroup]="resetpwdForm" (submit)="resetPwd()" novalidate>
    <ion-item>
      <ion-label stacked>Email</ion-label>
      <ion-input #email formControlName="email" type="email" (change)="elementChanged(email)"
        placeholder="Your email address"
        [class.invalid]="!resetpwdForm.controls.email.valid && (emailChanged || submitAttempt)"></ion-input>
    </ion-item>
    <ion-item class="error-message" *ngIf="!resetpwdForm.controls.email.valid  && (emailChanged || submitAttempt)">
      <p>Please enter a valid email.</p>
    </ion-item>
    <button ion-button block type="submit">
      Reset Password
    </button>
  </form>
</ion-content>
For style just copy paste same code from register.scss. Next, replace all codes from pages/resetpwd/resetpwd.ts with this codes.
import { Component } from '@angular/core';
import { NavController, AlertController, NavParams, LoadingController } from 'ionic-angular';
import { FormBuilder, Validators } from '@angular/forms';
import { AuthService } from '../../providers/auth-service';
import { HomePage } from '../home/home';

/*
  Generated class for the Resetpwd page.

  See http://ionicframework.com/docs/v2/components/#navigation for more info on
  Ionic pages and navigation.
*/
@Component({
  selector: 'page-resetpwd',
  templateUrl: 'resetpwd.html'
})
export class ResetpwdPage {

  public resetpwdForm;
  emailChanged: boolean = false;
  submitAttempt: boolean = false;
  loading: any;

  constructor(public navCtrl: NavController, public authService: AuthService, public navParams: NavParams, public formBuilder: FormBuilder,public alertCtrl: AlertController, public loadingCtrl: LoadingController) {
    let EMAIL_REGEXP = /^[a-z0-9!#$%&'*+\/=?^_`{|}~.-]+@[a-z0-9]([a-z0-9-]*[a-z0-9])?(\.[a-z0-9]([a-z0-9-]*[a-z0-9])?)*$/i;
    this.resetpwdForm = formBuilder.group({
      email: ['', Validators.compose([Validators.required, Validators.pattern(EMAIL_REGEXP)])]
    });
  }

  elementChanged(input){
    let field = input.inputControl.name;
    this[field + "Changed"] = true;
  }

  resetPwd() {
    if (!this.resetpwdForm.valid){
      console.log(this.resetpwdForm.value);
    } else {
      this.authService.resetPassword(this.resetpwdForm.value.email).then( authService => {
        this.navCtrl.setRoot(HomePage);
      }, error => {
        this.loading.dismiss().then( () => {
          let alert = this.alertCtrl.create({
            message: error.message,
            buttons: [
              {
                text: "Ok",
                role: 'cancel'
              }
            ]
          });
          alert.present();
        });
      });

      this.loading = this.loadingCtrl.create({
        dismissOnPageChange: true,
      });
      this.loading.present();
    }
  }

}
Reset password mechanism handled all by firebase. When you send email for reset password, firebase will send email contains reset link to your email then you can follow rest until your password changed.
Oh wait, one thing left is logout. We will put logout button in home page so add this code to pages/home/home.html in ion-navbar under ion-title.
<ion-title>Home</ion-title>
<ion-buttons end>
  <button ion-button color="primary" (click)="logout()">
    <ion-icon ios="ios-exit" md="md-exit"></ion-icon>
  </button>
</ion-buttons>
Don't forget to add function to home.ts also importing AuthService.
import { AuthService } from '../../providers/auth-service';
...
logout() {
  this.authService.doLogout();
}
That's all required steps for making your Ionic 2 Firebase Email Authentication. Now, you run your app in the browser by this command.
ionic serve
Or in Emulator, by this command.
ionic emulate