Hi guys! I'm back with a new article of how to build a video sharing website like youtube we will discuss about YouTube launched in 2005, no one could have imagined that it would become such a successful website. Today, YouTube is the #3 website in the world pulling in over 1 billion visitors each month...that's a lot of people. One of the biggest reasons why YouTube became so popular is because video is the most powerful way to present anything. Here are some amazing stats about YouTube:
More than 1 billion unique users visit YouTube each month Over 6 billion hours of video are watched each month on YouTube—that's almost an hour for every person on Earth 100 hours of video are uploaded to YouTube every minute 80% of YouTube traffic comes from outside the US YouTube is localized in 61 countries and across 61 languages According to Nielsen, YouTube reaches more US adults ages 18-34 than any cable network Millions of subscriptions happen each day. The number of people subscribing daily is up more than 3x since last year, and the number of daily subscriptions is up more than 4x since last year
What is this article about? This article will teach you step by step how to create a website similar to YouTube. So if you've ever wanted to launch a YouTube like site, you will be able to at the end of the article.
Who is this article for? This article is for people, organizations agencies or companies that want to build their brand by presenting amazing video content. Users will be able to upload or import their videos through their admin panel, create playlists, give thumbs up or down for videos, embed videos, and so much more. While it's a good idea to post your videos on YouTube, it would be just as good to drive a ton of traffic by having people visit your website and watching the videos without having to go somewhere else. This is great for SEO and brand visibility.
Monetizing Your Site You will learn how to monetize your site with Google Adsense or banners simply by inserting your codes in whatever position you want to show ads. This will give you complete control over what ads show on your website.
Website and Video Optimization This article will teach you how to optimize your site, menus, videos, and content pages. This will increase your visibility on search engines like Google, Bing and Yahoo!.
Your website will have the following features:
video upload
video thumbnail generation
server side video conversion
full video player
likes + dislikes on videos
full comment system with likes/dislikes, replies etc.
video details editing
account creation
Easy-to-use interface inspired by YouTube
Front-end management for user and admin
Social media sharing (Facebook, Twitter, Google+, Email)
Are you looking for Fidget Spinner, this post will explain you how to create a Fidget Spinner using Jquery, HTML and CSS, I want to explain how to design Fidget Spinner with CSS, HTML and Jquery. Fidget Spinner help you to spin Like Real Fidget Spinner, Just take a quick look at these four steps, use it and make your own Fidget Spinner.
HTML Code
Layout divided into five parts are BG, everything and holder ,spinner. Herehandle
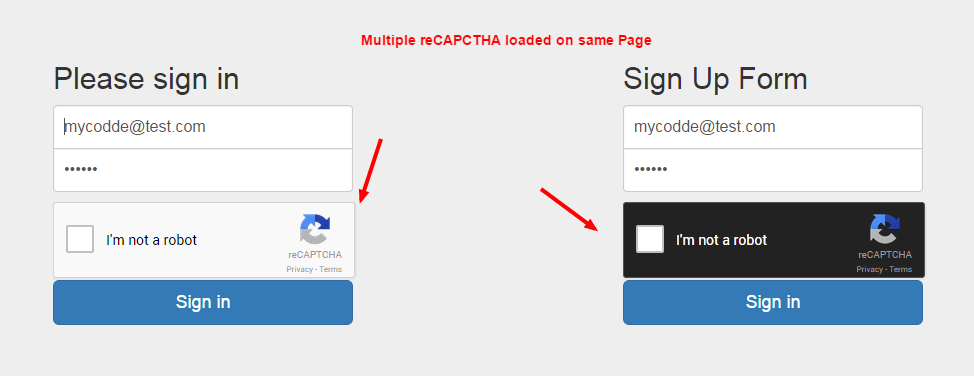
<scriptsrc="https://www.google.com/recaptcha/api.js?onload=myCallBack&render=explicit"asyncdefer></script>
<script>
var recaptcha1;
var recaptcha2;
var myCallBack= function() {
//Render the recaptcha1 on the element with ID "recaptcha1"
recaptcha1 = grecaptcha.render('recaptcha1', {
'sitekey' : '6Lc_0f4SAAAAAF9ZA', //Replace this with your Site key
'theme' : 'light'
});
//Render the recaptcha2 on the element with ID "recaptcha2"
recaptcha2 = grecaptcha.render('recaptcha2', {
'sitekey' : '6Lc_0f4SAAAAAF9ZA', //Replace this with your Site key
'theme' : 'dark'
});
};
</script>
As per Wikipedia,
JavaScript is a high-level, dynamic, untyped, and interpreted
programming language. Alongside HTML and CSS, it is one of the three
core technologies of World Wide Web content production. The majority of
websites employ it and it is supported by all modern Web browsers
without plug-ins. It also support object-oriented, imperative, and
functional programming styles. It has an API for working with text,
arrays, dates and regular expressions, but does not include any I/O,
such as networking, storage, or graphics facilities, relying for these
upon the host environment in which it is embedded. Why every programmer should learn JavaScript?
Demand -
As per GitHub and StackOverflow, JavaScript is more popular than any
other languages and number one computer language till date.
JavaScript's matures and things like Node.js become increasingly viable
options, the demand for JavaScript programmers will continue to
increase. JavaScript already surpasses C# as rated by demand, and is
surpassed only by Java.
Higher paid - JavaScript
pays better than C# but still Java pays a bit better right now. But as
demand for JavaScript grows, we can expect the pay to increase as well.
While the demand for JavaScript is evident, it is obvious that several
languages that have a smaller demand actually pay better. I suspect this
is because many organizations still think of JavaScript as the language
that anyone can use. It will be a very painful lesson when they find
out that "Anyone can program in JavaScript" really means, "Anyone can
write crappy code in JavaScript".
JavaScript is Maturing -
With the recent commitment of the standards committee to release a new
JavaScript standard every year, it is clear that the amount of
Syntactic Sugar that will be added on to JavaScript is going to be
increasing every year for a while now. One of the best features
JavaScript is the ability to use the async and await keywords in code to
eliminate callback hell.
The browsers are also
continually improving how they handle JavaScript code. In the future
when browsers not only cache the JavaScript files, but cache the
compiled version of the JavaScript files. Bringing us closer to near
binary speed.
JavaScript Programmers Are More Equal Than Others -
Many people who call themselves JavaScript programmers, but don't know
the basics. And that is today. Imagine what this is going to look like
three to five years from now. And don't forget that a lot of the tooling
to support profiling and memory leaks is just at its infancy. If you
have those skills today, and you have marketed yourself well, you are
already realizing that a lot of what I'm saying here is true. Frameworks Are Maturing -
With the new version of Angular in the works, Aurelia in the works as
an alternative. Commercial products such as Scencha's EXTjs. Node.js
for server side programing. Node.js for server side programing. And
others No one can say that it is too hard to develop real applications
using JavaScript. Even, you could write a desktop application that ran
using nothing but JavaScript.
JavaScript Runs Everywhere -
JavaScript runs on every major browser on every major platform. It
runs on the server side on every major operating system. Anyone writing
a web site today of any major functionality is going to need someone
who knows JavaScript to write the front end. It doesn't matter what the
back end code was written in be it Java, PHP, .NET, Node.js or
something else, the client side is going to need a JavaScript developer.
JavaScript is a Compiled Language - It
may shock you to know that, technically, JavaScript is a compiled
language. This has two implications. First, once the code is
compiled, it is possible for it to run as fast as any other executable.
Second, it is technically possible to write tooling for JavaScript that
would create a binary file that does not need to be recompiled every
time the code is loaded into memory.
JavaScript will dominate, but no one will write it -
Future of JavaScript is different than others. If we don't write
JavaScript, who will? Transcoding robots, that’s who. We'll write our
code in any of a dozen dialects and the transcoding robots will turn it
into something that the browser or Node.js understands. More and more
code on GitHub can't run without being "compiled" by something. The most
prominent are pinky-saving dialects, such as TypeScript and
CoffeeScript, that strip away much of the punctuation that bothers some
programmers. These are only the beginning because clever programmers
have written transcoders for languages as diverse as Cobol, Java, Lisp,
and C. All of them can now run in your browser after being lovingly
translated and optimized for fast delivery and parsing.
In this article, we will talk about how to handle file uploads with
Angular. We will create an images uploader that allow user to upload
single or multiple images file by drag and drop or select file dialog.We will then upload the selected images and display them accordingly.
We will also learn to filter the upload file type, for example, we only
allow images, do not allow file type like PDF.
# File Upload UI & API
File upload consists of two parts: the UI (front-end) and the API (back-end). We will be using Angular
to handle the UI part. We need a backend application to accept the
uploaded files. You may follow the backend tutorials or download and run
either one of these server side application to handle file upload for
your backend:-
Switch to any cloud solution of your choice (Amazon S3, Google Drive, etc).
We will be using File upload with Hapi.js as our backend throughout this articles. We will also learn the tricks to enable fake upload on the front-end.
<!-- page-file-upload.component.html --><div><!--UPLOAD--><form#f="ngForm"enctype="multipart/form-data"novalidate*ngIf="currentStatus === STATUS_INITIAL || currentStatus === STATUS_SAVING"><h1>Upload images</h1><divclass="dropbox"><inputtype="file"multiple[name]="uploadFieldName"(change)="filesChange($event.target.name, $event.target.files)"[disabled]="currentStatus === STATUS_SAVING"accept="image/*"#photos><p*ngIf="currentStatus === STATUS_INITIAL">
Drag your file(s) here to begin<br>
or click to browse
</p><p*ngIf="currentStatus === STATUS_SAVING">
Uploading {{ photos.files.length }} files...
</p></div></form></div>
Notes:-
Our upload form will have a few statuses: STATUS_INITIAL,
STATUS_SAVING, STATUS_SUCCESS, STATUS_FAILED, the variable name is
pretty expressive themselves.
We will display the upload form when the status is initial or saving.
The form attribute enctype="multipart/form-data" is important. To enable file upload, this attribute must be set. Learn more about enctype here.
We have a file input <input type="file" /> to accept file upload. The property multiple indicate it's allow multiple file upload. Remove it for single file upload.
We will handle the file input change event. Whenever the file input change (someone drop or select files), we will trigger the filesChange function and pass in the control name and selected files $event.target.files, and then upload to server.
We limit the file input to accept images only with the attribute accept="image/*".
The file input will be disabled during upload, so user can only drop / select files again after upload complete.
We set a template variable #photos to the file input. This gives us a reference to the file input control. Later, you can see we use the photos variable in displaying number of files uploading Uploading {{ photos.files.length }} files....
# Style our File Upload Component
Now, that's the interesting part. Currently, our component look like this:
We need to transform it to look like this:
Let's style it!
/* page-file-upload.component.css */.dropbox{outline:2px dashed grey;/* the dash box */outline-offset: -10px;background: lightcyan;color: dimgray;padding:10px 10px;min-height:200px;/* minimum height */position: relative;cursor: pointer;}.dropbox:hover{background: lightblue;/* when mouse over to the drop zone, change color */}input[type="file"] {opacity:0;/* invisible but it's there! */width:100%;height:200px;position: absolute;cursor: pointer;}.dropbox p {font-size:1.2em;text-align: center;padding:50px 0;}
With only few lines of css, our component looks prettier now.
Notes:-
We make the file input invisible by applying opacity: 0 style. This doesn't hide the file input, it just make it invisible.
Then, we style the file input parent element, the dropbox css class. We make it look like a drop file zone surround with dash.
Then, we align the text inside dropbox to center.
# File Upload Component Code
// page-file-upload.component.tsimport{ Component } from '@angular/core';import{ FileUploadService } from './file-upload.service';// we will create this next!
@Component({
selector:'page-file-upload',
templateUrl:'./page-file-upload.component.html',
styleUrls:['./page-file-upload.component.css']})exportclassPageFileUploadComponent{
uploadedFiles =[];
uploadError;
currentStatus:number;
uploadFieldName ='photos';
readonly STATUS_INITIAL =0;
readonly STATUS_SAVING =1;
readonly STATUS_SUCCESS =2;
readonly STATUS_FAILED =3;constructor(private _svc: FileUploadService){this.reset();// set initial state}filesChange(fieldName:string, fileList: FileList){// handle file changesconst formData =newFormData();if(!fileList.length)return;// append the files to FormDataArray.from(Array(fileList.length).keys()).map(x =>{
formData.append(fieldName, fileList[x], fileList[x].name);});// save itthis.save(formData);}reset(){this.currentStatus =this.STATUS_INITIAL;this.uploadedFiles =[];this.uploadError =null;}save(formData: FormData){// upload data to the serverthis.currentStatus =this.STATUS_SAVING;this._svc.upload(formData).take(1).delay(1500)// DEV ONLY: delay 1.5s to see the changes.subscribe(x =>{this.uploadedFiles =[].concat(x);this.currentStatus =this.STATUS_SUCCESS;}, err =>{this.uploadError = err;this.currentStatus =this.STATUS_FAILED;})}}
Notes:-
Later on, we will call the Hapi.js file upload API to upload images, the API accept a field call photos. That's our file input field name.
We handle the file changes with the filesChange function. FileList is an object returned by the files property of the HTML element. It allow us to access the list of files selected with the element. Learn more [here]((https://developer.mozilla.org/en/docs/Web/API/FileList).
We then create a new FormData, and append all our photos files to it. FormData interface provides a way to easily construct a set of key/value pairs representing form fields and their values. Learn more here.
The save function will call our file upload service
(hang on, we will create the service next!). We also set the status
according to the result.
# File Upload Service
// file-upload.service.tsimport{ Injectable } from '@angular/core';import{ Http, RequestOptionsArgs, Headers } from '@angular/http';
@Injectable()exportclassFileUploadService{
baseUrl ='http://localhost:3001';// our local Hapi Js APIconstructor(private _http: Http){}upload(formData){const url =`${this.baseUrl}/photos/upload`;returnthis._http.post(url, formData).map(x => x.json()).map((x:any[])=> x
// add a new field url to be used in UI later.map(item => Object
.assign({}, item,{ url:`${this.baseUrl}/images/${item.id}`})));}}
Nothing much, the code is pretty expressive itself. We upload the files, wait for the result, map it accordingly.
Now wire up your component and service to module, usually app.module.ts, and run it.
# Display Success and Failed Result
We can upload the files successfully now. However, there's no indication in UI. Let's update our HTML.
Display the uploaded image when upload successfully.
Display the error message when upload failed.
# Fake the Upload in Front-end
If you are lazy to start the back-end application (Hapi, Express,
etc) to handle file upload. Here is a fake service to replace the file
upload service.
Came across this solution in this Stackoverflow post. Pretty useful. My online demo is using this service.
Basically, what the code do is read the source, draw it in canvas, and save it as data url with the canvas toDataURL function. Learn more about canvas here.
If you realize, our fake service has a same public interface as the real file upload service, both has upload function and return list of files. This is important for the next step, swap the real file upload service with the fake one.
# Swap the Real File Upload with the Fake Service
First you might think that to use the fake service, you need to
register the fake service in module, and import it in our file upload
component like how we do usually. However, there's a quicker way, with
Angular dependency injection (DI). Let's look at our App module.
// app.module.ts...import{ PageFileUploadComponent, FileUploadFakeService,
FileUploadService } from './file-upload';
@NgModule({...
providers:[// FileUploadService, // normally we do this, comment it, we do the below instead{ provide: FileUploadService, useClass: FileUploadFakeService },// we can do this instead],...})exportclassAppModule{}
With this, you don't need to change your component code, stop your
backend API, refresh the browser, you should see our app is still
working, calling fake service instead.
In short, Providers: [FileUploadService] is the short form of Providers: [{ provide: FileUploadService, useClass: FileUploadService }]. Therefore, as long as we have another class with similar interface, we can swap it easily.
Angular DI is powerful. We'll leave that for another post.