

Ionic 2 Firebase authentication using email and password is one of the authentication methods in firebase. This will be a good practice for Ionic 2 apps since it's supported AngularFire very well.
There are several authentication methods that firebase provided.
- Email/Password
- Github
- Anonymous
Right now, we just using standard Email/Password method for authenticating to our app and accessing firebase database from our app. Let's start the engine.
1. Setup Projects
For smoother tutorial progress, please update your latest Ionic 2 installation by this command.
sudo npm install -g ionic@latest cordova typescript
Create a new project using this command and give a name (mine is "Ionic2FirebaseEmailAuth").
ionic start Ionic2FirebaseEmail --v2
That command will create a new Ionic project with tab template and run "npm" install automatically, just wait until finished.
Go to the folder that created by Ionic start.
cd Ionic2FirebaseEmail
Install required dependencies and plugins.
npm install @ionic/app-scripts@latest --save-dev
npm install @types/request@latest --save-dev
npm install angularfire2 --save
2. Configure Project
Open src/app/app.module.ts. Add import AngularFireModule in import line under TabsPage.
import { AngularFireModule, AuthProviders, AuthMethods } from 'angularfire2';

Initialize firebase by adding firebase config under import section.

export const firebaseConfig = {
  apiKey: "AIzaSyCrZpORU_czh2oUrAkRrN7TyuZChUNx0B4",
  authDomain: "myionic2firebase.firebaseapp.com",
  databaseURL: "https://myionic2firebase.firebaseio.com",
  storageBucket: "myionic2firebase.appspot.com"
};

const myFirebaseAuthConfig = {
  provider: AuthProviders.Password,
  method: AuthMethods.Password
}

firebase.initializeApp(firebaseConfig);
To fill those configs, go to your console.firebase.google.com. ApiKey is found at Setting (Gear Icon) -> Project Settings -> General Tab, you can pick Web API Key for this. AuthDomain fills with "projectID.firebaseapp.com" where projectId is found above Web API Key. DatabaseURL is found in Database menu. StorageBucket is found in Storage menu. Next, call this firebaseConfig in imports.
imports: [
  IonicModule.forRoot(MyApp),
  AngularFireModule.initializeApp(firebaseConfig, myFirebaseAuthConfig)
],
For connecting between Ionic 2 app with Firebase, we need to create a service. Create a service by this command.
ionic g provider AuthService
Now, register this provider in src/app/app.module.ts. Add import to this new provider.
import { AuthService } from '../providers/auth-service';
Declare in provider section of @NgModule.
providers: [
  {provide: ErrorHandler, useClass: IonicErrorHandler},
  AuthService
]
Next, edit the generated src/providers/auth-service.ts. Import firebase module in the header of the file.
import { Injectable } from '@angular/core';
import firebase from 'firebase';
Add this fields to authentication and hold user data.
public fireAuth: any;
public userData: any;
Initialize them both in the constructor.
constructor() {
  this.fireAuth = firebase.auth();
  this.userData = firebase.database().ref('/userData');
}
Create new function for login.
doLogin(email: string, password: string): any {
  return this.fireAuth.signInWithEmailAndPassword(email, password);
}
Create new function for the register.
register(email: string, password: string): any {
  return this.fireAuth.createUserWithEmailAndPassword(email, password)
    .then((newUser) => {
      this.userData.child(newUser.uid).set({email: email});
    });
}
Create new function for reset password.
resetPassword(email: string): any {
  return this.fireAuth.sendPasswordResetEmail(email);
}
And the last, create the new function for logout from firebase.
doLogout(): any {
  return this.fireAuth.signOut();
}
With above configuration in an app, now we should change the configuration in console.firebase.google.com. Go to your app dashboard then choose authentication. Choose sign-in method tab and click Email/Password.
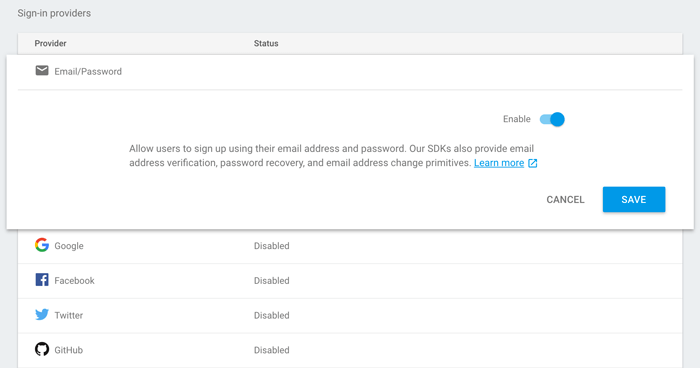
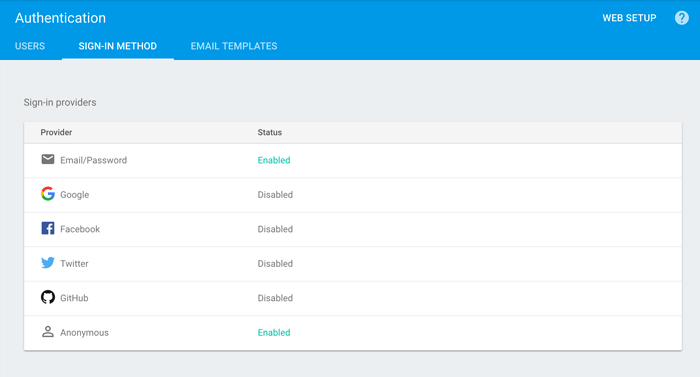
Click save and you will see sign-in method change.
3. Create Login, Register and Reset Password Page
In this tutorial, we need a new login, register and reset password page. Just type this command to generate sets of the login page
ionic g page login
ionic g page register
ionic g page resetpwd
Register this new login page in src/app/app.module.ts. Add the import in this file.
import { LoginPage } from '../pages/login/login';
import { RegisterPage } from '../pages/register/register';
import { ResetpwdPage } from '../pages/resetpwd/resetpwd';
Add this line inside declarations and inside entryComponents of @NgModule.
LoginPage,
RegisterPage,
ResetpwdPage
Next, we have to create a restriction to the landing page (home) for an only authenticated user. We have to import login page and firebase in pages/home/home.ts.
import firebase from 'firebase';
import { LoginPage } from '../login/login';

Then add this filter code inside constructor.

firebase.auth().onAuthStateChanged(function(user) {
  if (!user) {
    navCtrl.setRoot(LoginPage);
  }
});
This code will redirect to Login Page if no user found/login.
Next, open ../pages/login/login.html to add login form. Replace all generated html with this code to login.html.
<ion-content padding>
  <h2>Please, Login</h2>
  <form [formGroup]="loginForm" (submit)="loginUser()" novalidate>
    <ion-item>
      <ion-label stacked>Email</ion-label>
      <ion-input #email formControlName="email" type="email" (change)="elementChanged(email)"
        placeholder="Your email address"
        [class.invalid]="!loginForm.controls.email.valid && (emailChanged || submitAttempt)"></ion-input>
    </ion-item>
    <ion-item class="error-message" *ngIf="!loginForm.controls.email.valid  && (emailChanged || submitAttempt)">
      <p>Please enter a valid email.</p>
    </ion-item>
    <ion-item>
      <ion-label stacked>Password</ion-label>
      <ion-input #password formControlName="password" type="password" (change)="elementChanged(password)"
        placeholder="Your password"
        [class.invalid]="!loginForm.controls.password.valid && (passwordChanged || submitAttempt)"></ion-input>
    </ion-item>
    <ion-item class="error-message" *ngIf="!loginForm.controls.password.valid  && (passwordChanged || submitAttempt)">
      <p>Your password needs more than 6 characters.</p>
    </ion-item>
    <button ion-button block type="submit">
      Login
    </button>
  </form>

  <button ion-button block clear (click)="register()">
    No have an account? Register Now
  </button>
  <button ion-button block clear (click)="resetPwd()">
    Forgot Password
  </button>
</ion-content>
Give a little style to fit the page in pages/login/login.scss.
page-login {
  h2 {
    text-align: center;
    margin: 10px;
  }
  form {
    margin-bottom: 20px;
    button {
      margin-top: 20px !important;
    }
    p {
      font-style: italic;
      color: red;
    }
  }

  .invalid {
    border-bottom: 1px solid #FF6153;
  }

  .error-message .item-inner {
    border-bottom: 0 !important;
  }
}
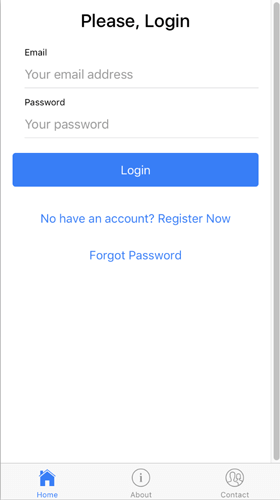
Now, the login page should be like this.
Replace all codes in pages/login/login.ts with this codes.
import { Component } from '@angular/core';
import { NavController, AlertController, NavParams, LoadingController } from 'ionic-angular';
import { FormBuilder, Validators } from '@angular/forms';
import { AuthService } from '../../providers/auth-service';
import { HomePage } from '../home/home';
import { RegisterPage } from '../register/register';
import { ResetpwdPage } from '../resetpwd/resetpwd';

/*
  Generated class for the Login page.

  See http://ionicframework.com/docs/v2/components/#navigation for more info on
  Ionic pages and navigation.
*/
@Component({
  selector: 'page-login',
  templateUrl: 'login.html'
})
export class LoginPage {

  public loginForm;
  emailChanged: boolean = false;
  passwordChanged: boolean = false;
  submitAttempt: boolean = false;
  loading: any;

  constructor(public navCtrl: NavController, public authService: AuthService, public navParams: NavParams, public formBuilder: FormBuilder,public alertCtrl: AlertController, public loadingCtrl: LoadingController) {
    let EMAIL_REGEXP = /^[a-z0-9!#$%&'*+\/=?^_`{|}~.-]+@[a-z0-9]([a-z0-9-]*[a-z0-9])?(\.[a-z0-9]([a-z0-9-]*[a-z0-9])?)*$/i;
    this.loginForm = formBuilder.group({
      email: ['', Validators.compose([Validators.required, Validators.pattern(EMAIL_REGEXP)])],
      password: ['', Validators.compose([Validators.minLength(6), Validators.required])]
    });
  }

  elementChanged(input){
    let field = input.inputControl.name;
    this[field + "Changed"] = true;
  }

  register(){
    this.navCtrl.push(RegisterPage);
  }

  resetPwd(){
    this.navCtrl.push(ResetpwdPage);
  }

  loginUser(){
    this.submitAttempt = true;

    if (!this.loginForm.valid){
      console.log(this.loginForm.value);
    } else {
      this.authService.doLogin(this.loginForm.value.email, this.loginForm.value.password).then( authService => {
        this.navCtrl.setRoot(HomePage);
      }, error => {
        this.loading.dismiss().then( () => {
          let alert = this.alertCtrl.create({
            message: error.message,
            buttons: [
              {
                text: "Ok",
                role: 'cancel'
              }
            ]
          });
          alert.present();
        });
      });

      this.loading = this.loadingCtrl.create({
        dismissOnPageChange: true,
      });
      this.loading.present();
    }
  }

}
Inside this code, there is a form validator (Angular 2 built in), login function and navigation to register and reset the password.
Next, we have to modify register page. Open pages/register/register.html and replace with this code.
<ion-header>

  <ion-navbar>
    <ion-title>register</ion-title>
  </ion-navbar>

</ion-header>


<ion-content padding>
  <h2>Register</h2>
  <form [formGroup]="registerForm" (submit)="doRegister()" novalidate>
    <ion-item>
      <ion-label stacked>Email</ion-label>
      <ion-input #email formControlName="email" type="email" (change)="elementChanged(email)"
        placeholder="Your email address"
        [class.invalid]="!registerForm.controls.email.valid && (emailChanged || submitAttempt)"></ion-input>
    </ion-item>
    <ion-item class="error-message" *ngIf="!registerForm.controls.email.valid  && (emailChanged || submitAttempt)">
      <p>Please enter a valid email.</p>
    </ion-item>
    <ion-item>
      <ion-label stacked>Password</ion-label>
      <ion-input #password formControlName="password" type="password" (change)="elementChanged(password)"
        placeholder="Your password"
        [class.invalid]="!registerForm.controls.password.valid && (passwordChanged || submitAttempt)"></ion-input>
    </ion-item>
    <ion-item class="error-message" *ngIf="!registerForm.controls.password.valid  && (passwordChanged || submitAttempt)">
      <p>Your password needs more than 6 characters.</p>
    </ion-item>
    <ion-item>
      <ion-label stacked>Full Name</ion-label>
      <ion-input #fullname formControlName="fullname" type="text" (change)="elementChanged(fullname)"
        placeholder="Your Full Name"
        [class.invalid]="!registerForm.controls.fullname.valid && (fullnameChanged || submitAttempt)"></ion-input>
    </ion-item>
    <ion-item class="error-message" *ngIf="!registerForm.controls.fullname.valid  && (fullnameChanged || submitAttempt)">
      <p>Your full name can't empty.</p>
    </ion-item>
    <button ion-button block type="submit">
      Register
    </button>
  </form>
</ion-content>
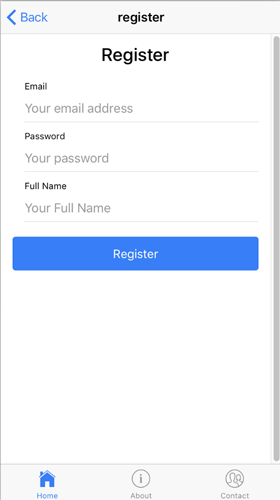
The style for this page is same as the login page, just place same code as login page inside pages/register/register.scss. Now, the register page looks like this.
Replace all codes from pages/register/register.ts with this codes.
import { Component } from '@angular/core';
import { NavController, AlertController, NavParams, LoadingController } from 'ionic-angular';
import { FormBuilder, Validators } from '@angular/forms';
import { AuthService } from '../../providers/auth-service';
import { HomePage } from '../home/home';

/*
  Generated class for the Register page.

  See http://ionicframework.com/docs/v2/components/#navigation for more info on
  Ionic pages and navigation.
*/
@Component({
  selector: 'page-register',
  templateUrl: 'register.html'
})
export class RegisterPage {

  public registerForm;
  emailChanged: boolean = false;
  passwordChanged: boolean = false;
  fullnameChanged: boolean = false;
  submitAttempt: boolean = false;
  loading: any;

  constructor(public navCtrl: NavController, public authService: AuthService, public navParams: NavParams, public formBuilder: FormBuilder,public alertCtrl: AlertController, public loadingCtrl: LoadingController) {
    let EMAIL_REGEXP = /^[a-z0-9!#$%&'*+\/=?^_`{|}~.-]+@[a-z0-9]([a-z0-9-]*[a-z0-9])?(\.[a-z0-9]([a-z0-9-]*[a-z0-9])?)*$/i;
    this.registerForm = formBuilder.group({
      email: ['', Validators.compose([Validators.required, Validators.pattern(EMAIL_REGEXP)])],
      password: ['', Validators.compose([Validators.minLength(6), Validators.required])]
    });
  }

  elementChanged(input){
    let field = input.inputControl.name;
    this[field + "Changed"] = true;
  }

  doRegister(){
    this.submitAttempt = true;

    if (!this.registerForm.valid){
      console.log(this.registerForm.value);
    } else {
      this.authService.register(this.registerForm.value.email, this.registerForm.value.password).then( authService => {
        this.navCtrl.setRoot(HomePage);
      }, error => {
        this.loading.dismiss().then( () => {
          let alert = this.alertCtrl.create({
            message: error.message,
            buttons: [
              {
                text: "Ok",
                role: 'cancel'
              }
            ]
          });
          alert.present();
        });
      });

      this.loading = this.loadingCtrl.create({
        dismissOnPageChange: true,
      });
      this.loading.present();
    }
  }

}
This codes almost same as login.ts, but this only for the register. Next, we have to modify reset the password. Edit pages/resetpwd/resetpwd.html and replace all with this codes.
<ion-header>

  <ion-navbar>
    <ion-title>resetpwd</ion-title>
  </ion-navbar>

</ion-header>


<ion-content padding>
  <h2>Reset Password</h2>
  <form [formGroup]="resetpwdForm" (submit)="resetPwd()" novalidate>
    <ion-item>
      <ion-label stacked>Email</ion-label>
      <ion-input #email formControlName="email" type="email" (change)="elementChanged(email)"
        placeholder="Your email address"
        [class.invalid]="!resetpwdForm.controls.email.valid && (emailChanged || submitAttempt)"></ion-input>
    </ion-item>
    <ion-item class="error-message" *ngIf="!resetpwdForm.controls.email.valid  && (emailChanged || submitAttempt)">
      <p>Please enter a valid email.</p>
    </ion-item>
    <button ion-button block type="submit">
      Reset Password
    </button>
  </form>
</ion-content>
For style just copy paste same code from register.scss. Next, replace all codes from pages/resetpwd/resetpwd.ts with this codes.
import { Component } from '@angular/core';
import { NavController, AlertController, NavParams, LoadingController } from 'ionic-angular';
import { FormBuilder, Validators } from '@angular/forms';
import { AuthService } from '../../providers/auth-service';
import { HomePage } from '../home/home';

/*
  Generated class for the Resetpwd page.

  See http://ionicframework.com/docs/v2/components/#navigation for more info on
  Ionic pages and navigation.
*/
@Component({
  selector: 'page-resetpwd',
  templateUrl: 'resetpwd.html'
})
export class ResetpwdPage {

  public resetpwdForm;
  emailChanged: boolean = false;
  submitAttempt: boolean = false;
  loading: any;

  constructor(public navCtrl: NavController, public authService: AuthService, public navParams: NavParams, public formBuilder: FormBuilder,public alertCtrl: AlertController, public loadingCtrl: LoadingController) {
    let EMAIL_REGEXP = /^[a-z0-9!#$%&'*+\/=?^_`{|}~.-]+@[a-z0-9]([a-z0-9-]*[a-z0-9])?(\.[a-z0-9]([a-z0-9-]*[a-z0-9])?)*$/i;
    this.resetpwdForm = formBuilder.group({
      email: ['', Validators.compose([Validators.required, Validators.pattern(EMAIL_REGEXP)])]
    });
  }

  elementChanged(input){
    let field = input.inputControl.name;
    this[field + "Changed"] = true;
  }

  resetPwd() {
    if (!this.resetpwdForm.valid){
      console.log(this.resetpwdForm.value);
    } else {
      this.authService.resetPassword(this.resetpwdForm.value.email).then( authService => {
        this.navCtrl.setRoot(HomePage);
      }, error => {
        this.loading.dismiss().then( () => {
          let alert = this.alertCtrl.create({
            message: error.message,
            buttons: [
              {
                text: "Ok",
                role: 'cancel'
              }
            ]
          });
          alert.present();
        });
      });

      this.loading = this.loadingCtrl.create({
        dismissOnPageChange: true,
      });
      this.loading.present();
    }
  }

}
Reset password mechanism handled all by firebase. When you send email for reset password, firebase will send email contains reset link to your email then you can follow rest until your password changed.
Oh wait, one thing left is logout. We will put logout button in home page so add this code to pages/home/home.html in ion-navbar under ion-title.
<ion-title>Home</ion-title>
<ion-buttons end>
  <button ion-button color="primary" (click)="logout()">
    <ion-icon ios="ios-exit" md="md-exit"></ion-icon>
  </button>
</ion-buttons>
Don't forget to add function to home.ts also importing AuthService.
import { AuthService } from '../../providers/auth-service';
...
logout() {
  this.authService.doLogout();
}
That's all required steps for making your Ionic 2 Firebase Email Authentication. Now, you run your app in the browser by this command.
ionic serve
Or in Emulator, by this command.
ionic emulate
0 comments: