Sunday 14 November 2021

How to Set Up Laravel 8 on Your Android Phone


 In this article, I'm going to show you how you can install Laravel 8 on your phone. 

To get the most out of this guide, you should have some knowledge of PHP and you should know what Laravel is. But if you don't, don't worry – I will explain the basics so you can get started.

What Is Laravel?

Laravel is a web application framework with expressive, elegant syntax. It's built on PHP, which means that Laravel is PHP but it makes things easier to work with.

It comes with lots of packages for various features, like authentication, so we don't need to write authentication ourselves. To learn more about what Laravel can do, you can visit the site at laravel.com.

Why I wrote this tutorial

I created this tutorial because I want people interested in programming who don't have a laptop or pc to be able to build things on their phones.

My last post on freeCodeCamp made me realize that people are interested in learning how the tech works, so that's why I'm making more guides like this.

So let's dive into it. In this tutorial I am going to show you how you can install composer.php and use it to set up Laravel 8 on your phone 🔥🔥.

I am Precious Oladele, and I'm almost 19 this month 🥴. I'm from Nigeria and I will be taking you through this process. And if you're wondering how I know so much about this, it's because I also don't have a laptop so I explore with my phone instead 😎.

Requirements

To go through this tutorial, you'll need an Android phone with V6.0+.

Set up

We need to head over to the Play Store and download Termux:

Termux is a Linux-based system which we can use on our phones. It's as simple as using your regular Linux – you can install anything, even Kali, Ubuntu, or whatever you want. But for this tutorial we will be using it to set up Laravel 8 on our mobile phone.

Download composer

Before we download composer, we need to open up our Termux app and type in this command:

termux-setup-storage

It'll ask you for storage permissions, so go ahead and click accept. Once you're done head over to https://getcomposer.org/download/.

We need to grab everything there. But before that we need to install PHP so we can use it in our app. To do that in your Termux, type in the following command:

apt install php 

and click enter. You should see this:

Once that is done head over to the composer page and grab the code. We need to do this because Termux is Linux-based. If it was Windows there would be a simple button to download composer.exe there.

Copy the whole code and head over to Termux where you can paste it in. Then click enter.

When composer is installed you should see something like this:

How to Install Laravel 8

Before we install Laravel 8, let's check to see if we have a composer.phar file. In your Termux type this command:

ls

and hit enter. You will see the available files there.

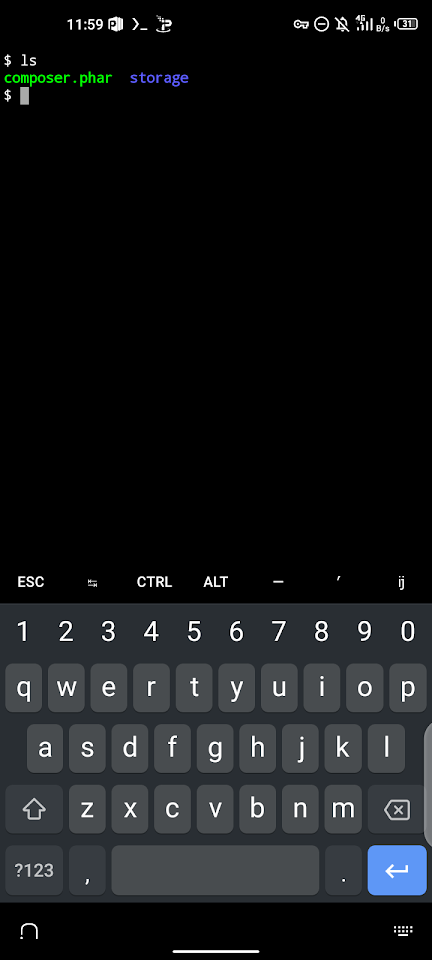
You can see the composer.phar file and a storage folder. The storage folder grants access to your file manager. Remember the termux-setup-storage command you wrote first.

Now let's install Laravel 8. To do so we can either create a project or just install it globally. But it's a bit of a long process when installing it globally on your phone because you need to set a path and so on, and it can be pretty confusing. So in this guide we will create a project instead.

In your Termux go ahead and type this:

php composer.phar create-project laravel/laravel myapp

myapp is just the project name – you can change it to whatever you want. Then hit enter and wait for the magic to happen.

When you see the below, it means that Laravel has been installed:

Easy as pie. Now to test it, you can cd into myapp by typing cd myapp. Then you can run the Laravel server with php artisan serve.

Voilà – development has started 🔥

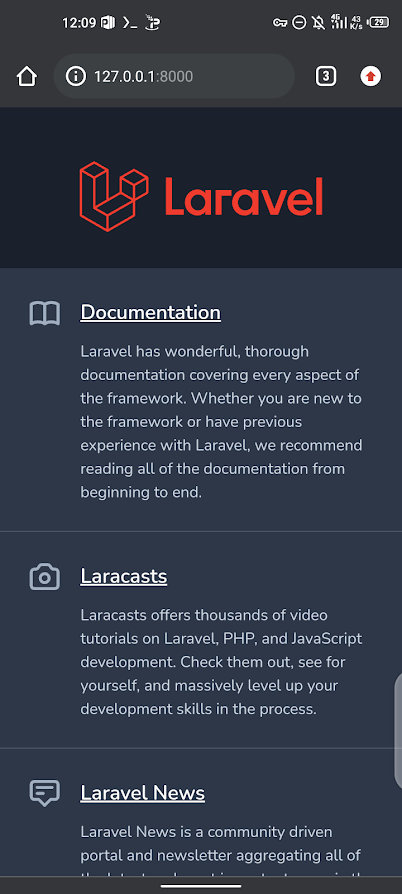
Now you can open http://127.0.0.1:8000 in your browser and see that Laravel is running:

Also make sure you do this so your Termux app won't force close when you are coding: 😎

That's it!

Thanks for reading. I hope you learned something from this tutorial. You should now be able to install Laravel on your Android phone and start using it to build apps.


Sunday 20 May 2018

how to run node.js on Android

I mainly use node.js since one year ago at work, and I really like it.
On my work project, I have to create a system which uses socket.io, but I don't have enough time to re-create a system using Android Java.
But I finally figure out how to run node.js on Android.

* This is really advanced topic, so I don't aim for Android beginners. Just for my memo.


1. Rooted your Android


First of all, you have to obtain root permission of your Android.
There are many ways and it's depends on your Android.
Ask to google.

2. Install Debian kit for Android


Debian kit for Android is really awesome tool.
You can install Debian onto your Android.
Download from Google Play store, then follow the instruction.

Debian kit for Android
https://play.google.com/store/apps/details?id=org.dyndns.sven_ola.debian_kit&hl=en

Instruction
http://sven-ola.dyndns.org/repo/debian-kit-en.html

$> cd /data/local/tmp
$> wget http://sven-ola.dyndns.org/repo/debian-kit-1-5.shar
$> sh debian-*
...
... (after the set up)
...
$> deb  // start debian
#> apt-get update
#> apt-get upgrade
#> apt-get install andromize
#> apt-get install sudo
...
... (install another packages if you want)
...

3. Install node.js


Before install node.js, you also need couple of debain packages.
#> apt-get install openssl build-essential python libssl-dev git-core
To install node.js for Debian, you might need to compile node.js from source code. 
#> cd /data/local/tmp
#> wget http://nodejs.org/dist/node-latest.tar.gz
#> tar zxf node-latest.tar.gz
#> cd node*
#> ./configure
#> make
#> make install

If your Android uses ARM architecture, you might be get couple of errors.
To prevent these, add couple of parameters.
#> ./configure --without-snapshot --dest-cpu=arm --dest-os=linux

Snapshot is a technology to run node.js quickly on V8 engine.
But there are bugs for ARM architecture, so you should disable snapshot.
http://stackoverflow.com/questions/16628118/node-js-source-code-build-giving-segmentation-fault-on-arm#16789296

Also you might face an error with "For thumb inter-working we require an architecture which supports blx".
Then get rid of the error code in the macro.
It doesn't affect (at least for me)

HOW TO INSTALL NODE.JS 0.8 ON ARM BASED SBC FOX BOARD G20 > 
STEP 8: CUSTOMIZE MACRO-ASSEMBLER-ARM.CC
http://www.yoovant.com/how-install-node-js-0-8-arm-based-sbc-fox-board-g20/

Congratulation!

Now node.js should run on your Android.

#> node -e "console.log('Hello Node.js on Android')"

Sunday 17 December 2017

Spinner DropDown List Example using PHP MySQL and Android Studio

           In this tutorial I will teach how to build a dropdwon list / menu using PHP, MySQL, and JSON
Needed:
  • PHP Editor like Notepad++ (downloaded here if you dont have it)
  • Webserver like XAMPP (downloaded here if you dont have it) or see this tutorial how to install XAMPP
  • Android Studio (downloaded here if you dont have it)
Step 1: Create Database
Go to your localhost:  http://localhost/ or  http://localhost/phpmyadmin/
and create new database named: customers
alfter that create a new table and call it  customer and  insert some data.
                   
Step 2: Create PHP
After that go to your XAMPP or WAMP or your webserver install directory
for XAMP users go to your XAMPP installation folder C:\xampp\htdocs and under the htdocs folder create a new folder and call it custmers and Create a new file call it spinner_test.php and write following code.
                      <?php
  $DB_USER='YOUR USER'; 
$DB_PASS='YOUR PASSWORD'; 
$DB_HOST='localhost';
$DB_NAME='YOUR DATABASE NAME';
                        $mysqli = new mysqli($DB_HOST, $DB_USER, $DB_PASS, $DB_NAME);
                       /* check connection */
                         if (mysqli_connect_errno())
                           {
printf("Connect failed: %s\n", mysqli_connect_error());
exit();
                          }
                          $mysqli->query("SET NAMES 'utf8'");
                          $sql="SELECT iname FROM Spinnertest";
                          $result=$mysqli->query($sql);
                          while($e=mysqli_fetch_assoc($result))
                           {
$output[]=$e; 
                           }
print(json_encode($output)); 
$mysqli->close();
                           ?>
Step 3: Gradle Files

   include android {....} brfore buildToolsVersion 
useLibrary 'org.apache.http.legacy'
   incclude dependencies{....}
 compile 'com.loopj.android:android-async-http:1.4.5'
 compile 'com.android.support:design:23.0.0'
Step 4: AndroidManifest.xml
   Include user permission in your AndroidManifest File
<uses-permission android:name="android.permission.INTERNET" />
Step 5:  Spinner_layout.xml
   <?xml version="1.0" encoding="utf-8"?>
<LinearLayout xmlns:android="http://schemas.android.com/apk/res/android"    
                    android:orientation="vertical"    
                    android:layout_width="match_parent"    
                    android:layout_height="match_parent>
    <TextView        
       android:id="@+id/txt"        
       android:layout_width="match_parent"        
       android:layout_height="wrap_content"      
       android:padding="10dp"        
       android:textSize="30dp"
       android:textColor="#000000" />
</LinearLayout>
Step 6:  Activity_Main.xml
                            <?xml version="1.0" encoding="utf-8"?>
              <LinearLayout xmlns:android="http://schemas.android.com/apk/res/android"    
               xmlns:tools="http://schemas.android.com/tools"    
               android:layout_width="match_parent"    
               android:layout_height="match_parent"    
               android:orientation="vertical"    
               android:padding="10dp"    
               tools:context=".MainActivity"    
               android:weightSum="1">
              <TextView
               android:layout_width="match_parent"  
               android:layout_height="wrap_content"   
               android:text="Click Spinner"    
               android:gravity="center" 
               android:textSize="25dp" />
             <Spinner 
              android:id="@+id/spinner"   
              android:layout_width="match_parent"   
              android:layout_height="wrap_content"   
              android:layout_weight="0.07">
             </Spinner>
Step 7:  MainActivity.java
                          package com.spinnerexample;
             import android.app.ProgressDialog;
             import android.os.AsyncTask;
             import android.support.v7.app.ActionBarActivity;
             import android.os.Bundle;
             import android.support.v7.app.AppCompatActivity;
             import android.view.View;
             import android.widget.AdapterView;
             import android.widget.ArrayAdapter;
             import android.widget.Spinner;
             import android.widget.Toast;
             import org.apache.http.HttpEntity;
             import org.apache.http.HttpResponse;
             import org.apache.http.client.HttpClient;
             import org.apache.http.client.methods.HttpPost;
             import org.apache.http.impl.client.DefaultHttpClient;
             import org.json.JSONArray;
             import org.json.JSONException;
             import org.json.JSONObject;
             import java.io.BufferedReader;
             import java.io.IOException;
             import java.io.InputStream;
             import java.io.InputStreamReader;
             import java.util.ArrayList;
             public class MainActivity extends AppCompatActivity{
             ArrayList<String> listItems=new ArrayList<>();
             ArrayAdapter<String> adapter;
            Spinner sp;
            protected void onCreate(Bundle savedInstanceState) {
            super.onCreate(savedInstanceState);
            setContentView(R.layout.activity_main);
            sp=(Spinner)findViewById(R.id.spinner);
       adapter=new ArrayAdapter<String>(this,R.layout.spinner_layout,R.id.txt,listItems);
       sp.setAdapter(adapter);
       sp.setOnItemSelectedListener(
       new AdapterView.OnItemSelectedListener() {
       public void onItemSelected(
       AdapterView<?> parent, View view, int position, long id) {
       Toast.makeText(getApplicationContext(),listItems.get(position),
       Toast.LENGTH_LONG).show();
                    }
                    public void onNothingSelected(AdapterView<?> parent) {
                    }
                });
           }
            public void onStart(){
        super.onStart();
        BackTask bt=new BackTask();
        bt.execute();
    }
        private class BackTask extends AsyncTask<Void,Void,Void> {
        ProgressDialog loading;
        ArrayList<String> list;
        protected void onPreExecute(){
            super.onPreExecute();
       loading = ProgressDialog.show(MainActivity.this, "Please Wait",null, true, true);
            list=new ArrayList<>();
        }
        protected Void doInBackground(Void...params){
            InputStream is=null;
            String result="";
            try{
            HttpClient httpclient=new DefaultHttpClient();
            HttpPost httppost= new HttpPost("http://krishscs.esy.es/Spinner_test.php");
            HttpResponse response=httpclient.execute(httppost);
            HttpEntity entity = response.getEntity();
        // Get our response as a String.                is = entity.getContent();
            }catch(IOException e){
                e.printStackTrace();
            }
//convert response to string            try{
        BufferedReader reader = new BufferedReader(new InputStreamReader(is,"utf-8"));
                String line = null;
                while ((line = reader.readLine()) != null) {
                    result+=line;
                }
                is.close();
                //result=sb.toString();            }catch(Exception e){
                e.printStackTrace();
            }
// parse json data            try{
                JSONArray jArray =new JSONArray(result);
                for(int i=0;i<jArray.length();i++){
                    JSONObject jsonObject=jArray.getJSONObject(i);
 // add interviewee name to arraylist  list.add(jsonObject.getString("iname"));
                }
            }
            catch(JSONException e){
                e.printStackTrace();
            }
            return null;
        } protected void onPostExecute(Void result){
            listItems.addAll(list);
            adapter.notifyDataSetChanged();
            loading.dismiss();
  Toast.makeText(getApplicationContext(),"Loading Completed",Toast.LENGTH_LONG).show();
        }
    }
}

Wednesday 29 November 2017

Android RecycleView Example Using MySQL and include SearchView


This tutorial demonstrates how to deal with search view  in android using PHP as server side scripting language and MySQL as backend.  User enters search query into search view/search bar to search for particular information, the query is sent to php file and result from php file is displayed on Android ListView / RecyclerView.
 Gradle

compile 'com.loopj.android:android-async-http:1.4.5'
compile 'com.android.support:design:24.2.1'
compile 'com.github.bumptech.glide:glide:3.5.2'
compile 'com.android.support:support-v4:24.2.1'
compile 'com.android.support:recyclerview-v7:+'
compile 'com.android.support:cardview-v7:+'
 compile files("${android.getSdkDirectory().getAbsolutePath()}" + File.separator + "platforms" + File.separator + "android-23" + File.separator + "optional" + File.separator + "org.apache.http.legacy.jar")
MainActivity.java
package com.recyclerviewexample;

import android.content.Intent;
import android.os.AsyncTask;
import android.support.v4.view.MenuItemCompat;
import android.support.v7.app.AppCompatActivity;
import android.os.Bundle;
import android.support.v7.widget.LinearLayoutManager;
import android.support.v7.widget.LinearSmoothScroller;
import android.support.v7.widget.RecyclerView;
import android.support.v7.widget.SearchView;
import android.util.DisplayMetrics;
import android.util.Log;
import android.view.Menu;
import android.view.MenuInflater;
import android.view.MenuItem;
import android.view.View;
import android.widget.ProgressBar;
import android.widget.Toast;
import org.json.JSONArray;
import org.json.JSONException;
import org.json.JSONObject;
import java.io.BufferedReader;
import java.io.InputStreamReader;
import java.net.HttpURLConnection;
import java.net.URL;
import java.util.ArrayList;
import java.util.List;
import java.util.logging.Filter;
import static java.security.AccessController.getContext;

public class MainActivity extends AppCompatActivity implements SearchView.OnQueryTextListener {
    private static final String TAG = "RecyclerViewExample";
    private List<FeedItem> feedsList;
    private RecyclerView mRecyclerView;
    private MyRecyclerViewAdapter adapter;
    private ProgressBar progressBar;

    private SearchView mSearchView;
    @Override
    protected void onCreate(Bundle savedInstanceState) {
        super.onCreate(savedInstanceState);
        setContentView(R.layout.activity_main);

        mRecyclerView = (RecyclerView) findViewById(R.id.recycler_view);
        mRecyclerView.setLayoutManager(new LinearLayoutManager(this));
        progressBar = (ProgressBar) findViewById(R.id.progress_bar);
        String url = "http://krishscs.esy.es/RecycleViewExample/RecycleViewExample.php";
        mSearchView = (SearchView) findViewById(R.id.search_view);
        setupSearchView();
        new DownloadTask().execute(url);
}
   public class DownloadTask extends AsyncTask<String, Void, Integer> {
        @Override
        protected void onPreExecute() {
            progressBar.setVisibility(View.VISIBLE);
        }
@Override
        protected Integer doInBackground(String... params) {
            Integer result = 0;
            HttpURLConnection urlConnection;
            try {
                URL url = new URL(params[0]);
                urlConnection = (HttpURLConnection) url.openConnection();
                int statusCode = urlConnection.getResponseCode();

                // 200 represents HTTP OK
                if (statusCode == 200) {
                    BufferedReader r = new BufferedReader(new InputStreamReader(urlConnection.getInputStream()));
                    StringBuilder response = new StringBuilder();
                    String line;
                    while ((line = r.readLine()) != null) {
                        response.append(line);
                    }
                    parseResult(response.toString());
                    result = 1; // Successful
                } else {
                    result = 0; //"Failed to fetch data!";
                }
            } catch (Exception e) {
                Log.d(TAG, e.getLocalizedMessage());
            }
            return result; //"Failed to fetch data!";
        }

        @Override
        protected void onPostExecute(Integer result) {
            progressBar.setVisibility(View.GONE);

            if (result == 1) {
                adapter = new MyRecyclerViewAdapter(MainActivity.this, feedsList);
                mRecyclerView.setAdapter(adapter);
            } else {
                Toast.makeText(MainActivity.this, "Failed to fetch data!", Toast.LENGTH_SHORT).show();
            }
        }
    }

    private void parseResult(String result) {
        try {
            feedsList = new ArrayList<FeedItem>();
            JSONObject response = new JSONObject(result);
            JSONArray posts = response.optJSONArray("result");
            for (int i = 0; i < posts.length(); i++) {
                JSONObject post = posts.optJSONObject(i);
                FeedItem item = new FeedItem();
                item.setTitle(post.optString("name"));
                item.setThumbnail(post.optString("image"));
                feedsList.add(item);
            }
        } catch (JSONException e) {
            e.printStackTrace();
        }
    }
    private void setupSearchView() {
        // mSearchView.setIconifiedByDefault(false);
        mSearchView.setOnQueryTextListener(this);
//        adapter.setFilter(feedsList);
        // mSearchView.setSubmitButtonEnabled(true);
        mSearchView.setQueryHint("Search here....");
    }

    @Override
    public boolean onCreateOptionsMenu(Menu menu) {
        MenuInflater inflater = getMenuInflater();
        inflater.inflate(R.menu.searchview_in_menu, menu);
        return super.onCreateOptionsMenu(menu);
    }
    @Override
    public boolean onOptionsItemSelected(MenuItem item) {
        // Take appropriate action for each action item click
int id = item.getItemId();
        if (id == R.id.search) {
            // Handle the camera action
            final SearchView searchView = (SearchView)  MenuItemCompat.getActionView(item);
            searchView.setOnQueryTextListener(this);
        }
        return true;
    }
    @Override
    public boolean onQueryTextChange(String newText) {
        final List<FeedItem> filteredModelList = filter(feedsList, newText);
        adapter.setFilter(filteredModelList);
        return true;
    }
    @Override
    public boolean onQueryTextSubmit(String query) {
        return false;
    }
    private List<FeedItem> filter(List<FeedItem> models, String query) {
        query = query.toLowerCase();final List<FeedItem> filteredModelList = new ArrayList<>();
        for (FeedItem model : models) {
            final String name = model.getTitle().toLowerCase();
            if (name.contains(query)) {
                filteredModelList.add(model);
            }
        }
        return filteredModelList;
    }
}
MyRecyclerViewAdapter.java
package com.recyclerviewexample;

import android.app.Activity;
import android.content.Context;
import android.content.Intent;
import android.support.v7.widget.RecyclerView;
import android.text.Html;
import android.text.TextUtils;
import android.view.LayoutInflater;
import android.view.View;
import android.view.ViewGroup;
import android.widget.ImageView;
import android.widget.TextView;
import android.widget.Toast;
import com.bumptech.glide.Glide;
import com.bumptech.glide.load.engine.DiskCacheStrategy;
import java.util.ArrayList;
import java.util.List;

public class MyRecyclerViewAdapter extends RecyclerView.Adapter<MyRecyclerViewAdapter.CustomViewHolder> {
    private List<FeedItem> feedItemList;
    private Context mContext;
    //private OnItemClickListener onItemClickListener;
    View view;
    public MyRecyclerViewAdapter(Context context, List<FeedItem> feedItemList) {
        this.feedItemList = feedItemList;
        this.mContext = context;
        //this.feedItemList = new ArrayList<FeedItem>();
        // we copy the original list to the filter list and use it for setting row values
        //this.feedItemList.addAll(this.feedItemList);
    }
    @Override
    public CustomViewHolder onCreateViewHolder(ViewGroup viewGroup, int i) {
        view = LayoutInflater.from(viewGroup.getContext()).inflate(R.layout.list_row, null);
        CustomViewHolder viewHolder = new CustomViewHolder(view);
        return viewHolder;
    }
    @Override
    public void onBindViewHolder(CustomViewHolder customViewHolder, int i) {
        final FeedItem feedItem = feedItemList.get(i);
        //Download image using picasso library
        if (!TextUtils.isEmpty(feedItem.getThumbnail())) {
            Glide.with(mContext).load(feedItem.getThumbnail()).diskCacheStrategy(DiskCacheStrategy.ALL)
                    .into(customViewHolder.imageView);
        }

        //Setting text view title
        customViewHolder.textView.setText(Html.fromHtml(feedItem.getTitle()));
        customViewHolder.textView.setOnClickListener(new View.OnClickListener() {
            @Override
            public void onClick(View view) {
                Toast.makeText(view.getContext(), feedItem.getTitle(), Toast.LENGTH_SHORT).show();            }
        });
      /*  final View.OnClickListener listener = new View.OnClickListener() {
            @Override
            public void onClick(View v) {
                //onItemClickListener.onItemClick(feedItem);
                Toast.makeText(view.getContext(),feedItem.getTitle(), Toast.LENGTH_SHORT).show();
            }
        };*/
        /*customViewHolder.imageView.setOnClickListener(listener);
        customViewHolder.textView.setOnClickListener(listener);*/
    }
    class CustomViewHolder extends RecyclerView.ViewHolder {
        protected ImageView imageView;
        protected TextView textView;

        public CustomViewHolder(View view) {
            super(view);
            this.imageView = (ImageView) view.findViewById(R.id.thumbnail);
            this.textView = (TextView) view.findViewById(R.id.title);
        }
    }


    @Override
    public int getItemCount() {
        return feedItemList.size();
    }

    public void setFilter(List<FeedItem> countryModels) {
        feedItemList = new ArrayList<>();
        feedItemList.addAll(countryModels);
        notifyDataSetChanged();
    }
}

FeedItem.java

package com.recyclerviewexample;
public class FeedItem {
    private String title;
    private String thumbnail;
    public String getTitle() {
        return title;
    }
    public void setTitle(String title) {
        this.title = title;
    }
    public String getThumbnail() {
        return thumbnail;
    }
    public void setThumbnail(String thumbnail) {
        this.thumbnail = thumbnail;
    }
}
 AndroidManifest.xml
<?xml version="1.0" encoding="utf-8"?>
<manifest xmlns:android="http://schemas.android.com/apk/res/android"
    package="com.recyclerviewexample">
    <uses-permission android:name="android.permission.INTERNET"/>
    <application
        android:allowBackup="true"
        android:icon="@mipmap/ic_launcher"
        android:label="@string/app_name"
        android:supportsRtl="true"
        android:theme="@style/AppTheme">
        <activity android:name=".MainActivity">
            <intent-filter>
                <action android:name="android.intent.action.MAIN" />
                <category android:name="android.intent.category.LAUNCHER" />
            </intent-filter>
        </activity>
    </application>
</manifest>
activity_main.xml
<?xml version="1.0" encoding="utf-8"?>
<RelativeLayout  xmlns:android="http://schemas.android.com/apk/res/android"   
 xmlns:tools="http://schemas.android.com/tools"   
 android:id="@+id/activity_main"   
 android:layout_width="match_parent"    
android:layout_height="match_parent"    
android:background="#f1f1f1"    
android:padding="12dp"    tools:context=".MainActivity">
    <android.support.v7.widget.SearchView   android:layout_width="match_parent"      
  android:layout_height="wrap_content"       
 android:id="@+id/search_view"       
 android:focusable="false"       
 android:focusableInTouchMode="false">
    </android.support.v7.widget.SearchView>
    <ProgressBar   android:id="@+id/progress_bar"   
     android:layout_width="wrap_content"     
   android:layout_height="wrap_content"  
   android:layout_centerInParent="true"/>

    <android.support.v7.widget.RecyclerView      
  android:id="@+id/recycler_view"      

  android:layout_width="match_parent"    
    android:layout_height="match_parent"     
   android:layout_alignParentLeft="true"     
   android:layout_alignParentStart="true"      
  android:layout_below="@+id/search_view" />
</RelativeLayout>
searchview_in_menu.xml
<?xml version="1.0" encoding="utf-8"?>
<menu xmlns:app="http://schemas.android.com/apk/res-auto"
    xmlns:android="http://schemas.android.com/apk/res/android">
    <item
        android:id="@+id/search"
        android:icon="@android:drawable/ic_menu_search"
        app:actionViewClass="android.support.v7.widget.SearchView"
        android:title="search............."
        app:showAsAction="collapseActionView|ifRoom" />
</menu> 
list_row.xml


<?xml version="1.0" encoding="utf-8"?>
<android.support.v7.widget.CardView
    xmlns:android="http://schemas.android.com/apk/res/android"
    xmlns:cardview="http://schemas.android.com/apk/res-auto"
    android:layout_width="match_parent"
    android:layout_height="wrap_content"
    android:layout_marginBottom="5dp"
    cardview:cardCornerRadius="8dp"
    cardview:cardElevation="3dp"
    cardview:cardUseCompatPadding="true">

    <RelativeLayout
        android:layout_width="match_parent"
        android:layout_height="wrap_content">

        <ImageView
            android:id="@+id/thumbnail"
            android:layout_width="match_parent"
            android:layout_height="180dp"
            android:layout_alignParentTop="true"
            android:scaleType="fitXY"/>

        <TextView
            android:id="@+id/title"
            android:layout_width="wrap_content"
            android:layout_height="wrap_content"
            android:layout_below="@+id/thumbnail"
            android:layout_centerVertical="true"
            android:layout_marginLeft="12dp"
            android:hint="Name"
            android:textAppearance="@style/TextAppearance.AppCompat.Headline"
            android:textColor="#444"
            android:textSize="18dp"
            android:textStyle="bold"/>


    </RelativeLayout>
</android.support.v7.widget.CardView>
PHP’s
 RecycleViewExample.php

<?php
 require_once('db_Connect.php');
$sql = "select * from RecycleViewExample";
$res = mysqli_query($con,$sql);
$result = array();
while($row = mysqli_fetch_array($res)){
array_push($result,
array('id'=>$row[0],
'name'=>$row[1],
'image'=>$row[2]
));
}
echo json_encode(array("result"=>$result));
mysqli_close($con);
?>
db_Connect.php
<?php
 define('HOST','mysql.hostinger.in');
 define('USER','u293140154_user');
 define('PASS','******');
 define('DB','u293140154_test');
  $con = mysqli_connect(HOST,USER,PASS,DB) or die('Unable to Connect');
 ?>