Saturday 18 June 2022

Generate QR Code Using Simple QRcode In Laravel 8

QR (Quick Response) code is scannable black and white square box that stores data.

They are commonly used to store information, redirect users to a website, download files, payment, etc.

In this tutorial, I show how you can generate QR code using simple qrcode package in Laravel 8.


Contents

  1. Install Package
  2. Update app.php
  3. Route
  4. Controller
  5. View


1. Install Package

Install the package using composer –

composer require simplesoftwareio/simple-qrcode

2. Update app.php

  • Open config/app.php file.
  • Add the following SimpleSoftwareIO\QrCode\QrCodeServiceProvider::class in 'providers' –
'providers' => [ .... .... .... SimpleSoftwareIO\QrCode\QrCodeServiceProvider::class, ];
  • Add the following 'QrCode' => SimpleSoftwareIO\QrCode\Facades\QrCode::class in 'aliases' –
'aliases' => [ .... .... .... 'QrCode' => SimpleSoftwareIO\QrCode\Facades\QrCode::class ];

3. Route

  • Open routes/web.php file.
  • Define a routes –
    • / – Load index view.

Completed Code

<?php

use Illuminate\Support\Facades\Route;
use App\Http\Controllers\PageController;

Route::get('/', [PageController::class, 'index']);

4. Controller

  • Create PagesController Controller.
php artisan make:controller PagesController
  • Open app/Http/Controllers/PagesController.php file.
  • Import QrCode package  – use SimpleSoftwareIO\QrCode\Facades\QrCode;
  • Create a method –
    • index() – Generating a simple QR code which holds some text and assign to $data['qrcode'].

Generate QR code with text and store in images/ folder for download. Load index view and pass $data.

$data['qrcode'] = QrCode::generate('Welcome to Makitweb'); // Store QR code QrCode::generate('Welcome to Makitweb', public_path('images/qrcode.svg') );

Completed Code

<?php

namespace App\Http\Controllers;

use Illuminate\Http\Request;
use SimpleSoftwareIO\QrCode\Facades\QrCode;

class PageController extends Controller
{
    public function index(){
        // QR code with text
        $data['qrcode'] = QrCode::generate('Welcome to Makitweb');

        // Store QR code for download
        QrCode::generate('Welcome to Makitweb', public_path('images/qrcode.svg') );

        return view('index',$data);
    }

}

5. View

Create index.blade.php file in resources/views/ folder.


Display QR code generated in the controller –

{!! $qrcode !!}

QR code with text –

{!! QrCode::generate('Welcome to Makitweb'); !!}

Pass text in generate().


QR code with URL –

{!! QrCode::generate('https://makitweb.com'); !!}

Pass URL in generate().


Change QR code color –

QrCode::color(224, 224, 224)->backgroundColor(102, 0, 204)->generate('Welcome to Makitweb');

color() – Pass RGB color code to change QR color.

backgroundColor() – Pass RGB color code to change QR background color.


Change size –

QrCode::size(200)->generate('Welcome to Makitweb');

By default QR code size is 100px, to change it use size().


Change format –

QrCode::format('png')->generate('Welcome to Makitweb');

Default format of QR code is SVG, to change pass png to format().

NOTE – Make sure imagick extension is installed otherwise it will display error.


Download QR code –

Saved QR code to images/qrcode.svg using –

// Store QR code QrCode::generate('Welcome to Makitweb', public_path('images/qrcode.svg') );

Pass file path in anchor tag –

<a href="{{ asset('images/qrcode.svg') }}" download>Download</a>

Completed Code


<!DOCTYPE html>
<html>
<head>
   <meta charset="utf-8">
   <meta name="viewport" content="width=device-width, initial-scale=1">
   <title>How to Generate QR Code Using Simple QRcode In Laravel 8</title>

</head>
<body>

    <table border="1" style="border-collapse: collapse;">
       <tr>
          <td>
             QR with text <br>
             Generated from controller
          </td>
          <td>
             {!! $qrcode !!}
          </td>
       </tr>

       <tr>
          <td>
             QR with text        
          </td>
          <td>
             {!! QrCode::generate('Welcome to Makitweb'); !!}
          </td>
       </tr>

       <tr>
          <td>
             QR with URL
          </td>
          <td>
             {!! QrCode::generate('https://makitweb.com'); !!}
          </td>
       </tr>

       <tr>
          <td>
             Change QR color
          </td>
          <td>
             {!! QrCode::color(224, 224, 224)->backgroundColor(102, 0, 204)->generate('Welcome to Makitweb'); !!}
          </td>
       </tr>

       <tr>
          <td>
             Change default size to 200px
          </td>
          <td>
             {!! QrCode::size(200)->generate('Welcome to Makitweb'); !!}
          </td>
       </tr>

       <tr>
          <td>
             PNG format
          </td>
          <td>
             {!! QrCode::format('png')->generate('Welcome to Makitweb'); !!}
          </td>
       </tr>

       <tr>
          <td>Download QR code</td>
          <td>
             <a href="{{ asset('images/qrcode.svg') }}" download>Download</a>
          </td>
        </tr>

    </table>

</body>
</html>

Monday 6 June 2022

Build REST API with Laravel 9


In this post, we'll show you how to build a REST API with laravel 9. Before you can proceed with this tutorial, you need to install the latest version of laravel, and make sure you have the following prerequisites:

  • PHP 8.0.2+
  • MySql
  • Composer

Laravel 9 is a full-stack web application framework with a robust and visually appealing design that is easy to use to create tradiotional web applications and modern web applications that expose REST APIs that could be consumed by front-end applications such as Angular, React or Vue.js.

Using a web framework as a basis and starting point for developing your application will allow you to focus on creating something really amazing while the foundation takes care of the low-level technicalities for you.

You can also use laravel 9 to build a REST API that can be consumed by a JavaScript client application.

Create a laravel 9 project

You can create a laravel 9 by creating using composer as in the following instructions.

Open a new command-line interface and and run the following command:

composer create-project laravel/laravel laravel9restapi

Wait for composer to create the project's files and install the dependencies from its registry then run the following commands to serve your laravel 9 application using a local development server:

cd laravel9restapi
php artisan serve

Create a new laravel 9 model

Open a new command line interface and run the following command from the project root folder to generate a product model with a migration file:

php artisan make:model Product -m

Next, opne the migartion file inside the database/migrations folder and update it as follows:

<?php

use Illuminate\Database\Migrations\Migration;
use Illuminate\Database\Schema\Blueprint;
use Illuminate\Support\Facades\Schema;

return new class extends Migration
{
    /**
     * Run the migrations.
     *
     * @return void
     */
    public function up()
    {
        Schema::create('products', function (Blueprint $table) {
            $table->id();
            $table->string('reference');
            $table->string('name');
            $table->longText('description');
            $table->timestamps();
        });
    }

    /**
     * Reverse the migrations.
     *
     * @return void
     */
    public function down()
    {
        Schema::dropIfExists('products');
    }
};

Following that, open the app/models/Product.php file and update the fillable array as follows:

<?php

namespace App\Models;

use Illuminate\Database\Eloquent\Factories\HasFactory;
use Illuminate\Database\Eloquent\Model;

class Product extends Model
{
    use HasFactory;

    protected $fillable = ['reference', 'name'];
}

Create the REST API controller

After creating the model and migration file for products, let's now create the controller. Head back to your command-line interface and run the following command:

php artisan make:controller Api\\ProductController --model=Product

Next, open the app/Http/Controllers/Api/ProductController.php file and update the index() function it as follows:

public function index()
{
    $products = Product::all();
    return response()->json([
        'products' => $products
    ]);
}

Next, update the store() method as follows:

public function store(StoreProductRequest $request)
{
    $product = Product::create($request->all());

    return response()->json([
        'message' => "Product saved successfully!",
        'product' => $product
    ], 200);
}

Next, update the update() method as follows:

public function update(StoreProductRequest $request, Product $product)
{
    $product->update($request->all());

    return response()->json([
        'message' => "Product updated successfully!",
        'product' => $product
    ], 200);
}

Finally, update the destroy() method of the controller class as follows:

public function destroy(Product $product)
{
    $product->delete();

    return response()->json([
        'message' => "Product deleted successfully!",
    ], 200);
}

Go back to your command line interface and , generate a request as follows:

php artisan make:request StoreProductRequest

Open the app/Http/Requests/StoreProductRequest.php file as follows:

<?php

namespace App\Http\Requests;

use Illuminate\Foundation\Http\FormRequest;

class StoreProductRequest extends FormRequest
{
    /**
     * Determine if the user is authorized to make this request.
     *
     * @return bool
     */
    public function authorize()
    {
        return true;
    }

    /**
     * Get the validation rules that apply to the request.
     *
     * @return array
     */
    public function rules()
    {
        return [
            "name" => "required",
            "reference" => "required"
        ];
    }
}

Create the REST API endpoints

After that, open the routes/api.php file and add the REST API endpoints as follows:

<?php

use App\Http\Controllers\Api\ProductController;
use Illuminate\Http\Request;
use Illuminate\Support\Facades\Route;


Route::apiResource('products', ProductController::class);

You can test these API routes using a tool like Postman to send API requests to the laravel 9 application.

Conclusion

We've seen how to install laravel 9 by creating a new project using composer. In order to provide an amazing developer experience, Laravel includes features like robust dependency injection, a powerful database abstraction layer, queues and scheduled jobs, unit and integration testing, and more.

Laravel is a framework that can adapt with your skills, whether you are beginner to PHP web frameworks or have years of expertise. Laravel 9 assists you in taking your initial steps as a web developer or give you a push as you advance your skills.


Sunday 14 November 2021

How to Set Up Laravel 8 on Your Android Phone


 In this article, I'm going to show you how you can install Laravel 8 on your phone. 

To get the most out of this guide, you should have some knowledge of PHP and you should know what Laravel is. But if you don't, don't worry – I will explain the basics so you can get started.

What Is Laravel?

Laravel is a web application framework with expressive, elegant syntax. It's built on PHP, which means that Laravel is PHP but it makes things easier to work with.

It comes with lots of packages for various features, like authentication, so we don't need to write authentication ourselves. To learn more about what Laravel can do, you can visit the site at laravel.com.

Why I wrote this tutorial

I created this tutorial because I want people interested in programming who don't have a laptop or pc to be able to build things on their phones.

My last post on freeCodeCamp made me realize that people are interested in learning how the tech works, so that's why I'm making more guides like this.

So let's dive into it. In this tutorial I am going to show you how you can install composer.php and use it to set up Laravel 8 on your phone 🔥🔥.

I am Precious Oladele, and I'm almost 19 this month 🥴. I'm from Nigeria and I will be taking you through this process. And if you're wondering how I know so much about this, it's because I also don't have a laptop so I explore with my phone instead 😎.

Requirements

To go through this tutorial, you'll need an Android phone with V6.0+.

Set up

We need to head over to the Play Store and download Termux:

Termux is a Linux-based system which we can use on our phones. It's as simple as using your regular Linux – you can install anything, even Kali, Ubuntu, or whatever you want. But for this tutorial we will be using it to set up Laravel 8 on our mobile phone.

Download composer

Before we download composer, we need to open up our Termux app and type in this command:

termux-setup-storage

It'll ask you for storage permissions, so go ahead and click accept. Once you're done head over to https://getcomposer.org/download/.

We need to grab everything there. But before that we need to install PHP so we can use it in our app. To do that in your Termux, type in the following command:

apt install php 

and click enter. You should see this:

Once that is done head over to the composer page and grab the code. We need to do this because Termux is Linux-based. If it was Windows there would be a simple button to download composer.exe there.

Copy the whole code and head over to Termux where you can paste it in. Then click enter.

When composer is installed you should see something like this:

How to Install Laravel 8

Before we install Laravel 8, let's check to see if we have a composer.phar file. In your Termux type this command:

ls

and hit enter. You will see the available files there.

You can see the composer.phar file and a storage folder. The storage folder grants access to your file manager. Remember the termux-setup-storage command you wrote first.

Now let's install Laravel 8. To do so we can either create a project or just install it globally. But it's a bit of a long process when installing it globally on your phone because you need to set a path and so on, and it can be pretty confusing. So in this guide we will create a project instead.

In your Termux go ahead and type this:

php composer.phar create-project laravel/laravel myapp

myapp is just the project name – you can change it to whatever you want. Then hit enter and wait for the magic to happen.

When you see the below, it means that Laravel has been installed:

Easy as pie. Now to test it, you can cd into myapp by typing cd myapp. Then you can run the Laravel server with php artisan serve.

Voilà – development has started 🔥

Now you can open http://127.0.0.1:8000 in your browser and see that Laravel is running:

Also make sure you do this so your Termux app won't force close when you are coding: 😎

That's it!

Thanks for reading. I hope you learned something from this tutorial. You should now be able to install Laravel on your Android phone and start using it to build apps.


Wednesday 31 March 2021

Install laravel on windows10 xampp


Install laravel on windows xampp. In this post, we will show you how to install laravel latest version on the windows 10 xampp step by step with the composer using cmd.

This how to install laravel on windows xampp step by step tutorial will guide on how to install and setup laravel latest version(7,6,5) on windows 10 xampp with composer. As well as, short description of “what is laravel framework”.

What is Laravel?

Laravel is a free open source “PHP framework” based on the MVC design pattern.
It is created by Taylor Otwell. Laravel provides expressive and elegant syntax that helps in creating a wonderful web application easily and quickly.

How to Install Laravel on Windows 10 Xampp

Follow the below simple and easy steps to install laravel 5, 6, 7 on windows 10 xampp and ubuntu with composer:

  • Download and Install Composer
  • System Requirement
  • Create a Project
  • Run the Application on Development Server

Note: If you install laravel in the ubuntu system. Must Read, How to install composer in ubuntu, Click Here

Step 1: Download and Install Composer

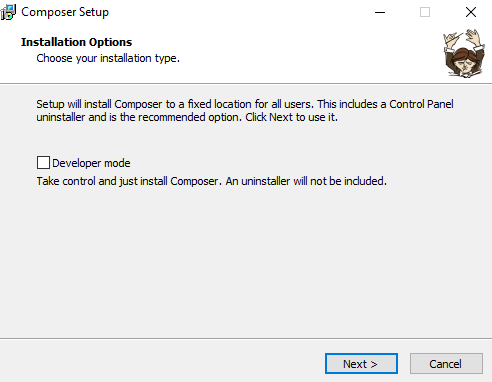
Before installing laravel on windows. first of download composer on windows system. If you already composer download / installed Composer.  go to STEP 2, otherwise follow the steps.

Click  Download Composer from www.getcomposer.org

install composer

Run the setup and Install Composer.

install composer

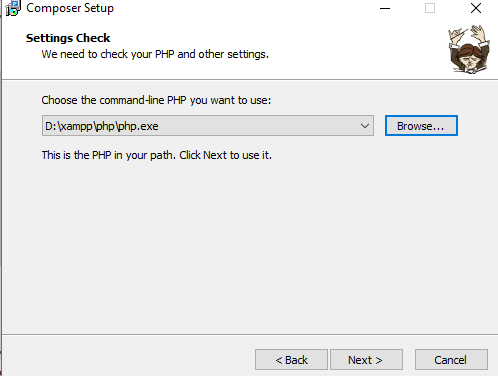
Next the window will display the resume of the settings, click “Install” to continue.

install composer

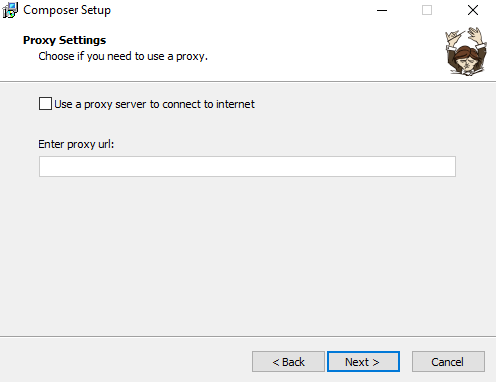
If you have any proxy URL enter here, don’t know to leave it to click next to

install composer
install composer

The setup wizard will download the required files from getcomposer.org. Your installation will be completed.

install composer

Composer installed successfully. Click to finish button and move to the next step.

install composer
install composer

Open command prompt & type cd C:\xampp\htdocs

install composer

Step 2: Server Requirements

The Laravel framework has a few system requirements. Before we will install laravel 6 on windows, read some system requirements.

  • PHP >= 7.2.0
  • BCMath PHP Extension
  • Ctype PHP Extension
  • JSON PHP Extension
  • Mbstring PHP Extension
  • OpenSSL PHP Extension
  • PDO PHP Extension
  • Tokenizer PHP Extension
  • XML PHP Extension

Step 3: Install Laravel

Type the command In the command prompt => composer create-project laravel/laravel Project Name. It will install a laravel new setup on your windows xampp:

composer create-project --prefer-dist laravel/laravel blog

Wait for Laravel install on windows system.

install laravel

Step 4: Run the Application on Development Server

In this step to use the php artisan serve command .it will start your server locally

php artisan serve

If you want to run the project diffrent port so use this command

php artisan serve --port=8080 

You have successfully install laravel on windows, Now Go to the browser and hit the

URL : http://localhost:8000/blog

If you are not run php artisan server command, direct go to your browser and type the URL

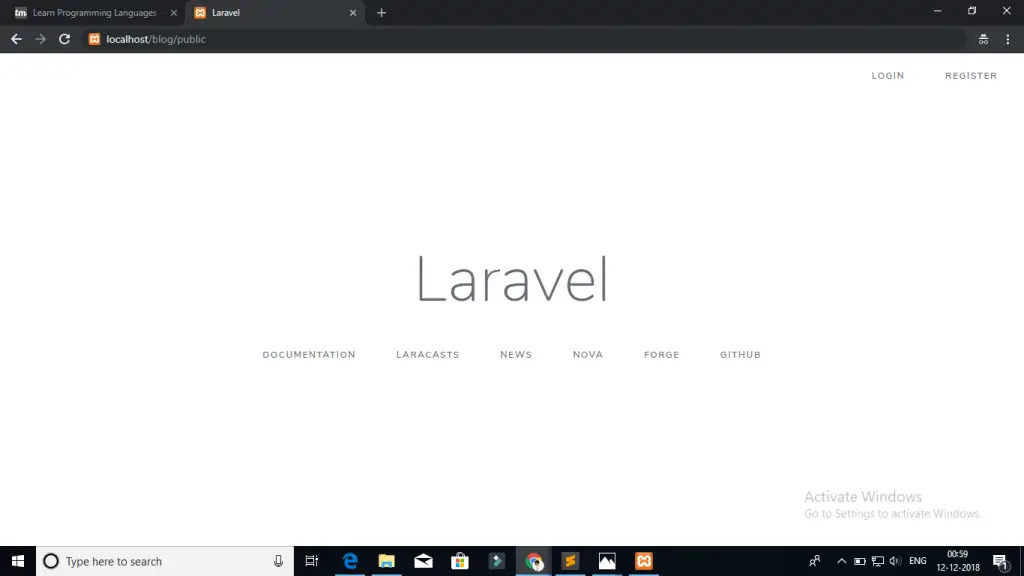
URL : http://localhost/blog/public/

Laravel  Installation Process completed go to the browser and hit URL. http://localhost/project-name /public/, you will be seen.
install laravel

Server Error 500 when accessing Laravel 6 (Solve)

Download New Laravel Setup and Run, It will show server error 500 when accessing Laravel 6

If your using ubuntu machine. open your terminal and go to your project root directory and type the command in command prompt :

sudo chmod  -R 777 storage

sudo chmod -R 777 bootstrap

Conclusion

In this how to install laravel on windows XAMPP, You have learned how to install the latest version laravel 5,6,7 on windows 10 with the composer by using cmd.


Friday 27 November 2020

php 8 New features


 PHP 8 is here! It was released on November 26, 2020. You can download it here. It's a new major version, which means that it will introduce some breaking changes, as well as lots of new features and performance improvements.

Because of the breaking changes, there's a higher chance you'll need to make some changes in your code to get it running on PHP 8. If you've kept up to date with the latest releases though, the upgrade shouldn't be too hard, since most breaking changes were deprecated before in the 7.* versions. And don't worry, all these deprecations are listed in this post.


Besides breaking changes, PHP 8 also brings a nice set of new features such as the JIT compiler, union types, attributes, and more.

New features

Let's start with all new features, it's quite a list!


 Union types RFC

Given the dynamically typed nature of PHP, there are lots of cases where union types can be useful. Union types are a collection of two or more types which indicate that either one of those can be used.

public function foo(Foo|Bar $input): int|float;

Note that void can never be part of a union type, since it indicates "no return value at all". Furthermore, nullable unions can be written using |null, or by using the existing ? notation:

public function foo(Foo|null $foo): void;

public function bar(?Bar $bar): void;

 JIT RFC

The JIT — just in time — compiler promises significant performance improvements, albeit not always within the context of web requests. I've done my own benchmarks on real-life web applications, and it seems like the JIT doesn't make that much of a difference, if any, on those kinds of PHP projects.

If you want to know more about what the JIT can do for PHP, you can read another post I wrote about it here.

The nullsafe operator RFC

If you're familiar with the null coalescing operator you're already familiar with its shortcomings: it doesn't work on method calls. Instead you need intermediate checks, or rely on optional helpers provided by some frameworks:

$startDate = $booking->getStartDate();

$dateAsString = $startDate ? $startDate->asDateTimeString() : null;

With the addition of the nullsafe operator, we can now have null coalescing-like behaviour on methods!

$dateAsString = $booking->getStartDate()?->asDateTimeString();

 Named arguments RFC

Named arguments allow you to pass in values to a function, by specifying the value name, so that you don't have to take their order into consideration, and you can also skip optional parameters!

function foo(string $a, string $b, ?string $c = null, ?string $d = null) 
{ /* … */ }

foo(
    b: 'value b', 
    a: 'value a', 
    d: 'value d',
);


 Attributes RFC

Attributes, commonly known as annotations in other languages, offers a way to add meta data to classes, without having to parse docblocks.

As for a quick look, here's an example of what attributes look like, from the RFC:

use App\Attributes\ExampleAttribute;

#[ExampleAttribute]
class Foo
{
    #[ExampleAttribute]
    public const FOO = 'foo';
 
    #[ExampleAttribute]
    public $x;
 
    #[ExampleAttribute]
    public function foo(#[ExampleAttribute] $bar) { }
}
#[Attribute]
class ExampleAttribute
{
    public $value;
 
    public function __construct($value)
    {
        $this->value = $value;
    }
}

Note that this base Attribute used to be called PhpAttribute in the original RFC, but was changed with another RFC afterwards. If you want to take a deep dive in how attributes work, and how you can build your own; you can read about attributes in depth on this blog.

Match expression RFC

You could call it the big brother of the switch expresion: match can return values, doesn't require break statements, can combine conditions, uses strict type comparisons and doesn't do any type coercion.

It looks like this:

$result = match($input) {
    0 => "hello",
    '1', '2', '3' => "world",
};


 Constructor property promotion RFC

This RFC adds syntactic sugar to create value objects or data transfer objects. Instead of specifying class properties and a constructor for them, PHP can now combine them into one.

Instead of doing this:

class Money 
{
    public Currency $currency;
 
    public int $amount;
 
    public function __construct(
        Currency $currency,
        int $amount,
    ) {
        $this->currency = $currency;
        $this->amount = $amount;
    }
}

You can now do this:

class Money 
{
    public function __construct(
        public Currency $currency,
        public int $amount,
    ) {}
}


 New static return type RFC

While it was already possible to return self, static wasn't a valid return type until PHP 8. Given PHP's dynamically typed nature, it's a feature that will be useful to many developers.

class Foo
{
    public function test(): static
    {
        return new static();
    }
}

New mixed type RFC

Some might call it a necessary evil: the mixed type causes many to have mixed feelings. There's a very good argument to make for it though: a missing type can mean lots of things in PHP:

  • A function returns nothing or null
  • We're expecting one of several types
  • We're expecting a type that can't be type hinted in PHP

Because of the reasons above, it's a good thing the mixed type is added. mixed itself means one of these types:

  • array
  • bool
  • callable
  • int
  • float
  • null
  • object
  • resource
  • string

Note that mixed can also be used as a parameter or property type, not just as a return type.

Also note that since mixed already includes null, it's not allowed to make it nullable. The following will trigger an error:

// Fatal error: Mixed types cannot be nullable, null is already part of the mixed type.
function bar(): ?mixed {}

Throw expression RFC

This RFC changes throw from being a statement to being an expression, which makes it possible to throw exception in many new places:

$triggerError = fn () => throw new MyError();

$foo = $bar['offset'] ?? throw new OffsetDoesNotExist('offset');

 Inheritance with private methods RFC

Previously, PHP used to apply the same inheritance checks on public, protected and private methods. In other words: private methods should follow the same method signature rules as protected and public methods. This doesn't make sense, since private methods won't be accessible by child classes.

This RFC changed that behaviour, so that these inheritance checks are not performed on private methods anymore. Furthermore, the use of final private function also didn't make sense, so doing so will now trigger a warning:

Warning: Private methods cannot be final as they are never overridden by other classes

Weak maps RFC

Built upon the weakrefs RFC that was added in PHP 7.4, a WeakMap implementation is added in PHP 8. WeakMap holds references to objects, which don't prevent those objects from being garbage collected.

Take the example of ORMs, they often implement caches which hold references to entity classes to improve the performance of relations between entities. These entity objects can not be garbage collected, as long as this cache has a reference to them, even if the cache is the only thing referencing them.

If this caching layer uses weak references and maps instead, PHP will garbage collect these objects when nothing else references them anymore. Especially in the case of ORMs, which can manage several hundreds, if not thousands of entities within a request; weak maps can offer a better, more resource friendly way of dealing with these objects.

Here's what weak maps look like, an example from the RFC:

class Foo 
{
    private WeakMap $cache;
 
    public function getSomethingWithCaching(object $obj): object
    {
        return $this->cache[$obj]
           ??= $this->computeSomethingExpensive($obj);
    }
}

 Allowing ::class on objects RFC

A small, yet useful, new feature: it's now possible to use ::class on objects, instead of having to use get_class() on them. It works the same way as get_class().

$foo = new Foo();

var_dump($foo::class);

Non-capturing catches RFC

Whenever you wanted to catch an exception before PHP 8, you had to store it in a variable, regardless whether you used that variable or not. With non-capturing catches, you can omit the variable, so instead of this:

try {
    // Something goes wrong
} catch (MySpecialException $exception) {
    Log::error("Something went wrong");
}

You can now do this:

try {
    // Something goes wrong
} catch (MySpecialException) {
    Log::error("Something went wrong");
}

Note that it's required to always specify the type, you're not allowed to have an empty catch. If you want to catch all exceptions and errors, you can use Throwable as the catching type.


Trailing comma in parameter lists RFC

Already possible when calling a function, trailing comma support was still lacking in parameter lists. It's now allowed in PHP 8, meaning you can do the following:

public function(
    string $parameterA,
    int $parameterB,
    Foo $objectfoo,
) {
    // …
}

As a sidenote: trailing commas are also supported in the use list of closures, this was an oversight and now added via a separate RFC.


Create DateTime objects from interface

You can already create a DateTime object from a DateTimeImmutable object using DateTime::createFromImmutable($immutableDateTime), but the other way around was tricky. By adding DateTime::createFromInterface() and DatetimeImmutable::createFromInterface() there's now a generalised way to convert DateTime and DateTimeImmutable objects to each other.

DateTime::createFromInterface(DateTimeInterface $other);

DateTimeImmutable::createFromInterface(DateTimeInterface $other);

 New Stringable interface RFC

The Stringable interface can be used to type hint anything that implements __toString(). Whenever a class implements __toString(), it automatically implements the interface behind the scenes and there's no need to manually implement it.

class Foo
{
    public function __toString(): string
    {
        return 'foo';
    }
}

function bar(string|Stringable $stringable) { /* … */ }

bar(new Foo());
bar('abc');

 New str_contains() function RFC

Some might say it's long overdue, but we finally don't have to rely on strpos() anymore to know whether a string contains another string.

Instead of doing this:

if (strpos('string with lots of words', 'words') !== false) { /* … */ }

You can now do this

if (str_contains('string with lots of words', 'words')) { /* … */ }

 New str_starts_with() and str_ends_with() functions RFC

Two other ones long overdue, these two functions are now added in the core.

str_starts_with('haystack', 'hay'); // true
str_ends_with('haystack', 'stack'); // true

 New fdiv() function PR

The new fdiv() function does something similar as the fmod() and intdiv() functions, which allows for division by 0. Instead of errors you'll get INF, -INF or NAN, depending on the case.


 New get_debug_type() function RFC

get_debug_type() returns the type of a variable. Sounds like something gettype() would do? get_debug_type() returns more useful output for arrays, strings, anonymous classes and objects.

For example, calling gettype() on a class \Foo\Bar would return object. Using get_debug_type() will return the class name.

A full list of differences between get_debug_type() and gettype() can be found in the RFC.


 New get_resource_id() function PR

Resources are special variables in PHP, referring to external resources. One example is a MySQL connection, another one a file handle.

Each one of those resources gets assigned an ID, though previously the only way to know that id was to cast the resource to int:

$resourceId = (int) $resource;

PHP 8 adds the get_resource_id() functions, making this operation more obvious and type-safe:

$resourceId = get_resource_id($resource);

 Abstract methods in traits improvements RFC

Traits can specify abstract methods which must be implemented by the classes using them. There's a caveat though: before PHP 8 the signature of these method implementations weren't validated. The following was valid:

trait Test {
    abstract public function test(int $input): int;
}

class UsesTrait
{
    use Test;

    public function test($input)
    {
        return $input;
    }
}

PHP 8 will perform proper method signature validation when using a trait and implementing its abstract methods. This means you'll need to write this instead:

class UsesTrait
{
    use Test;

    public function test(int $input): int
    {
        return $input;
    }
}

 Object implementation of token_get_all() RFC

The token_get_all() function returns an array of values. This RFC adds a PhpToken class with a PhpToken::tokenize() method. This implementation works with objects instead of plain values. It consumes less memory and is easier to read.


 Variable syntax tweaks RFC

From the RFC: "the Uniform Variable Syntax RFC resolved a number of inconsistencies in PHP's variable syntax. This RFC intends to address a small handful of cases that were overlooked."


 Type annotations for internal functions EXTERNALS

Lots of people pitched in to add proper type annotations to all internal functions. This was a long standing issue, and finally solvable with all the changes made to PHP in previous versions. This means that internal functions and methods will have complete type information in reflection.


 ext-json always available RFC

Previously it was possible to compile PHP without the JSON extension enabled, this is not possible anymore. Since JSON is so widely used, it's best developers can always rely on it being there, instead of having to ensure the extension exist first.

 Breaking changes

As mentioned before: this is a major update and thus there will be breaking changes. The best thing to do is take a look at the full list of breaking changes over at the UPGRADING document.

Many of these breaking changes have been deprecated in previous 7.* versions though, so if you've been staying up-to-date over the years, it shouldn't be all that hard to upgrade to PHP 8.


 Consistent type errors RFC

User-defined functions in PHP will already throw TypeError, but internal functions did not, they rather emitted warnings and returned null. As of PHP 8 the behaviour of internal functions have been made consistent.


Reclassified engine warnings RFC

Lots of errors that previously only triggered warnings or notices, have been converted to proper errors. The following warnings were changed.

  • Undefined variable: Error exception instead of notice
  • Undefined array index: warning instead of notice
  • Division by zero: DivisionByZeroError exception instead of warning
  • Attempt to increment/decrement property '%s' of non-object: Error exception instead of warning
  • Attempt to modify property '%s' of non-object: Error exception instead of warning
  • Attempt to assign property '%s' of non-object: Error exception instead of warning
  • Creating default object from empty value: Error exception instead of warning
  • Trying to get property '%s' of non-object: warning instead of notice
  • Undefined property: %s::$%s: warning instead of notice
  • Cannot add element to the array as the next element is already occupied: Error exception instead of warning
  • Cannot unset offset in a non-array variable: Error exception instead of warning
  • Cannot use a scalar value as an array: Error exception instead of warning
  • Only arrays and Traversables can be unpacked: TypeError exception instead of warning
  • Invalid argument supplied for foreach(): TypeError exception instead of warning
  • Illegal offset type: TypeError exception instead of warning
  • Illegal offset type in isset or empty: TypeError exception instead of warning
  • Illegal offset type in unset: TypeError exception instead of warning
  • Array to string conversion: warning instead of notice
  • Resource ID#%d used as offset, casting to integer (%d): warning instead of notice
  • String offset cast occurred: warning instead of notice
  • Uninitialized string offset: %d: warning instead of notice
  • Cannot assign an empty string to a string offset: Error exception instead of warning
  • Supplied resource is not a valid stream resource: TypeError exception instead of warning

 The @ operator no longer silences fatal errors

It's possible that this change might reveal errors that again were hidden before PHP 8. Make sure to set display_errors=Off on your production servers!


 Default error reporting level

It's now E_ALL instead of everything but E_NOTICE and E_DEPRECATED. This means that many errors might pop up which were previously silently ignored, though probably already existent before PHP 8.


 Default PDO error mode RFC

From the RFC: The current default error mode for PDO is silent. This means that when an SQL error occurs, no errors or warnings may be emitted and no exceptions thrown unless the developer implements their own explicit error handling.

This RFC changes the default error will change to PDO::ERRMODE_EXCEPTION in PHP 8.


 Concatenation precedence RFC

While already deprecated in PHP 7.4, this change is now taken into effect. If you'd write something like this:

echo "sum: " . $a + $b;

PHP would previously interpret it like this:

echo ("sum: " . $a) + $b;

PHP 8 will make it so that it's interpreted like this:

echo "sum: " . ($a + $b);

 Stricter type checks for arithmetic and bitwise operators RFC

Before PHP 8, it was possible to apply arithmetic or bitwise operators on arrays, resources or objects. This isn't possible anymore, and will throw a TypeError:

[] % [42];
$object + 4;

 Namespaced names being a single token RFC

PHP used to interpret each part of a namespace (separated by a backslash \) as a sequence of tokens. This RFC changed that behaviour, meaning reserved names can now be used in namespaces.


 Saner numeric strings RFC

PHP's type system tries to do a lot of smart things when it encounters numbers in strings. This RFC makes that behaviour more consistent and clear.


 Saner string to number comparisons RFC

This RFC fixes the very strange case in PHP where 0 == "foo" results in true. There are some other edge cases like that one, and this RFC fixes them.


 Reflection changes

A few reflection methods have been deprecated:

  • ReflectionFunction::isDisabled()
  • ReflectionParameter::getClass()
  • ReflectionParameter::isCallable()

You should now use ReflectionType to get information about a parameter's type:

$reflectionParameter->getType()->allowsNull();

If the type is a single type, ReflectionParameter::getType() returns an instance of ReflectionNamedType, which you can get its name from and whether it's built-in:

$reflectionParameter->getType()->getName();
$reflectionParameter->getType()->isBuiltin();

If the type is a union type however, you'll get an instance of ReflectionUnionType, which can give you an array of ReflectionNamedType like so:

$reflectionParameter->getType()->getTypes();

Checking whether a type is a union or not can be done with an instanceof check:

if ($reflectionParameter->getType() instanceof ReflectionNamedType) { 
    // It's a single type
}

if ($reflectionParameter->getType() instanceof ReflectionUnionType) {
    // It's a union type
}

Next up, three method signatures of reflection classes have been changed:

ReflectionClass::newInstance($args);
ReflectionFunction::invoke($args);
ReflectionMethod::invoke($object, $args);

Have now become:

ReflectionClass::newInstance(...$args);
ReflectionFunction::invoke(...$args);
ReflectionMethod::invoke($object, ...$args);

The upgrading guide specifies that if you extend these classes, and still want to support both PHP 7 and PHP 8, the following signatures are allowed:

ReflectionClass::newInstance($arg = null, ...$args);
ReflectionFunction::invoke($arg = null, ...$args);
ReflectionMethod::invoke($object, $arg = null, ...$args);


Stable sorting RFC

Before PHP 8, sorting algorithms were unstable. This means that the order of equal elements wasn't guaranteed. PHP 8 changes the behaviour of all sorting functions to stable sorting.


 Fatal error for incompatible method signatures RFC

From the RFC: Inheritance errors due to incompatible method signatures currently either throw a fatal error or a warning depending on the cause of the error and the inheritance hierarchy.


 Other deprecations and changes

During the PHP 7.* development, several deprecations were added that are now finalised in PHP 8.

Tuesday 24 November 2020

How to add bootstrap 4/5 to Angular 10/9


We will see how to use Bootstrap to style apps built using Angular 10.

We'll see how to integrate Angular with Bootstrap, in various ways including using ng-bootstrap and ngx-bootstrap packages.

These are the steps of our tutorial:

  • Step 1 - Installing Angular CLI v10
  • Step 2 - Installing Bootstrap 4 in Your Angular 10 Project
  • Step 3 (Method 1) - Adding Bootstrap 4 to Angular 10 Using angular.json
  • Step 3 (Method 2) - Adding Bootstrap 4 to Angular 10 Using index.html
  • Step 3 (Method 3) - Adding Bootstrap 4 to Angular 10 Using styles.css
  • Alternative Step - Adding Bootstrap 4 Using ng-bootstrap and ngx-bootstrap

Step 1: Installing Angular CLI v10

$ npm install -g @angular/cli

After the installation, you'll have at your disposal the ng utility. Let's use it to generate a new Angular 10 project.

$ ng new angular-bootstrap-examples

You will be prompted for a couple of questions:

? Would you like to add Angular routing? Yes

? Which stylesheet format would you like to use? (Use arrow keys)

> CSS

  SCSS   [ https://sass-lang.com/documentation/syntax#scss                ]

  Sass   [ https://sass-lang.com/documentation/syntax#the-indented-syntax ]

  Less   [ http://lesscss.org                                             ]

  Stylus [ http://stylus-lang.com                                         ]

Most importantly, choose CSS as the stylesheet format because we'll use ths CSS version of Bootstrap in our tutorial.

The command will generate the directory structure and necessary files for the project and will install the required dependencies.

Next, navigate inside the root folder of your project

$ cd angular-bootstrap-examples

You can then serve your Angular 10 application using the ng serve command as follows:

$ ng serve

Step 2: Installing Bootstrap 4 in Your Angular 10 Project

In this step, we'll proceed to add Bootstrap 4 to our Angular 10 application.

There are various ways that you can use to install Bootstrap in your project:

Installing Bootstrap from npm using the npm install command,

Downloading Bootstrap files and adding them to the src/assets folder of your Angular project,

Using Bootstrap from a CDN.

Let's proceed with the first method. Go back to your command-line interface and install Bootstrap 4 via npm as follows:

 $ npm install --save bootstrap

This will also add the bootstrap package to package.json.

As the time of writing this tutorial, bootstrap v4.3.1 will be installed.

The Bootstrap 4 assets will be installed in the node_modules/bootstrap folder. You'll need to tell Angular where to look for them.

Next, you also need to install jQuery using the following command:

 $ npm install --save jquery

At the time of this tutorial jquery v3.4.1 will be installed.

Step 3:Adding Bootstrap 4 to Angular 10 Using angular.json

Open the angular.json file of your project and include:

{

  "$schema": "./node_modules/@angular/cli/lib/config/schema.json",

  "version": 1, 

  "newProjectRoot": "projects",

  "projects": {

    "angular-bootstrap-examples": {

      "projectType": "application",

      "schematics": {},

      "root": "",

      "sourceRoot": "src",

      "prefix": "app",

      "architect": {

        "build": {

          "builder": "@angular-devkit/build-angular:browser",

          "options": {

            "outputPath": "dist/angular-bootstrap-examples",

            "index": "src/index.html",

            "main": "src/main.ts",

            "polyfills": "src/polyfills.ts",

            "tsConfig": "tsconfig.app.json",

            "aot": true,

            "assets": [

              "src/favicon.ico",

              "src/assets"

            ],

            "styles": [

              "./node_modules/bootstrap/dist/css/bootstrap.css",

              "src/styles.css"              

            ],

            "scripts": [

              "./node_modules/jquery/dist/jquery.js",

              "./node_modules/bootstrap/dist/js/bootstrap.js"

            ]

          },

Step 3: Adding Bootstrap 4 to Angular 10 Using index.html

You can also include Bootstrap files from node_modules/bootstrap using the index.html file.

<!doctype html>

<html lang="en">

<head>

  <meta charset="utf-8">

  <title>Angular Bootstrap 4 Examples</title>

  <base href="/">

  <meta name="viewport" content="width=device-width, initial-scale=1">

  <link rel="icon" type="image/x-icon" href="favicon.ico">

  <link rel="stylesheet" href="../node_modules/bootstrap/dist/css/bootstrap.css">


</head>

<body>

  <app-root></app-root>

  <script src="../node_modules/jquery/dist/jquery.js"></script>

  <script src="../node_modules/bootstrap/dist/js/bootstrap.js"></script>    

</body>

</html>

Step 3: Adding Bootstrap 4 to Angular 10 Using styles.css

We can also use the styles.css file to add the CSS file of Bootstrap to our project.

Open the src/styles.css file of your Angular project and import the bootstrap.css file as follows:

@import "~bootstrap/dist/css/bootstrap.css"

Adding Bootstrap 4 Using ng-bootstrap and ngx-bootstrap

Bootstrap depends on jQuery and Popper.js libraries, and if you don't include them in your project, any Bootstrap components that rely on JavaScript will not work.

Why not include those libs? For Angular it's better to avoid using libraries that make direct manipulation of the DOM (like jQuery) and let Angular handle that.

Now what if you need the complete features of Bootstrap 4 without the JS libraries?

A better way is to use component libraries created for the sake of making Bootstrap work seamlessly with Angular such as ng-bootstrap or ngx-bootstrap

npm install --save @ng-bootstrap/ng-bootstrap

Next you'll need to add the module you imported in your app root module

import {NgbModule} from '@ng-bootstrap/ng-bootstrap';

@NgModule({

  declarations: [/*...*/],

  imports: [/*...*/, NgbModule.forRoot()],

  /*...*/

})

export class AppModule {

}

Please note that ng-bootstrap requires the Bootstrap 4 CSS file to be present.

You can add it in the styles array of the angular.json file like that:

"styles": [

  "styles.css",

  "../node_modules/bootstrap/dist/css/bootstrap.css"

],