After play around with new Ionic 3 and Angular 4 in the previous tutorial, now we started the step by step tutorial of Ionic 3, Angular 4 and Google Maps Directions Service using Google Maps Javascript API.
1. Create New Ionic 3 and Angular 4 App
As usually, we are starting our tutorial from scratch. We assume that your computer or environment already have Node.js installed. Now, open the terminal or Node.js command line then type this command to install new Ionic 3 and Cordova.
sudo npm install -g cordova ionic
Now, go to project folders then type this command to make a new Ionic 3 App.
ionic start ionic3-googlemaps-directions blank --v2
Go to the newly created app folder.
cd ionic3-googlemaps-directions
This time we will modify few default files to implements lazy loading pages. Open and edit 'src/app/app.module.ts' then remove imports, NgModule-declaration and NgModule-entryComponents of page Home. So, this file will looks like this.
import { BrowserModule } from '@angular/platform-browser';
import { ErrorHandler, NgModule } from '@angular/core';
import { IonicApp, IonicErrorHandler, IonicModule } from 'ionic-angular';
import { SplashScreen } from '@ionic-native/splash-screen';
import { StatusBar } from '@ionic-native/status-bar';

import { MyApp } from './app.component';

@NgModule({
  declarations: [
    MyApp
  ],
  imports: [
    BrowserModule,
    IonicModule.forRoot(MyApp)
  ],
  bootstrap: [IonicApp],
  entryComponents: [
    MyApp
  ],
  providers: [
    StatusBar,
    SplashScreen,
    {provide: ErrorHandler, useClass: IonicErrorHandler}
  ]
})
export class AppModule {}
Add new file 'src/pages/home/home.module.ts'.
touch src/pages/home/home.module.ts
Open and edit that file then add this lines of codes.
import { NgModule } from '@angular/core';
import { HomePage} from './home';
import { IonicPageModule } from 'ionic-angular';

@NgModule({
  declarations: [HomePage],
  imports: [IonicPageModule.forChild(HomePage)],
  entryComponents: [HomePage]
})
export class HomePageModule { }
Now, open and edit 'src/pages/home/home.ts' then add this import.
import { IonicPage } from 'ionic-angular';
Then add annotation of IonicPage before component annotation.
@IonicPage()
@Component({
  selector: 'page-home',
  templateUrl: 'home.html'
})
Next, open and edit 'src/app/app.component.ts' then remove import of HomePage and change reference to HomePage component to be 'HomePage' string.
import { Component } from '@angular/core';
import { Platform } from 'ionic-angular';
import { StatusBar } from '@ionic-native/status-bar';
import { SplashScreen } from '@ionic-native/splash-screen';

@Component({
  templateUrl: 'app.html'
})
export class MyApp {
  rootPage: string = 'HomePage';

  constructor(platform: Platform, statusBar: StatusBar, splashScreen: SplashScreen) {
    platform.ready().then(() => {
      // Okay, so the platform is ready and our plugins are available.
      // Here you can do any higher level native things you might need.
      statusBar.styleDefault();
      splashScreen.hide();
    });
  }
}
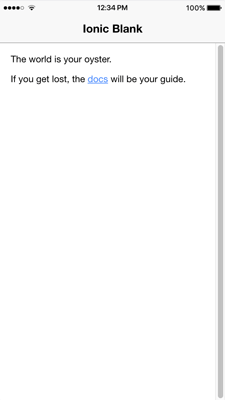
Now, run the app.
ionic serve -l
You should see this page in the browser.
2. Setup Google Maps and Google Maps Directions Service on Google Developer Console
Before setup Google Maps and Directions Service in the Ionic 3 and Angular 4 app, we have to make sure that Google Maps Javascript API and Google Maps Directions Service is enabled on Google Developer console.
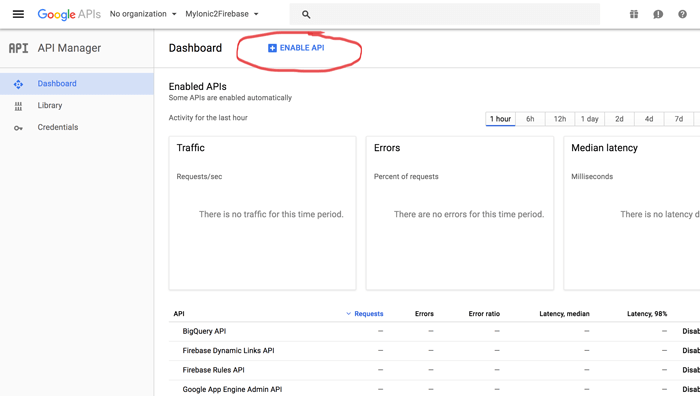
Open your browser then go to
Google Developer Console then click Enable API to enable Google Maps Javascript API and Google Maps Directions.
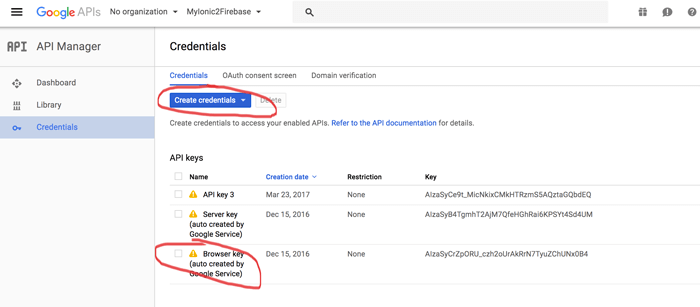
After enabling Google Maps and Google Maps Directions then Go to Credentials page by click on Credentials left the menu. Make sure that you have Browser Key, if not create Browser key by click on Create Credentials button.
Write down the key on a notepad or any text editor, because we will use it later on the app.
3. Implement Google Maps and Google Maps Directions Service on The Ionic 3 App
Now, it's time to implement Google Maps and Google Maps Directions Service on the Ionic 3 app. Starting with reference Javascript library of Google Maps in 'src/index.html'. Open and edit 'src/index.html' then add this script reference before the closing of the body tag.
<script src="https://maps.googleapis.com/maps/api/js?key=YOUR_API_KEY"></script>
Change 'YOUR_API_KEY' with the key that previously written in the text editor.
Next, open and edit 'src/pages/home/home.html' then replace all tags inside 'ion-content' with this lines of tags.
<ion-content>
  <div id="floating-panel">
    <b>Start: </b>
    <select [(ngModel)]="start" id="start" (change)="calculateAndDisplayRoute()">
      <option value="chicago, il">Chicago</option>
      <option value="st louis, mo">St Louis</option>
      <option value="joplin, mo">Joplin, MO</option>
      <option value="oklahoma city, ok">Oklahoma City</option>
      <option value="amarillo, tx">Amarillo</option>
      <option value="gallup, nm">Gallup, NM</option>
      <option value="flagstaff, az">Flagstaff, AZ</option>
      <option value="winona, az">Winona</option>
      <option value="kingman, az">Kingman</option>
      <option value="barstow, ca">Barstow</option>
      <option value="san bernardino, ca">San Bernardino</option>
      <option value="los angeles, ca">Los Angeles</option>
    </select><br>
    <b>End: </b>
    <select [(ngModel)]="end" id="end" (change)="calculateAndDisplayRoute()">
      <option value="chicago, il">Chicago</option>
      <option value="st louis, mo">St Louis</option>
      <option value="joplin, mo">Joplin, MO</option>
      <option value="oklahoma city, ok">Oklahoma City</option>
      <option value="amarillo, tx">Amarillo</option>
      <option value="gallup, nm">Gallup, NM</option>
      <option value="flagstaff, az">Flagstaff, AZ</option>
      <option value="winona, az">Winona</option>
      <option value="kingman, az">Kingman</option>
      <option value="barstow, ca">Barstow</option>
      <option value="san bernardino, ca">San Bernardino</option>
      <option value="los angeles, ca">Los Angeles</option>
    </select>
    </div>
    <div #map id="map"></div>
</ion-content>
The most important thing when using Google Maps in HTML is specifying the height of the map element 'DIV', otherwise the maps will never shown. For that, open and edit 'src/pages/home/home.scss' then make it like this.
page-home {
  #floating-panel {
    position: absolute;
    top: 10px;
    right: 5px;
    z-index: 5;
    background-color: #fff;
    padding: 5px;
    border: 1px solid #999;
    text-align: center;
    font-family: 'Roboto','sans-serif';
    line-height: 30px;
    padding-left: 10px;
  }
  #map {
    height: 100%;
  }
}
Open and edit 'src/pages/home/home.ts' then replace all codes with this codes.
import { Component, ViewChild, ElementRef } from '@angular/core';
import { IonicPage } from 'ionic-angular';
import { NavController } from 'ionic-angular';

declare var google;

@IonicPage()
@Component({
  selector: 'page-home',
  templateUrl: 'home.html'
})
export class HomePage {

  @ViewChild('map') mapElement: ElementRef;
  map: any;
  start = 'chicago, il';
  end = 'chicago, il';
  directionsService = new google.maps.DirectionsService;
  directionsDisplay = new google.maps.DirectionsRenderer;

  constructor(public navCtrl: NavController) {

  }

  ionViewDidLoad(){
    this.initMap();
  }

  initMap() {
    this.map = new google.maps.Map(this.mapElement.nativeElement, {
      zoom: 7,
      center: {lat: 41.85, lng: -87.65}
    });

    this.directionsDisplay.setMap(this.map);
  }

  calculateAndDisplayRoute() {
    this.directionsService.route({
      origin: this.start,
      destination: this.end,
      travelMode: 'DRIVING'
    }, (response, status) => {
      if (status === 'OK') {
        this.directionsDisplay.setDirections(response);
      } else {
        window.alert('Directions request failed due to ' + status);
      }
    });
  }

}
4. Run Ionic 3 App on The Browser and Device
To run the Ionic 3 app on the browser, type this command.
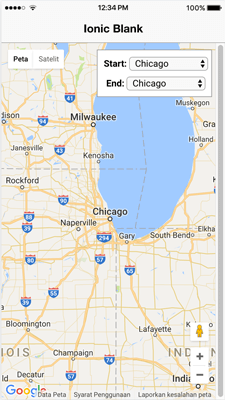
ionic serve -l
You should see this page.
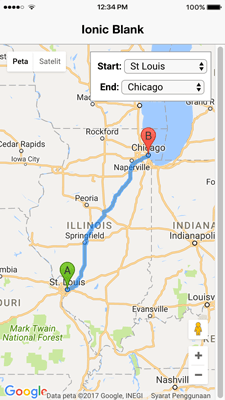
When you change to start, end or both select box, the map should show directions like this.
To run the Ionic 3 app on the device, don't forget to re-add platforms.
ionic platform rm ios
ionic platform add ios
ionic platform rm android
ionic platform add android
Finally, run the Ionic 3 app on the device.
ionic run android
or
ionic run ios
If you see same as the browser, then everything is working properly.
Thanks!


 Step 8 : After that Type cd AngularDemo(Porject name)
 Step 9: Type ng serve --open as shown below :
 Step 10 : Output is as shown in below and this is our first angular app
 Step 12 : Download and install visual studio code from https://code.visualstudio.com/download for editor.We can do angular in simple notepad but here we use visual studio code which helps us with all automation for HTML, JavaScript, Typescript and so on.
 Angular project in visual studio code
 Step 13: Now go to src->app->app.component.ts and change title to "Hello Angular". as shown below

 Step 16 : Now new output is as shown below and our angular app run on 4200 port but we can change this port.


 Angular project in visual studio code