Tuesday 26 December 2017

Ionic 3 Google Plus Authentication

This is step by step tutorial Ionic 3 and Angular 4 app authentication with Ionic 3 native Google plus plugin. Before started with the app, there's a setup of Google Plus via Google Developer Console.

1. Google API Setup

The first thing to setup from Google is generating configuration files for iOS and Android. For iOS, open your browser then point to this address then log in with your google account.
 Create the new iOS app from there by filling the form. Enter app name and iOS bundle ID, our example is "MyGooglePlusAuth" for app name and "com.mygoogleplusauth" for iOS bundle ID. Please, remember that iOS bundle ID will use in Ionic 3 config later and that would be easy if we use the same bundle ID for Android.
Leave other option to default then click "Choose and Configure Service" button.
Click "ENABLE GOOGLE SIGN IN" button. After that, click "Generate configuration file" button. Click the button "Download GoogleService-info.plist", we will use this files later on the Ionic 3 project.
Next, we have to generate Google service configuration file for Android too. Go to this address then choose app name that previously created. File Android package name same as iOS bundle ID "com.mygoogleplusauth".
 Click "Choose and configure service" button. Before enabling this service, we have to create new SHA-1 signing certificate which uses for release and debug. Open terminal or command line, then type this command to create certificate fingerprint for debugging.
keytool -exportcert -list -v \
> -alias androiddebugkey -keystore ~/.android/debug.keystore
or from the command line (windows).
keytool -exportcert -list -v \
-alias androiddebugkey -keystore %USERPROFILE%\.android\debug.keystore
Enter the password, by default for "debug.keystore is "android".
Alias name: androiddebugkey
Creation date: Nov 8, 2015
Entry type: PrivateKeyEntry
Certificate chain length: 1
Certificate[1]:
Owner: CN=Android Debug, O=Android, C=US
Issuer: CN=Android Debug, O=Android, C=US
Serial number: 5e9752f4
Valid from: Sun Nov 08 22:25:34 WIB 2015 until: Tue Oct 31 22:25:34 WIB 2045
Certificate fingerprints:
     MD5:  0A:2D:96:6B:B8:84:F7:37:2E:7E:83:09:43:BB:B7:D4
     SHA1: 2B:52:02:F0:82:94:34:68:FC:B6:DD:81:1D:3A:66:D7:57:3B:B9:11
     SHA256: B1:40:EB:9D:03:50:A2:0F:F2:D4:1B:6D:AA:F6:F9:6A:57:52:B0:70:5A:3C:87:9E:15:F0:BE:7C:90:00:DA:51
     Signature algorithm name: SHA256withRSA
     Version: 3

Extensions:

#1: ObjectId: 2.5.29.14 Criticality=false
SubjectKeyIdentifier [
KeyIdentifier [
0000: C0 3A D3 06 65 23 89 A1   5D 80 CC 55 88 D8 BD 23  .:..e#..]..U...#
0010: 80 6E 67 01                                        .ng.
]
]
Copy Certificate fingerprints SHA1 value then paste in "Android Signing Certificate SHA-1" of Google Developer to enable Google Sign-In service.
Next, just click the "CLOSE" button and not necessary to download generated configuration files for Android only. If you plan to use your app in production/published, change the certificate fingerprint with this command.
keytool -exportcert -list -v \
-alias <your-key-name> -keystore <path-to-production-keystore>
Keystore using same as your Keystore of build release for publishing. Then edit manually in Google developer console. Choose credentials from side menu then find "OAuth 2.0 client IDs" for Android. You can replace the SHA1 certificate fingerprint with production/release key.

2. Create Ionic 3 App

As usually in almost all of our tutorial, we create an app from scratch. Back to the terminal or command line then go to your apps folder. Type this command to create new Ionic 3 app.
ionic start mygoogleplusauth blank --v2
Go to the newly created app folder.
cd mygoogleplusauth
Now, open and edit config.xml in the root of app folder. Replace app id on the <widget> tag to match Android package or iOS bundle ID that previously created on the Google Developer page.
<widget id="com.mygoogleplusauth" version="0.0.1" xmlns="http://www.w3.org/ns/widgets" xmlns:cdv="http://cordova.apache.org/ns/1.0">
Run the app, to make sure everything still on the path.
ionic serve -l
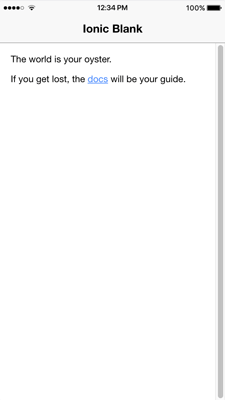
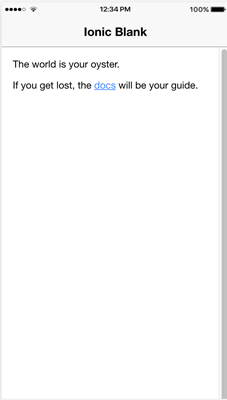
If you see the Ionic 3 blank app page below then we ready to continue.
Ionic 3 Google Plus Authentication Tutorial - Ionic Blank App
For now, stop the app by push control+c at the same time.


3. Setup Ionic 3 Native Google Plus Plugin

To install Ionic 3 native Google Plus plugin you can refer to the official Ionic Framework documentation. Back to the terminal or command line. Type this command to install Cordova plugin and ionic module of Google Plus plugin. You can find "REVERSED_CLIENT_ID" on generated "GoogleService-info.plist" file.
ionic plugin add cordova-plugin-googleplus --variable REVERSED_CLIENT_ID=myreversedclientid
npm install --save @ionic-native/google-plus
If you see warning like below then we should update the "@ionic-native/core" module.
npm WARN @ionic-native/google-plus@3.6.1 requires a peer of @ionic-native/core@^3.6.1 but none was installed.
Update the @ionic-native/core module by type this commands.
npm uninstall --save @ionic-native/core
npm install --save @ionic-native/core@^3.6.1


4. Add Google Login Button on The Page

To implement Google authentication, we put Google login button to trigger Google Plus authentication. Open and edit "src/pages/home/home.ts" then replace all codes with this.
import { Component } from '@angular/core';
import { NavController } from 'ionic-angular';
import { GooglePlus } from '@ionic-native/google-plus';

@Component({
  selector: 'page-home',
  templateUrl: 'home.html',
  providers: [GooglePlus]
})
export class HomePage {

  displayName: any;
  email: any;
  familyName: any;
  givenName: any;
  userId: any;
  imageUrl: any;

  isLoggedIn:boolean = false;

  constructor(public navCtrl: NavController, private googlePlus: GooglePlus) {

  }

  login() {
    this.googlePlus.login({})
      .then(res => {
        console.log(res);
        this.displayName = res.displayName;
        this.email = res.email;
        this.familyName = res.familyName;
        this.givenName = res.givenName;
        this.userId = res.userId;
        this.imageUrl = res.imageUrl;

        this.isLoggedIn = true;
      })
      .catch(err => console.error(err));
  }

  logout() {
    this.googlePlus.logout()
      .then(res => {
        console.log(res);
        this.displayName = "";
        this.email = "";
        this.familyName = "";
        this.givenName = "";
        this.userId = "";
        this.imageUrl = "";

        this.isLoggedIn = false;
      })
      .catch(err => console.error(err));
  }
}
Next, open and edit "src/pages/home/home.ts" then replace all codes with this.
<ion-header>
  <ion-navbar>
    <ion-title>
      Ionic Blank
    </ion-title>
  </ion-navbar>
</ion-header>

<ion-content padding>
  <div *ngIf="isLoggedIn; else loginTemplate">
    <h1>Welcome, {{displayName}}!</h1>
    <p>Email: {{email}}<br>
      Family Name: {{familyName}}<br>
      Given Name: {{givenName}}<br>
      User ID: {{userId}}</p>
    <p><ion-avatar item-left>
        <img src="{{imageUrl}}">
       </ion-avatar></p>
    <p><button ion-button (click)="logout()">Logout From Google</button></p>
  </div>

  <ng-template #loginTemplate>
    <h1>Please Login to see your Google Account Information</h1>
    <p><button ion-button (click)="login()">Login With Google</button></p>
  </ng-template>
</ion-content>
5. Run Ionic 3 App on Android and iOS Device
For android is really easy. Before run make sure we have to add Android platform.
ionic platform add android
Then run the app on Android device, make sure you have connected your device to your computer.
ionic run android
Ionic 3 Google Plus Authentication Tutorial - Ionic App with Google Login
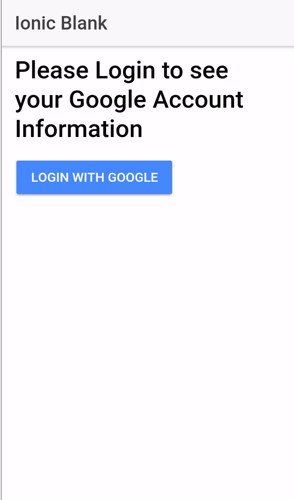
After clicking the button "Login With Google", it will show a dialog to choose your existing google credentials on the device. Choose one of it then it will back to the app with Google user detail.

 For iOS type this command.
ionic build ios
After the finished build, open the file with extension ".xcodeproj" on "/platforms/ios" folder using XCode.

Click/highlight project name on the left pane, then choose Capabilities. Turn on Keychain Sharing, for that you have to use your Apple developer account.

Now, we can run the app to an iOS device from XCode, make sure there's a Google account on the device.

Tuesday 25 July 2017

IONIC 3, ANGULAR 4 AND GOOGLE MAPS DIRECTIONS SERVICE


After play around with new Ionic 3 and Angular 4 in the previous tutorial, now we started the step by step tutorial of Ionic 3, Angular 4 and Google Maps Directions Service using Google Maps Javascript API.

1. Create New Ionic 3 and Angular 4 App

As usually, we are starting our tutorial from scratch. We assume that your computer or environment already have Node.js installed. Now, open the terminal or Node.js command line then type this command to install new Ionic 3 and Cordova.
sudo npm install -g cordova ionic
Now, go to project folders then type this command to make a new Ionic 3 App.
ionic start ionic3-googlemaps-directions blank --v2
Go to the newly created app folder.
cd ionic3-googlemaps-directions
This time we will modify few default files to implements lazy loading pages. Open and edit 'src/app/app.module.ts' then remove imports, NgModule-declaration and NgModule-entryComponents of page Home. So, this file will looks like this.
import { BrowserModule } from '@angular/platform-browser';
import { ErrorHandler, NgModule } from '@angular/core';
import { IonicApp, IonicErrorHandler, IonicModule } from 'ionic-angular';
import { SplashScreen } from '@ionic-native/splash-screen';
import { StatusBar } from '@ionic-native/status-bar';

import { MyApp } from './app.component';

@NgModule({
  declarations: [
    MyApp
  ],
  imports: [
    BrowserModule,
    IonicModule.forRoot(MyApp)
  ],
  bootstrap: [IonicApp],
  entryComponents: [
    MyApp
  ],
  providers: [
    StatusBar,
    SplashScreen,
    {provide: ErrorHandler, useClass: IonicErrorHandler}
  ]
})
export class AppModule {}
Add new file 'src/pages/home/home.module.ts'.
touch src/pages/home/home.module.ts
Open and edit that file then add this lines of codes.
import { NgModule } from '@angular/core';
import { HomePage} from './home';
import { IonicPageModule } from 'ionic-angular';

@NgModule({
  declarations: [HomePage],
  imports: [IonicPageModule.forChild(HomePage)],
  entryComponents: [HomePage]
})
export class HomePageModule { }
Now, open and edit 'src/pages/home/home.ts' then add this import.
import { IonicPage } from 'ionic-angular';
Then add annotation of IonicPage before component annotation.
@IonicPage()
@Component({
  selector: 'page-home',
  templateUrl: 'home.html'
})
Next, open and edit 'src/app/app.component.ts' then remove import of HomePage and change reference to HomePage component to be 'HomePage' string.
import { Component } from '@angular/core';
import { Platform } from 'ionic-angular';
import { StatusBar } from '@ionic-native/status-bar';
import { SplashScreen } from '@ionic-native/splash-screen';

@Component({
  templateUrl: 'app.html'
})
export class MyApp {
  rootPage: string = 'HomePage';

  constructor(platform: Platform, statusBar: StatusBar, splashScreen: SplashScreen) {
    platform.ready().then(() => {
      // Okay, so the platform is ready and our plugins are available.
      // Here you can do any higher level native things you might need.
      statusBar.styleDefault();
      splashScreen.hide();
    });
  }
}
Now, run the app.
ionic serve -l
You should see this page in the browser.
Step by Step Tutorial of Ionic 3, Angular 4 and Google Maps Directions Service - Ionic 3 Home Page

2. Setup Google Maps and Google Maps Directions Service on Google Developer Console
Before setup Google Maps and Directions Service in the Ionic 3 and Angular 4 app, we have to make sure that Google Maps Javascript API and Google Maps Directions Service is enabled on Google Developer console.
Open your browser then go to Google Developer Console then click Enable API to enable Google Maps Javascript API and Google Maps Directions.
Step by Step Tutorial of Ionic 3, Angular 4 and Google Maps Directions Service - Google Developer Console
After enabling Google Maps and Google Maps Directions then Go to Credentials page by click on Credentials left the menu. Make sure that you have Browser Key, if not create Browser key by click on Create Credentials button.
Step by Step Tutorial of Ionic 3, Angular 4 and Google Maps Directions Service - Create Credentials
Write down the key on a notepad or any text editor, because we will use it later on the app.

3. Implement Google Maps and Google Maps Directions Service on The Ionic 3 App
Now, it's time to implement Google Maps and Google Maps Directions Service on the Ionic 3 app. Starting with reference Javascript library of Google Maps in 'src/index.html'. Open and edit 'src/index.html' then add this script reference before the closing of the body tag.
<script src="https://maps.googleapis.com/maps/api/js?key=YOUR_API_KEY"></script>
Change 'YOUR_API_KEY' with the key that previously written in the text editor.
Next, open and edit 'src/pages/home/home.html' then replace all tags inside 'ion-content' with this lines of tags.
<ion-content>
  <div id="floating-panel">
    <b>Start: </b>
    <select [(ngModel)]="start" id="start" (change)="calculateAndDisplayRoute()">
      <option value="chicago, il">Chicago</option>
      <option value="st louis, mo">St Louis</option>
      <option value="joplin, mo">Joplin, MO</option>
      <option value="oklahoma city, ok">Oklahoma City</option>
      <option value="amarillo, tx">Amarillo</option>
      <option value="gallup, nm">Gallup, NM</option>
      <option value="flagstaff, az">Flagstaff, AZ</option>
      <option value="winona, az">Winona</option>
      <option value="kingman, az">Kingman</option>
      <option value="barstow, ca">Barstow</option>
      <option value="san bernardino, ca">San Bernardino</option>
      <option value="los angeles, ca">Los Angeles</option>
    </select><br>
    <b>End: </b>
    <select [(ngModel)]="end" id="end" (change)="calculateAndDisplayRoute()">
      <option value="chicago, il">Chicago</option>
      <option value="st louis, mo">St Louis</option>
      <option value="joplin, mo">Joplin, MO</option>
      <option value="oklahoma city, ok">Oklahoma City</option>
      <option value="amarillo, tx">Amarillo</option>
      <option value="gallup, nm">Gallup, NM</option>
      <option value="flagstaff, az">Flagstaff, AZ</option>
      <option value="winona, az">Winona</option>
      <option value="kingman, az">Kingman</option>
      <option value="barstow, ca">Barstow</option>
      <option value="san bernardino, ca">San Bernardino</option>
      <option value="los angeles, ca">Los Angeles</option>
    </select>
    </div>
    <div #map id="map"></div>
</ion-content>
The most important thing when using Google Maps in HTML is specifying the height of the map element 'DIV', otherwise the maps will never shown. For that, open and edit 'src/pages/home/home.scss' then make it like this.
page-home {
  #floating-panel {
    position: absolute;
    top: 10px;
    right: 5px;
    z-index: 5;
    background-color: #fff;
    padding: 5px;
    border: 1px solid #999;
    text-align: center;
    font-family: 'Roboto','sans-serif';
    line-height: 30px;
    padding-left: 10px;
  }
  #map {
    height: 100%;
  }
}
Open and edit 'src/pages/home/home.ts' then replace all codes with this codes.
import { Component, ViewChild, ElementRef } from '@angular/core';
import { IonicPage } from 'ionic-angular';
import { NavController } from 'ionic-angular';

declare var google;

@IonicPage()
@Component({
  selector: 'page-home',
  templateUrl: 'home.html'
})
export class HomePage {

  @ViewChild('map') mapElement: ElementRef;
  map: any;
  start = 'chicago, il';
  end = 'chicago, il';
  directionsService = new google.maps.DirectionsService;
  directionsDisplay = new google.maps.DirectionsRenderer;

  constructor(public navCtrl: NavController) {

  }

  ionViewDidLoad(){
    this.initMap();
  }

  initMap() {
    this.map = new google.maps.Map(this.mapElement.nativeElement, {
      zoom: 7,
      center: {lat: 41.85, lng: -87.65}
    });

    this.directionsDisplay.setMap(this.map);
  }

  calculateAndDisplayRoute() {
    this.directionsService.route({
      origin: this.start,
      destination: this.end,
      travelMode: 'DRIVING'
    }, (response, status) => {
      if (status === 'OK') {
        this.directionsDisplay.setDirections(response);
      } else {
        window.alert('Directions request failed due to ' + status);
      }
    });
  }

}
4. Run Ionic 3 App on The Browser and Device
To run the Ionic 3 app on the browser, type this command.
ionic serve -l
You should see this page.
Step by Step Tutorial of Ionic 3, Angular 4 and Google Maps Directions Service - Google Maps
When you change to start, end or both select box, the map should show directions like this.
Step by Step Tutorial of Ionic 3, Angular 4 and Google Maps Directions Service - Directions
To run the Ionic 3 app on the device, don't forget to re-add platforms.
ionic platform rm ios
ionic platform add ios
ionic platform rm android
ionic platform add android
Finally, run the Ionic 3 app on the device.
ionic run android
or
ionic run ios
If you see same as the browser, then everything is working properly.

Thanks!

Saturday 22 July 2017

IONIC 3 AND ANGULAR 4 MULTI LEVEL ACCORDION MENU EXAMPLE

This is an example of a multi-level accordion menu with dynamic data using latest Ionic 3 and Angular 4.

1. Create New Ionic 3 and Angular 4 Side Menu App

We will start this tutorial by creating new Ionic 3 and Angular 4 app. This time we will use generated side menu app. Open and edit the terminal or Node.js command line then type this command.
ionic start ionic3-accordion-menu sidemenu --v2
That command will create new Ionic 3 app with the name 'ionic3-accordion-menu' using default template 'sidemenu'. Go to the newly created app folder.
cd ionic3-accordion-menu
Run the Ionic 3 app on the browser.
ionic serve -l
You should see this side menu.
Ionic 3 and Angular 4 Multi Level Accordion Menu Example - Side Menu
Right now, we will skip lazy loading pages configuration because we will focus only on the multilevel accordion menu. You can find more about lazy loading and Ionic 3 getting started here.


2. Create Nested Array of Objects

We have to create nested Array of objects which it's contains multilevel arrays. Create a new folder and JSON file in asset folder.
mkdir src/assets/data
touch src/assets/data/menus.json
Open and edit 'menus.json' then add this lines of data.
[
  {
    "category":"PC",
    "subs": [
      {
        "subcategory":"Processor",
        "manufactures": [
          {
            "manufacture":"Intel"
          },
          {
            "manufacture":"AMD"
          }
        ]
      },
      {
        "subcategory":"Motherboard",
        "manufactures": [
          {
            "manufacture":"Asus"
          },
          {
            "manufacture":"AMD"
          },
          {
            "manufacture":"GigaByte"
          },
          {
            "manufacture":"Intel"
          }
        ]
      },
      {
        "subcategory":"Memory",
        "manufactures": [
          {
            "manufacture":"Visipro"
          },
          {
            "manufacture":"Crucial"
          },
          {
            "manufacture":"VenomRX"
          }
        ]
      }
    ]
  },
  {
    "category":"Laptop",
    "subs": [
      {
        "subcategory":"Notebook",
        "manufactures": [
          {
            "manufacture":"Lenovo"
          },
          {
            "manufacture":"Dell"
          }
        ]
      },
      {
        "subcategory":"Netbook",
        "manufactures": [
          {
            "manufacture":"Lenovo"
          },
          {
            "manufacture":"Dell"
          },
          {
            "manufacture":"Acer"
          },
          {
            "manufacture":"HP"
          }
        ]
      }
    ]
  },
  {
    "category":"Printer",
    "subs": [
      {
        "subcategory":"Laserjet",
        "manufactures": [
          {
            "manufacture":"HP"
          },
          {
            "manufacture":"Brother"
          },
          {
            "manufacture":"Canon"
          },
          {
            "manufacture":"Samsung"
          }
        ]
      },
      {
        "subcategory":"Deskjet",
        "manufactures": [
          {
            "manufacture":"HP"
          },
          {
            "manufacture":"Canon"
          },
          {
            "manufacture":"Epson"
          }
        ]
      }
    ]
  }
]

3. Create and Call Service/Provider for Accessing Data
To access JSON data we have to create new service or provider to keep app modular. Type this command to create it.
ionic g provider DataService
Open and edit 'src/providers/data-service.ts' add 'Response' to 'Http' import.
import { Http, Response } from "@angular/http";
Create this function for call JSON data.
getMenus(){
  return this.http.get('assets/data/menus.json')
   .map((response:Response)=>response.json());
}
Register this service in 'app.module.ts' by open and edit 'src/app/app.module.ts' then add this import.
import { HttpModule } from '@angular/http';
import { DataService } from '../providers/data-service';
Add 'HttpModule' in '@NgModule' imports.
...
imports: [
  BrowserModule,
  IonicModule.forRoot(MyApp),
],
...
Add 'DataService' in '@NgModule' providers.
...
providers: [
  StatusBar,
  SplashScreen,
  {provide: ErrorHandler, useClass: IonicErrorHandler},
  DataService
]
...
Because menu holds by component, we have to edit it to call data for the menu from service/provider. Open and edit 'src/app/app.component.ts' then add this import.
import { DataService } from '../providers/data-service';
Replace this line.
pages: Array<{title: string, component: any}>;
With this.
pages: any;
Now, inject 'DataService' in constructor parameter and add this function for calling JSON data inside of constructor.
constructor(public platform: Platform, public statusBar: StatusBar, public splashScreen: SplashScreen, public dataService: DataService) {
  this.initializeApp();

  this.dataService.getMenus()
    .subscribe((response)=> {
        this.pages = response;
        console.log(this.pages);
    });

}


4. Create Multilevel Accordion Menu

Now, is the point. Creating multilevel Accordion Menu with Ionic 3 and Angular 4. Open and edit 'src/app/app.html' the add this lines of codes inside '<ion-content>'.
<ion-content>
  <ion-list>
    <ion-item *ngFor="let p of pages" text-wrap>
      {{p.category}}
      <ion-list>
        <ion-item *ngFor="let s of p.subs" text-wrap>
          {{s.subcategory}}
          <ion-list>
            <ion-item *ngFor="let m of s.manufactures" text-wrap>
              {{m.manufacture}}
            </ion-item>
          </ion-list>
        </ion-item>
      </ion-list>
    </ion-item>
  </ion-list>
</ion-content>
After we re-run the Ionic 3 app, the menu should look like this.
Ionic 3 and Angular 4 Multi Level Accordion Menu Example - Multi Level Menu
As you can see, there is 3 level of the menu. For that, we have to make accordion to hide child menus. Open and edit 'src/app/app.component.ts' then declare this variable.
showLevel1 = null;
showLevel2 = null;
Create new functions for toggle show/hide level 2 and level 3 of the menu.
toggleLevel1(idx) {
  if (this.isLevel1Shown(idx)) {
    this.showLevel1 = null;
  } else {
    this.showLevel1 = idx;
  }
};

toggleLevel2(idx) {
  if (this.isLevel2Shown(idx)) {
    this.showLevel1 = null;
    this.showLevel2 = null;
  } else {
    this.showLevel1 = idx;
    this.showLevel2 = idx;
  }
};
Also, create the function for check if level 2 and 3 is shown or hidden.
isLevel1Shown(idx) {
  return this.showLevel1 === idx;
};

isLevel2Shown(idx) {
  return this.showLevel2 === idx;
};
Now, open and edit 'src/app/app.html' then replace all list with this list.
<ion-content>
  <ion-list>
    <ion-item *ngFor="let p of pages; let i=index" text-wrap (click)="toggleLevel1('idx'+i)" [ngClass]="{active: isLevel1Shown('idx'+i)}">
      <h4>
        {{p.category}}
        <ion-icon color="success" item-right [name]="isLevel1Shown('idx'+i) ? 'arrow-dropdown' : 'arrow-dropright'"></ion-icon>
      </h4>
      <ion-list *ngIf="isLevel1Shown('idx'+i)">
        <ion-item *ngFor="let s of p.subs; let i2=index" text-wrap (click)="toggleLevel2('idx'+i+'idx'+i2)" [ngClass]="{active: isLevel2Shown('idx'+i+'idx'+i2)}">
          <h4>
            {{s.subcategory}}
            <ion-icon color="success" item-right [name]="isLevel2Shown('idx'+i+'idx'+i2) ? 'arrow-dropdown' : 'arrow-dropright'"></ion-icon>
          </h4>
          <ion-list *ngIf="isLevel2Shown('idx'+i+'idx'+i2)">
            <ion-item *ngFor="let m of s.manufactures" text-wrap>
              {{m.manufacture}}
            </ion-item>
          </ion-list>
        </ion-item>
      </ion-list>
    </ion-item>
  </ion-list>
</ion-content>
Then re-run the Ionic 3 app and see the results in the browser.
Ionic 3 and Angular 4 Multi Level Accordion Menu Example - Multi Level Accordion Menu
That it's for now, we are leaving this tutorial without action for click on each menu item. We know this isn't a best and simple way for creating multiple accordions. For that, we need suggestions and best algorithm to make this tutorial better and useful for everyone.

Wednesday 28 June 2017

Ionic 3 and Angular 4 connection with a REST web service


Announcement of Ionic 3

Wait, the Ionic 2 has just been launched a few months ago, is not it? Do not worry! Ionic 3 is Ionic 2 with some break changes. Like Angular, which arrives at its 4th version a few days ago, which means that when some updates require structural changes, the number of major versions increases accordingly.
This version comes with support for Angular 4 and an experimental support for Lazy Loading. 
More details on the Ionic blog:  http://blog.ionic.io/ionic-3-0-has-arrived/ 

Create desktop applications with Ionic Split Pane and Grid


Create applications that work on a mobile, tablet, and now desktop application with the new Ionic Split Pane and Grid controls. We are getting closer to our vision of an ionic application running wherever your users are, and these two components are major pieces of this puzzle.

Discover  Split Pane  and the new  Responsive Grid ! 
The Ionic 3 is still in beta. Before you start, you have to make a checklist.

- Node.js already installed with the command prompt.

- Ionic must be updated with this command.
npm install -g ioni

Create an Ionic 3 application

Always like the previous version of Ionic. Type this command to create a new Ionic 3 application.

ionic start ionic3 --v2
This command always uses the prefix "--v2", but do not worry if you check the dependencies in "package.json", you will see the difference.
Now you have to place yourself, with the command prompt, in the folder of your project (ionic3) and run on the browser after typing this command.
ionic serve -l

You are going to have an ionic 3 project with 3 tabs: Home, about and contact.

In this project we will try to display a list of countries that exist in this link which displays the data in JSON format:  https://restcountries.eu/rest/v2/all 

Ionic 3: connection with a REST web service


First, to be able to access a REST API, we must create a service or a Provider by this command.

ionic g provider rest
You will get a folder provider in which there is a file rest.ts
Open this file and put the following code in this file:
Import { Injectable } from '@ angular / core' ;
Import { Http } from '@ angular / http' ;
Import 'rxjs / add / operator / map' ;
@ Injectable ()
Export class Rest
{
Constructor ( public http : Http )
{
This . Http = http ;
}
GetAll ()
{
Return this . Http . Get ( 'https://restcountries.eu/rest/v2/all' ). Map ( res => res . Json ());
}
}
We need to register "HttpModule" in "app.module.ts", add this import to "app.module.ts".
import { HttpModule } from '@angular/http';
In the @NgModule imports section, add "HttpModule" so that it looks like this.
imports: [
  BrowserModule,HttpModule,
  IonicModule.forRoot(MyApp)
  ],
Always in "app.module.ts", save the Provider "Rest" first.
import { Rest } from '../providers/rest';
In the @NgModule providers section, add "Rest".
providers: [
  StatusBar,
  SplashScreen,
  {provide: ErrorHandler, useClass: IonicErrorHandler}, Rest
 ]
Now it's time to display the list of countries in the Home page. First, we need to change "home.ts" and put this code.
Import { Component } from '@ angular / core' ;
Import { NavController } from 'ionic-angular' ;
Import { Rest } from '../../providers/rest' ;
@ Component ({
Selector: 'page-home' ,
TemplateUrl: 'home.html'
})
Export class HomePage {
Items : string [];
Constructor ( public navCtrl : NavController , public rest : Rest ) {
This . GetPays ();
}
GetPays ()
{
This . Rest . GetAll (). Subscribe ( res => {
This . Items = res ;
});
}
}
Now change the code of the home.html file and put this code:
< Ion-header >
< Ion-navbar >
< Title-title > Home </ ion-title >
</ Ion-navbar >
</ Ion-header >
< Ion-content padding >
< Ion-list >
< Ion-item * ngFor = "let item of items" >
< Ion-avatar item-left >
< Img src = "{{item.flag}}" >
</ Ion-avatar >
< H2 > Country: </ h2 > < h2 > {{item.name}} </ h2 >
< P > Capital: {{item.capital}}, Region: {{item.region}} </ p >
</ Ion-item >
</ Ion-list >
</ Ion-content >