Monday 2 April 2018

Create Your First Angular 5 Project Step By Step


In this article, I will explain How to Create Project in Angular 5.

Step 1: Download nodeJs from https://nodejs.org/en/ and install it.

Step 2 : After installing nodeJs .Open cmd by run as administrator and type node -v for node version check as shown below :
Step 2: Type npm -v  for npm version check as shown below :
Step 3 : Install typescript using  "npm install typescript -g”.
The “-g” command says that you can execute typescript command from any folder.Typescript is a javascript open source framework so the best way to get it installed is by using “npm”.

Step 4 : Type tsc -v for typescript version check
Step 5 : Type npm install -g @angular/cli as shown below.The Angular CLI is a command line interface tool that can create a project, add files, and perform a variety of ongoing development tasks such as testing, bundling, and deployment
Step 6 : Type ng -v for checking Angular  CLI version

Step 7 : Go to location where you want to create project .Here i have  i want to create project inside DIT folder of my E drive  so Type ng new AngularDemo(Project Name) and hit enter as shown in below :It will some time...
Step 8 : After that Type cd AngularDemo(Porject name)
as shown below :
Step 9: Type ng serve --open as shown below :
Step 10 : Output is as shown in below and this is our first angular  app

Step 11 : Press ctrl+c and type y and enter as shown below :
Step 12 : Download and install visual studio code from https://code.visualstudio.com/download for editor.We can do angular in simple notepad but here we use visual studio code which helps us with all automation for HTML, JavaScript, Typescript and so on.
Step 13 :  After installation of visual studio code .go to cmd and open as administrator and type code .(dot)  .It will open your angular project in visual code editor.
Angular project in visual studio code 
Step 13: Now go to src->app->app.component.ts and change  title to "Hello Angular". as shown below 

Step 14 : Now go to src->app->app.component.html and change <P>{{title}}</P>
as Shown below

Step 15 : Now again go to cmd and open run as administrator and type ng serve --open  again
Step 16 : Now new output is as shown below and our angular app run on 4200 port but we can change this port.

Sunday 27 August 2017

build your own React Native applications with Angular 2

Starting from this, we pushed the idea forward and are now pleased to share a library to build your own React Native applications with Angular 2 for iOS and Android:


The TodoMVC of the Kitchen Sink demo application in iOS (left) and Android (right)

It’s all about cross-platform apps

The strategy of Angular 2 is to provide a single platform that developers can use to target all channels and devices:


With a similar intent, React Native was created by the React team to provide a unified developer experience for web and mobile application development, with JS and React. Here, applications render native UI as they directly use actual UI components - i.e. there is no Cordova or WebView involved.

Integrating Angular 2 and React Native together is a great solution for the mobile application channel!

A React Native renderer for Angular 2

That’s exactly what the library really is - a renderer which glues Angular 2 and React Native together (see the technical details below). With it, developers can create applications where the best of both world can be used in terms of features and tools.
They key is that, in such applications, the Angular 2 part is just standard, with the usual directives, modules, dependency injection, change detection, etc.
So all the skills and code can be shared to do cross-platform development!


Well, to be honest, they are almost standard, because there is no such thing as HTML or CSS in a native application. Instead, in their templates, developers will take advantage of the provided ambient components as basic bricks to build applications:
  • Image, Picker, RefreshControl, ScrollView, Switch, Text, TextInput, View, WebView - that are common to both Android and iOS
  • Android specific: DrawerLayout, PagerLayout, ProgressBar, Toolbar
  • iOS specific: ActivityIndicator, DatePicker, MapView, Navigator, ProgressView, SegmentedControl, Slider, TabBar
Instead of CSS, React Native comes with its own style system, where flexbox is available.

Moreover, to guarantee a great developer experience, the library ensures that all Angular 2 features are usable, including the router and http modules.
It also provides advanced gestures recognition based on Hammer.js. Reacting to a tap, a swipe or a pinch in an application is as easy as reacting to a click in a website.
Finally, it also integrates the APIs of React Native, making sure they all work seamlessly with zone.js, e.g. network, geolocation, async storage, clipboard, etc.

Try it today!

To start a new project quickly, you should have a look at the angular2-react-native-seed project on Github and read the documentation.
From the react-native-renderer itself, you can also build and play with demo applications for both Android and iOS. They showcase all components and features available.

How does it work?

Here is the full picture where the blue parts are from React Native, and the red ones from Angular 2:
Architecture of a React Native application with Angular 2


Technically, a React Native application runs 3 threads. The main one is a JS thread where any JS code can be executed; it controls the full application. The other two run the native part of the application: the standard main UI thread, and a “shadow” thread where measuring and layout occur.
The native and JS sides communicate in both directions through a bridge. This means that there are Bridge JS APIs to access native features (network, geolocation, clipboard, etc) and  manipulate native elements, and that native events are sent back to the JS side.
You can read more about this architecture in React Native Scheduling by Andy Street.

Angular 2 fully decouples the rendering from the core of the application where live all the components, directives, dependency injection, change detection, etc. By default it renders to DOM, but makes it possible to create custom renderers. This is explained in depth in Rendering in Angular 2 by Matias Niemelä.

So, let’s take a step back and put all pieces together:
a React Native application…
...in which an Angular 2 application runs in the JS thread…
...with a custom renderer that uses the JS APIs to create a native UI.

That’s it!

What’s next?

We have just entered the alpha phase which is necessary to get first feedbacks, fix bugs and implement more features.

Then, as next steps, we will look at:

  • Animations: Angular 2 will have a brand new animation module. At the same time, the React Native team is working hard to push animations on the native side to get more performance. These two need to work together to bring awesome animations.
  • Extensibility: React Native provides a subset of the features and components that exist in the Native world. It can be extended and there is already an active community publishing packages. This has to be made available in the Angular 2 context as well.
  • Universal Windows Platform: Microsoft and Facebook announced at F8 2016 that it will be supported in React Native.
  • And performance: it is great today but we want to make it lightning-fast.

Thursday 3 August 2017

Getting started with Angular 2


Since Angular2 RC2 introduced a complete new form modules(search @angular/forms in https://npmjs.com), it allow you use template driven form like Angular 1.x, it also support the programatic approach.
In the previous posts, we have create some components, and use HTTP client to fetch data from backend APIs. In this post, we will focus on form submission.

Add Post

new-post.component.ts:
import { Component, OnInit, OnDestroy } from '@angular/core';
import { Router } from '@angular/router';
import { Subscription } from 'rxjs/Subscription';
import { Post } from '../core/post.model';
import { PostService } from '../core/post.service';

@Component({
  selector: 'app-new-post',
  templateUrl: './new-post.component.html',
  styleUrls: ['./new-post.component.css']
})
export class NewPostComponent implements OnInit, OnDestroy {
  data = { title: '', home: '' };
  sub: Subscription;

  constructor(private postService: PostService, private router: Router) { }

  save() {
    console.log('saving post data!' + this.data);
    this.postService
      .savePost(this.data)
      .subscribe(res => {
        this.router.navigate(['', 'posts']);
      });
  }

  ngOnInit() {
  }

  ngOnDestroy() {
    // if (this.sub) {
    //   this.sub.unsubscribe();
    // }
  }

}
In the constructor method, it injects PostService and Router. In save method, it calls PostService.save() to save post and then navigate to posts list page.
Add the following content into new-post.component.html file.
<div class="card">
  <div class="card-header">
    <h1 class="card-title">{{'new-post'}} </h1>
    <p><small>all fields marked with star are required.</small></p>
  </div>
  <div class="card-block">

    <form id="form" #f="ngForm" name="form" class="form" (ngSubmit)="save()" novalidate>

      <div class="form-group" [class.has-danger]="title.invalid && !title.pristine">
        <label class="form-control-label" for="title">{{'title'}} *</label>
        <input class="form-control" id="title" name="title" #title="ngModel" [(ngModel)]="data.title" required/>
        <div class="form-control-feedback" *ngIf="title.invalid && !title.pristine">
          <p *ngIf="title.errors.required">Post Title is required</p>
        </div>
      </div>

      <div class="form-group" [class.has-danger]="home.invalid && !home.pristine">
        <label class="form-control-label" for="home">{{'home'}} *</label>
        <textarea class="form-control" #home="ngModel" type="home" name="home" id="home" [(ngModel)]="data.home" rows="8" required
          minlength="10">
        </textarea>
        <div class="form-control-feedback" *ngIf="home.invalid && !home.pristine">
          <p *ngIf="home.errors.required">Post Home is required</p>
          <p *ngIf="home.errors.minlength">At least 10 chars</p>
        </div>
      </div>

      <div class="form-group">
        <button type="submit" class="btn btn-success btn-lg" [disabled]="f.invalid || f.pending">  {{'save'}}</button>
      </div>
    </form>
  </div>
  <div class="card-footer">
    back to <a [routerLink]="['','posts']">{{'post-list'}}</a>
  </div>
</div>
#f is a reference of NgForm directive, (ngSubmit) defines an output event handler. [(ngModel)] is the two-way binding property, it is default binding approach in AngularJS 1.x. 
Similar with AngularJS 1.x, there are some status value can be use for describing the status of form and form fields. such as valid and invaliddirty and pristine, an form has extra pending and submitted status.
[class.has-danger] is an attribute directive to toggle CSS class. *ngIf is a structure directive, it will add or remove the hosted node according to the evalutated result of the applied expression. 
This form uses HTML5 compatible attributes(required, minlength etc) to set form validation, but it use Angular to valdiate. title.errors, title is the reference of #title, a FormControl directive. .errors will store all validation errors of this field.
To use form, you have to import FormsModule.
...
import { FormsModule } from '@angular/forms';
...

@NgModule({
  imports: [
    CommonModule,
    FormsModule,
   ...
})
export class PostsModule { }
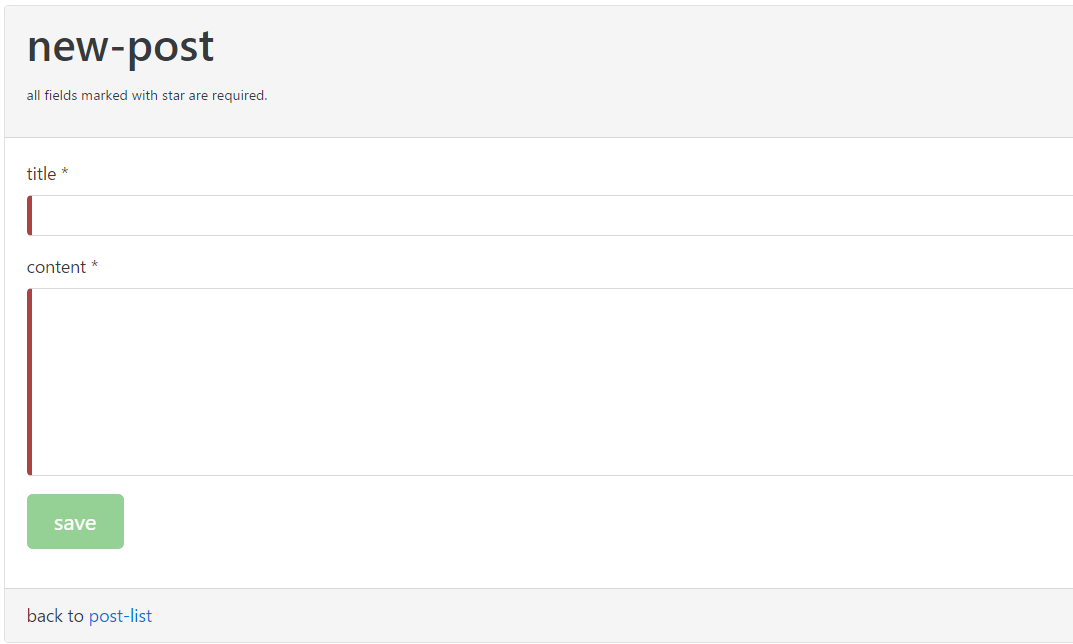
Run this application, navigate to http://localhost:4200.
New Post FORM

Edit Post

Similar with the New post component. It is easy to complete the edit post page.
edit-post.component.ts:
import { Component, OnInit, OnDestroy } from '@angular/core';
import { Router, ActivatedRoute } from '@angular/router';
import { Subscription } from 'rxjs/Subscription';
import { Post } from '../core/post.model';
import { PostService } from '../core/post.service';

@Component({
  selector: 'app-edit-post',
  templateUrl: './edit-post.component.html',
  styleUrls: ['./edit-post.component.css']
})
export class EditPostComponent implements OnInit, OnDestroy {
  data: Post = { title: '', home: '' };
  sub: Subscription;
  id: number;

  constructor(private postService: PostService, private router: Router, private route: ActivatedRoute) { }

  save() {
    let _body = { title: this.data.title, home: this.data.home };

    this.postService
      .updatePost(this.id, _body)
      .subscribe(res => this.router.navigate(['', 'posts']));
  }

  ngOnInit() {
    this.sub = this.route.params
      .flatMap(params => {
        this.id = +params['id'];
        return this.postService.getPost(this.id);
      })
      .subscribe((res: Post) => this.data = res);
  }

  ngOnDestroy() {
    this.sub.unsubscribe();
  }
}
It is very similar with new-post component, except we fetch the initial post data according to params id.
edit-post.compponent.html:
<div class="card">
  <div class="card-header">
    <h1 class="card-title">{{'edit-post'}} </h1>
    <p>created at: {{data.createdAt}} &bull; {{data.createdBy}}</p>
    <p><small>all fields marked with star are required.</small></p>
  </div>
  <div class="card-block">

    <form id="form" #f="ngForm" name="form" class="form" (ngSubmit)="save()" novalidate>

      <div class="form-group" [class.has-danger]="title.invalid && !title.pristine">
        <label class="form-control-label" for="title">{{'title'}} *</label>
        <input class="form-control" id="title" name="title" #title="ngModel" [(ngModel)]="data.title" required/>
        <div class="form-control-feedback" *ngIf="title.invalid && !title.pristine">
          <p *ngIf="title.errors.required">Post Title is required</p>
        </div>
      </div>

      <div class="form-group" [class.has-danger]="home.invalid && !home.pristine">
        <label class="form-control-label" for="home">{{'home'}} *</label>
        <textarea class="form-control" #home="ngModel" type="home" name="home" id="home" [(ngModel)]="data.home" rows="8" required
          minlength="10">
        </textarea>
        <div class="form-control-feedback" *ngIf="home.invalid && !home.pristine">
          <p *ngIf="home.errors.required">Post Home is required</p>
          <p *ngIf="home.errors.minlength">At least 10 chars</p>
        </div>
      </div>

      <div class="form-group">
        <button type="submit" class="btn btn-success btn-lg" [disabled]="f.invalid || f.pending">  {{'save'}}</button>
      </div>
    </form>
  </div>
  <div class="card-footer">
    back to <a [routerLink]="['','posts']">{{'post-list'}}</a>
  </div>
</div>
I added extra createdAt and createdBy below the post title.

ReactiveForms

We have used template driven forms in add ang edit post components, it is stupid and simple and very similar with AnguarJS 1.x.
Let have a look at template version of the search bar in posts component.
  q:string='';


  search() {
    this.sub = this.postService.getPosts({ q: this.q }).subscribe(
      res => this.posts = res
    );
  }
<form class="form-inline">
  <div class="form-group" (ngSubmit)="search()">
    <input type="text" name="q" class="form-control" [(ngModel)]="q" />
  </div>
  <button type="submit" class="btn btn-outline-info">{{'search'}}</button>
</form>
In this form, a submit event will trigger search method. Alternatively, we can use #xyz to refer the input box and get the user input value. 
<form class="form-inline">
  <div class="form-group" (ngSubmit)="search(term.value)">
    <input type="text" name="q" class="form-control" #term />
  </div>
  <button type="submit" class="btn btn-outline-info">{{'search'}}</button>
</form>
  search(term:string) {
    this.sub = this.postService.getPosts({ q: term }).subscribe(
      res => this.posts = res
    );
  }
If you want more interactive when inputing search term and get the result as soon as possible.
The simplest way is adding a keyup output binding to search method.
<form class="form-inline">
  <div class="form-group" (ngSubmit)="search(term.value)">
    <input type="text" name="q" class="form-control" #term (keyup)="search(term.value)"/>
  </div>
  <button type="submit" class="btn btn-outline-info">{{'search'}}</button>
</form>
A more controlable approach is using ReactiveForms.
Import it in PostsModule.
...
import { FormsModule, ReactiveForms } from '@angular/forms';
...

@NgModule({
  imports: [
    CommonModule,
    FormsModule,
    ReactiveForms
   ...
})
export class PostsModule { }
In post.component.ts
import {FormCtrol} from '@angular/forms';

q:FormCtrol;

constructor(){
this.q.valueChanges
       .debounceTime(500)
       .distinctUntilChanged()
       .flatMap(term => this.postService.getPosts({ q: term }))
       .subscribe((res: Array<Post>) => this.posts = res);
}
debounceTime accepts 500 ms to delay to process, and distinctUntilChanged() use avoid duplicated request using the same search term. 
flatMap will concat PostService.getPosts into the first stream and use it as successor in the Observerable flow.
The template can be more simple, eg.
<form class="form-inline">
  <div class="form-group" ">
    <input type="text" name="q" class="form-control" [formCtrol]="q"/>
  </div>
  <button type="submit" class="btn btn-outline-info">{{'search'}}</button>
</form>
Now try to input some texts in the serach box. And watch http hit logging in Browser console.

Source codes

Grab the sample codes from Github.