Wednesday 30 August 2017

Create First Android Application with Android Studio

Hello world. Today i will show you how create first android apps / application with android studio. Now i am use mac operating system for develop apps. Basically create android apps its so easy if you have basic programming language, for specifically Java Programming. I suppose you if you want to develop android apps, please use android studio, latest update SDK. If you have everything like that it can help you to develop android apps something like reduse minimum issue, beautiful design, and know news update about android. Yoyoy we can start now step by step.

1. Install Latest Java JDK Version

You can download here in oracle. I suppose you to download and install latest version because we can reduce minimum issue for android studio and support for android studio work fine.

2. Install Android Studio Version

You can download android studio here in developer android studio. Again i suppose you to download and install because we can reduce issue (android studio its still young), make beautiful design and develop android app with last operating system. You can follow step by step to install whenever in mac, windows and linux in there. 

3. Install Last SDK

In the third step you can install all sdk in android studio. Pick Configure > SDK Manager > Launch Standalone SDK Manager, and install everything in there if you want easy to develop android apps, no more issue. After that your ready to develop android apps.

3.  Hello World Project

Open you android studio and pick start a new Android Studio Project.


https://dedyyuristiawan.blogspot.co.id
First Screen Android Studio Menu


First Screen write your application name. Pick Location that you want save your android project. Click next

https://dedyyuristiawan.blogspot.co.id
Write Android App Name


Second screen just pick minimum sdk (its minimum os android for your android apps). After that you can choose version that you want to develop whenever in Phone and Tablet, Wear, Tv, Android Auto, Glass. Click next.

https://dedyyuristiawan.blogspot.co.id
Choose Target Android App


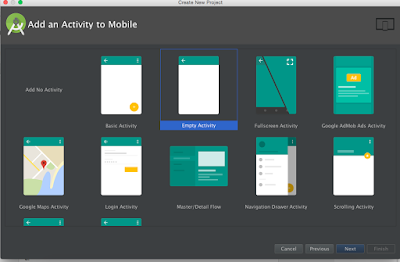
Third screen you can pick layout whenever its basic activity, empty activity etc. In this post i will choose empty activity. And then click next.

https://dedyyuristiawan.blogspot.co.id
Choose App Template Screen


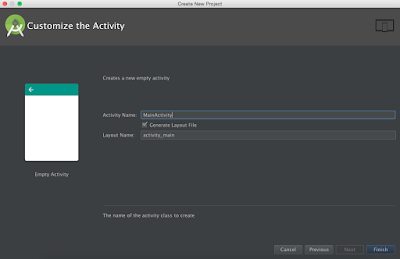
Fourth screen just let all default, click finish, and wait. Its just name for java file and xml file. i will guide to learn structure about android project.

https://dedyyuristiawan.blogspot.co.id
Write Name Java Xml File


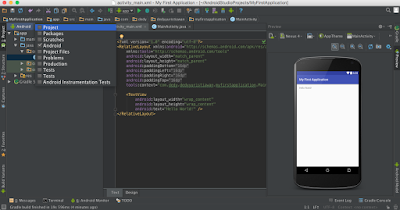
Now you can run your android project. But before we run project i will set user interface android so we can understand so easily about structure android project.  Pick android and choose project.

https://dedyyuristiawan.blogspot.co.id
Change Project UI Screen


and stucture android project will be like that.


https://dedyyuristiawan.blogspot.co.id
Project UI Easy to Undersatand


In java folder its for we write java code and logically android project runs. File MainActivity.java its for runs xml file look this code.

setContentView(R.layout.activity_main);

Move to xml file, you can move to res folder > layout > activity_main.xml. Look from the top from default xml had relative layout and text view. Textview its for show with text  'Hello World' in screen android, you can look in preview screen

android:text="Hello World!"

https://dedyyuristiawan.blogspot.com
Xml Hello World


There is another folder that you can use its drawable folder. In this folder you can put image, xml file and etc i will tell you more in next post.

Mipmap folder its for image for with different dimension to fix screen in android phone. For example default its ic_launcher.png its a logo android app. You can look when android project run.
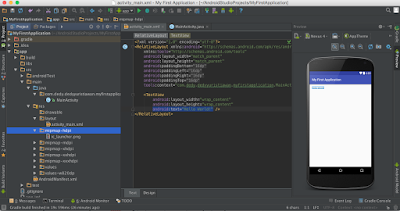

https://dedyyuristiawan.blogspot.co.id
Mipmap Folder


Values folder its for you to set color, string (text), dimes (dimension), and style (usually its for theme android apps)

https://dedyyuristiawan.blogspot.co.id
Values Folder 


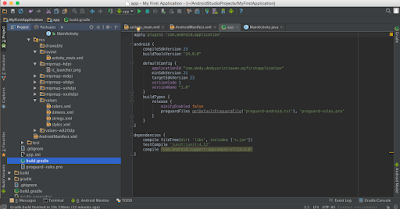
The important file its AndroidManifest.xml its for manage your activity, theme, and name of android apps. see and understand it. There another file that important in android project is a build.gradle file. This file if want to use library in folder or web, so android studio can automatically add library if you put link in dependency code.

dependencies {
    compile fileTree(dir: 'libs', include: ['*.jar'])
    testCompile 'junit:junit:4.12'
    compile 'com.android.support:appcompat-v7:23.4.0'
}
https://dedyyuristiawan.blogspot.co.id
Build.Gradle File


if you want to use library android just put bellow  compile 'com.android.support:appcompat-v7:23.4.0' and click sync, android will automatically add library in you android project.

So if you understand with all of that we can run android project or you can write comment in bellow. Before you want run android project android studio you must create android virtual device with this step :

Click button run app (green triangle in top) > 
Create emulator > choose phone that you want > next > 
Choose os android (i suppose you to choose os with ABI x86, because it can help emulator run fast) > next > 
Write your avd name > finish > wait > 
Choose adv that you created > click ok and emulator android will be show.


Sunday 27 August 2017

build your own React Native applications with Angular 2

Starting from this, we pushed the idea forward and are now pleased to share a library to build your own React Native applications with Angular 2 for iOS and Android:


The TodoMVC of the Kitchen Sink demo application in iOS (left) and Android (right)

It’s all about cross-platform apps

The strategy of Angular 2 is to provide a single platform that developers can use to target all channels and devices:


With a similar intent, React Native was created by the React team to provide a unified developer experience for web and mobile application development, with JS and React. Here, applications render native UI as they directly use actual UI components - i.e. there is no Cordova or WebView involved.

Integrating Angular 2 and React Native together is a great solution for the mobile application channel!

A React Native renderer for Angular 2

That’s exactly what the library really is - a renderer which glues Angular 2 and React Native together (see the technical details below). With it, developers can create applications where the best of both world can be used in terms of features and tools.
They key is that, in such applications, the Angular 2 part is just standard, with the usual directives, modules, dependency injection, change detection, etc.
So all the skills and code can be shared to do cross-platform development!


Well, to be honest, they are almost standard, because there is no such thing as HTML or CSS in a native application. Instead, in their templates, developers will take advantage of the provided ambient components as basic bricks to build applications:
  • Image, Picker, RefreshControl, ScrollView, Switch, Text, TextInput, View, WebView - that are common to both Android and iOS
  • Android specific: DrawerLayout, PagerLayout, ProgressBar, Toolbar
  • iOS specific: ActivityIndicator, DatePicker, MapView, Navigator, ProgressView, SegmentedControl, Slider, TabBar
Instead of CSS, React Native comes with its own style system, where flexbox is available.

Moreover, to guarantee a great developer experience, the library ensures that all Angular 2 features are usable, including the router and http modules.
It also provides advanced gestures recognition based on Hammer.js. Reacting to a tap, a swipe or a pinch in an application is as easy as reacting to a click in a website.
Finally, it also integrates the APIs of React Native, making sure they all work seamlessly with zone.js, e.g. network, geolocation, async storage, clipboard, etc.

Try it today!

To start a new project quickly, you should have a look at the angular2-react-native-seed project on Github and read the documentation.
From the react-native-renderer itself, you can also build and play with demo applications for both Android and iOS. They showcase all components and features available.

How does it work?

Here is the full picture where the blue parts are from React Native, and the red ones from Angular 2:
Architecture of a React Native application with Angular 2


Technically, a React Native application runs 3 threads. The main one is a JS thread where any JS code can be executed; it controls the full application. The other two run the native part of the application: the standard main UI thread, and a “shadow” thread where measuring and layout occur.
The native and JS sides communicate in both directions through a bridge. This means that there are Bridge JS APIs to access native features (network, geolocation, clipboard, etc) and  manipulate native elements, and that native events are sent back to the JS side.
You can read more about this architecture in React Native Scheduling by Andy Street.

Angular 2 fully decouples the rendering from the core of the application where live all the components, directives, dependency injection, change detection, etc. By default it renders to DOM, but makes it possible to create custom renderers. This is explained in depth in Rendering in Angular 2 by Matias Niemelä.

So, let’s take a step back and put all pieces together:
a React Native application…
...in which an Angular 2 application runs in the JS thread…
...with a custom renderer that uses the JS APIs to create a native UI.

That’s it!

What’s next?

We have just entered the alpha phase which is necessary to get first feedbacks, fix bugs and implement more features.

Then, as next steps, we will look at:

  • Animations: Angular 2 will have a brand new animation module. At the same time, the React Native team is working hard to push animations on the native side to get more performance. These two need to work together to bring awesome animations.
  • Extensibility: React Native provides a subset of the features and components that exist in the Native world. It can be extended and there is already an active community publishing packages. This has to be made available in the Angular 2 context as well.
  • Universal Windows Platform: Microsoft and Facebook announced at F8 2016 that it will be supported in React Native.
  • And performance: it is great today but we want to make it lightning-fast.

Friday 25 August 2017

ionic 3 : development tools and first project

1. INSTALL NODEJS


First thing first, before we can install Ionic and Cordova we need to have Node.js.
 Be sure to select an appropriate version based on your Windows platform (32-bit or 64-bit). During installation, remember the final location.
To check that everything is properly installed type in the command prompt:

Node -v
Then
Npm -v
You will get the versions installed on your machine.

2. INSTALL Ionic & CORDOVA

Now that Node.js is installed, you will install Ionic by running the package installation command via NPM.
Npm install -g ionic cordova
Now that you have the first elements of your development environment, you will create your very first project to get a quick overview of the possibilities offered by Ionic.

3. INSTALL Visual Studio code (it's a code editor and not Microsoft Visual Studio) 


4. Create a project

To create a project use the command prompt by typing:

ionic start nomProjet  --v2

 And after it is created, put yourself in the project folder (in our case the project is named projectName and finally type the command  code    (code then space then point) so that the project opens with Visual studio code.
If the default template is not something you want to use, Ionic has some templates available:
•  tabs: a simple 3 tab layout
•  sidemenu: a layout with a swipable menu on the side
•  blank: a bare starter with a single page
•  super: starter project with over 14 ready to use page designs
•  tutorial: a guided starter project

If you do not specify a template by executing "ionic start projectName --v2", the template tabs will be used.
If for example you type "ionic start nameProject tutorial --v2" the tutorial model will be the project template: 
·      
  •       Start will tell the CLI to create a new application.
  • ·         MyIonic2Project will be the name of the directory and the name of the application for your project.
  • ·         Tutorial will be the startup template for your project.
  • ·         --v2 tells the CLI that you want a 3.0 project.

To get a quick overview of your application in the browser, use the serve command.
Cd myProject /
Ionic serve
or
Ionic serve --lab

The first command will open the application in your web browser defined by default for your OS, the second will open the application in your browser but with the display as it will be on iOS and on Android.

Wednesday 16 August 2017

Login System in Ionic 2 with Authentication by JWT

Auth0 team has a great post about How to secure your mobile app with JWT (Json Web Tokens). In this article, I want to modify its AuthService service with full functions. So you can reuse this code in any your project. Addition, I also show you how to navigate between pages after authenticated.

Step 1: start your project
#ionic start ionic-auth-jwt-sample blank --v2 --ts

Step 2: add angular2-jwt. I use version @0.1.12 because the latest version of angular2-jwt has problem with latest version of ionic 2 + angular:
#cd ionic-auth-jwt-sample
#npm install angular2-jwt@0.1.12

Step 3: install authenticate server
+Copy the source code from here
+Go to the folder copied, run the server
#npm install
#node server.js

Step 4: generate AuthService and modify its code
#ionic g provider AuthService

Then edit file app/providers/auth-service/auth-service.ts as below:

import {Injectable} from 'angular2/core';
import {Http, Headers} from 'angular2/http';
import {Storage, LocalStorage} from 'ionic-angular';
import {JwtHelper, tokenNotExpired} from 'angular2-jwt';
import 'rxjs/add/operator/map';

@Injectable()
export class AuthService {
    LOGIN_URL: string = "http://localhost:3001/sessions/create";
    SIGNUP_URL: string = "http://localhost:3001/users";
    contentHeader: Headers = new Headers({"Content-Type": "application/json"});
    local: Storage = new Storage(LocalStorage);
    jwtHelper: JwtHelper = new JwtHelper();
    user: string;
    error: string;

    constructor(private http: Http) {
        let token = localStorage.getItem('id_token');
        if (token) {
            this.user = this.jwtHelper.decodeToken(token).username;
        }
    }

    public authenticated() {
        return tokenNotExpired();
    }

    login(credentials) {
        return new Promise((resolve, reject) => {
            this.http.post(this.LOGIN_URL, JSON.stringify(credentials), { headers: this.contentHeader })
                .map(res => res.json())
                .subscribe(
                    data => {
                        this.authSuccess(data.id_token);
                        resolve(data)
                    },
                    err => {
                        this.error = err;
                        reject(err)
                    }
                );
        });
    }

    signup(credentials) {
        return new Promise((resolve, reject) => {
            this.http.post(this.SIGNUP_URL, JSON.stringify(credentials), { headers: this.contentHeader })
              .map(res => res.json())
              .subscribe(
                  data => {
                    this.authSuccess(data.id_token);
                    resolve(data)
                  },
                  err => {
                    this.error = err;
                    reject(err)
                  }
              );
        });
    }

    logout() {
        this.local.remove('id_token');
        this.user = null;
    }

    authSuccess(token) {
        this.error = null;
        this.local.set('id_token', token);
        this.user = this.jwtHelper.decodeToken(token).username;
    }

}

Step 5: generate LoginPage and WorkPage
#ionic g page Login
#ionic g page Work

Then edit file app/pages/login/login.ts as below:

import {Page, NavController} from 'ionic-angular';
import {AuthService} from '../../providers/auth-service/auth-service';
import {WorkPage} from '../work/work';

@Page({
  templateUrl: 'build/pages/login/login.html',
})
export class LoginPage {
    authType: string = "login";

    constructor(private auth: AuthService, private nav: NavController) {
    }

    login(credentials) {
        this.auth.login(credentials).then(
          (success) => {
            this.nav.setRoot(WorkPage);
          },
          (err) => console.log(err)
        );
    }


    signup(credentials) {
        this.auth.signup(credentials).then(
          (success) => {
            this.nav.setRoot(WorkPage);
          },
          (err) => console.log(err)
        );
    }

}


Edit file app/pages/login/login.html as below:

<ion-navbar *navbar>
  <ion-title>Login</ion-title>
</ion-navbar>

<ion-content class="login" *ngIf="!auth.authenticated()">

    <div padding>
      <ion-segment [(ngModel)]="authType">
        <ion-segment-button value="login">
          Login
        </ion-segment-button>
        <ion-segment-button value="signup">
          Signup
        </ion-segment-button>
      </ion-segment>
    </div>

    <div [ngSwitch]="authType">
      <form *ngSwitchWhen="'login'" #loginCreds="ngForm" (ngSubmit)="login(loginCreds.value)">
        <ion-item>
          <ion-label>Username</ion-label>
          <ion-input type="text" ngControl="username"></ion-input>
        </ion-item>

        <ion-item>
          <ion-label>Password</ion-label>
          <ion-input type="password" ngControl="password"></ion-input>
        </ion-item>

        <div padding>
          <button block type="submit">Login</button>
        </div>

      </form>
      <form *ngSwitchWhen="'signup'" #signupCreds="ngForm" (ngSubmit)="signup(signupCreds.value)">
        <ion-item>
          <ion-label>Username</ion-label>
          <ion-input type="text" ngControl="username"></ion-input>
        </ion-item>

        <ion-item>
          <ion-label>Password</ion-label>
          <ion-input type="password" ngControl="password"></ion-input>
        </ion-item>

        <div padding>
          <button block type="submit">Signup</button>
        </div>

      </form>
    </div>

    <div padding>
      <p *ngIf="error" class="error">{{ error._body }}</p>
    </div>

</ion-content>


Edit file app/pages/work/work.ts as below:

import {Page, NavController} from 'ionic-angular';
import {AuthService} from '../../providers/auth-service/auth-service';
import {LoginPage} from '../login/login';

@Page({
  templateUrl: 'build/pages/work/work.html',
})

export class WorkPage {
  constructor(private auth: AuthService, private nav: NavController) {}

  logout() {
    this.auth.logout();
    this.nav.setRoot(LoginPage);
  }
}


Edit file app/pages/work/work.html as below:

<ion-navbar *navbar>
  <ion-title>Work</ion-title>
</ion-navbar>

<ion-content padding class="tools">
  <div *ngIf="auth.authenticated()">
    <div padding>
      <h1>Welcome {{ auth.user }}! Let do your job then Logout.</h1>
      <button block (click)="logout()">Logout</button>
    </div>
  </div>
</ion-content>


Step 6: edit file app/app.ts

import {App, Platform} from 'ionic-angular';
import {StatusBar} from 'ionic-native';
import {LoginPage} from './pages/login/login';
import {Http} from 'angular2/http';
import {AuthHttp, AuthConfig} from 'angular2-jwt';
import {provide} from 'angular2/core';
import {AuthService} from './providers/auth-service/auth-service';

@App({
  template: '<ion-nav [root]="rootPage"></ion-nav>',
  providers: [
      provide(AuthHttp, {
        useFactory: (http) => {
          return new AuthHttp(new AuthConfig, http);
        },
        deps: [Http]
      }),
      AuthService
    ],
  config: {}
})
export class MyApp {
  rootPage: any = LoginPage;

  constructor(platform: Platform) {
    platform.ready().then(() => {
      StatusBar.styleDefault();
    });
  }
}


Step 7: start the app and check.
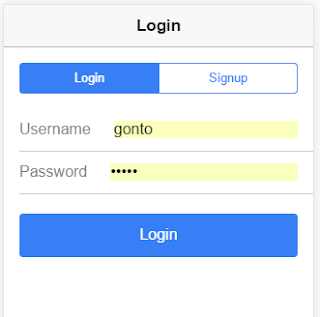
#ionic serve

Below are my captured images: