Wednesday 31 March 2021

Install laravel on windows10 xampp


Install laravel on windows xampp. In this post, we will show you how to install laravel latest version on the windows 10 xampp step by step with the composer using cmd.

This how to install laravel on windows xampp step by step tutorial will guide on how to install and setup laravel latest version(7,6,5) on windows 10 xampp with composer. As well as, short description of “what is laravel framework”.

What is Laravel?

Laravel is a free open source “PHP framework” based on the MVC design pattern.
It is created by Taylor Otwell. Laravel provides expressive and elegant syntax that helps in creating a wonderful web application easily and quickly.

How to Install Laravel on Windows 10 Xampp

Follow the below simple and easy steps to install laravel 5, 6, 7 on windows 10 xampp and ubuntu with composer:

  • Download and Install Composer
  • System Requirement
  • Create a Project
  • Run the Application on Development Server

Note: If you install laravel in the ubuntu system. Must Read, How to install composer in ubuntu, Click Here

Step 1: Download and Install Composer

Before installing laravel on windows. first of download composer on windows system. If you already composer download / installed Composer.  go to STEP 2, otherwise follow the steps.

Click  Download Composer from www.getcomposer.org

install composer

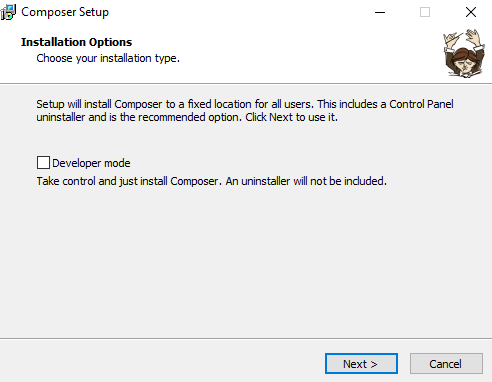
Run the setup and Install Composer.

install composer

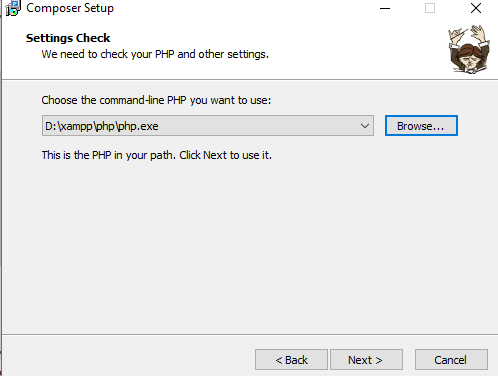
Next the window will display the resume of the settings, click “Install” to continue.

install composer

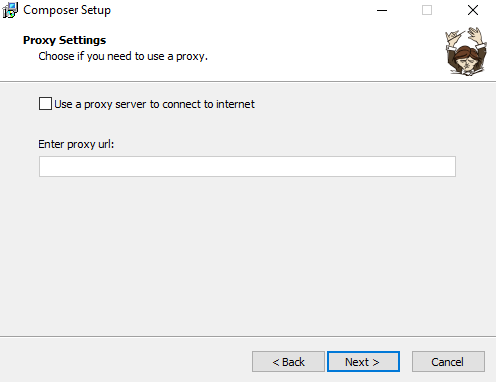
If you have any proxy URL enter here, don’t know to leave it to click next to

install composer
install composer

The setup wizard will download the required files from getcomposer.org. Your installation will be completed.

install composer

Composer installed successfully. Click to finish button and move to the next step.

install composer
install composer

Open command prompt & type cd C:\xampp\htdocs

install composer

Step 2: Server Requirements

The Laravel framework has a few system requirements. Before we will install laravel 6 on windows, read some system requirements.

  • PHP >= 7.2.0
  • BCMath PHP Extension
  • Ctype PHP Extension
  • JSON PHP Extension
  • Mbstring PHP Extension
  • OpenSSL PHP Extension
  • PDO PHP Extension
  • Tokenizer PHP Extension
  • XML PHP Extension

Step 3: Install Laravel

Type the command In the command prompt => composer create-project laravel/laravel Project Name. It will install a laravel new setup on your windows xampp:

composer create-project --prefer-dist laravel/laravel blog

Wait for Laravel install on windows system.

install laravel

Step 4: Run the Application on Development Server

In this step to use the php artisan serve command .it will start your server locally

php artisan serve

If you want to run the project diffrent port so use this command

php artisan serve --port=8080 

You have successfully install laravel on windows, Now Go to the browser and hit the

URL : http://localhost:8000/blog

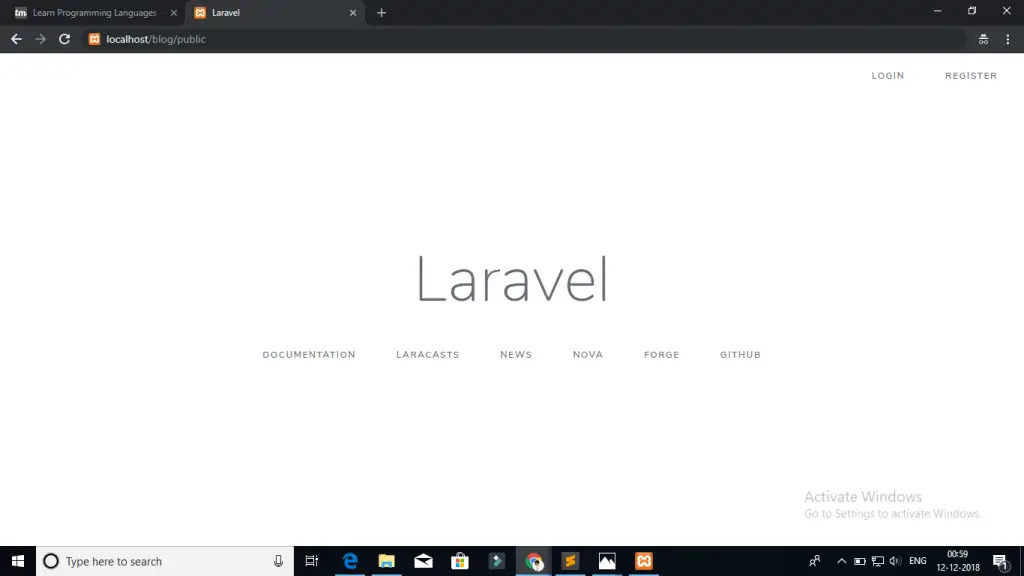
If you are not run php artisan server command, direct go to your browser and type the URL

URL : http://localhost/blog/public/

Laravel  Installation Process completed go to the browser and hit URL. http://localhost/project-name /public/, you will be seen.
install laravel

Server Error 500 when accessing Laravel 6 (Solve)

Download New Laravel Setup and Run, It will show server error 500 when accessing Laravel 6

If your using ubuntu machine. open your terminal and go to your project root directory and type the command in command prompt :

sudo chmod  -R 777 storage

sudo chmod -R 777 bootstrap

Conclusion

In this how to install laravel on windows XAMPP, You have learned how to install the latest version laravel 5,6,7 on windows 10 with the composer by using cmd.


Tuesday 4 June 2019

Step to create a WordPress blog using XAMPP

 Hope this post will help you to install WordPress. If you enjoy my work then please share my posts with your buddies and anyone who might be interested in WordPress If you had any problem about this post, please do mention it in the comment section.WordPress is an open-source content management system (CMS). It’s based on PHP and MySQL. It most associates with blogging, E-commerce stores, personal sites and many more. Now WordPress control 30%of the web. In this guide, we discuss how to create a WordPress blog using XAMPP.


1) Why WordPress?

It’s FREE                                           SEO Friendly                                  
High Security                                    High Performance
Customizable Design                       Responsive Mobile Sites

2) Step by Step Guide

Step 1 – Prerequisites

1.XAMPP – Apache (A) + MariaDB(M) + PHP(P) + Perl(P)


                     CtechF - How to create WordPress blog using xampp (Localy) - Screenshot
XAMPP is an Open source software. It’s a Stands of Cross-platform (X). we can create a local web server using XAMPP. It’s easy to use and it works with Windows, Linux, and Mac OS. You can use alternative software for XAMPP, such as WAMP, MAMP but today I’m going to focus about XAMPP.
XAMPP Download link (121 MB) – https://www.apachefriends.org/index.html
WAMP download link (286 MB) – http://www.wampserver.com/en/#download-wrapper
MAMP download link (410 MB) – https://www.mamp.info/en/downloads/
2. WordPress (v5.1)


                           CtechF - How to create WordPress blog using xampp (Localy) - Screenshot
WordPress Download link (11 MB) – https://wordpress.org/download/
Step 1 Completed
 

Step 2 – How to install XAMPP.

  • Click on the downloaded XAMPP setup. (If you got any permission message or warning message click “OK” or “YES” button to continue)
  • It will open the XAMPP setup wizard. Click next button to continue.


CtechF - How to create WordPress blog using xampp (Localy) - Screenshot
  • Now it asked, what components we want to install and what’s not. We only need Apache and MySQL. (select following Components and click the next button to continue)
    • Server
      • Apache – Apache Server
      • MySQL – Database Server
    • Program Language
      • PHP – Hypertext Preprocessor
    • Program Languages
      • phpMyAdmin – Database Control panel


CtechF - How to create WordPress blog using xampp (Localy) - Screenshot
  • Choose installation location and click Next (Default: C:\xampp)  (If you got Windows Defender Firewall Permission request, Tick both checkboxes and click Allow access.)
  • Click the next button to continue Now it will install XAMPP (wait till the installation complete) After the installation complete. Click Finish.
  • It will open the XAMPP Control panel automatically.
  • This is a XAMPP Control Panel.


CtechF - How to create WordPress blog using xampp (Localy) - Screenshot
  • Now click Start up Apache and MySQL (It will start Apache and MySQL servers)
CtechF - How to create WordPress blog using xampp (Localy) - Screenshot

 Now open your web browser and type http://localhost  or http://127.0.0.1 on the address bar.


Step 2 Completed

Step 3 – Creating a Database

  • Open a web browser and type http://localhost/phpmyadmin or http://127.0.0.1/phpmyadmin (it will redirect you to phpMyAdmin control page)


CtechF - How to create WordPress blog using xampp (Localy) - Screenshot
  • Click Databases and enter the Database Name then click Create, it will create our database.


CtechF - How to create WordPress blog using xampp (Localy) - Screenshot
My database name is “wpdb2019”
Congratulation! Step 3 Completed

Step 4 – WordPress Installation

Open XAMPP Control Panel and click the explorer button. It will open the XAMPP installation directory.
Open an “htdocs” folder and Copy you’re downloaded WordPress file into the htdocs folder then extract it. (htdocs -> wordpress)
Then rename it whatever you like. I’m going to call it “wordpress”.

WordPress Installation (Normal configuration)
  • Enter http://localhost/wordpress or http://127.0.0.1/wordpress on your browser (It will redirect us to the WordPress installation wizard.)


CtechF - How to create WordPress blog using xampp (Localy) - Screenshot
  • Select a language and click Continue.
  • It’s Time to connect database and WordPress. click Let’s go! It will redirect you to the “database configuration page”. Enter your Database Details, Then click submit button to continue.


CtechF - How to create WordPress blog using xampp (Localy) - Screenshot
Database Name – “wpdb2019” (you’re Database name)
Username – “root” (it’s default root)
Password – “” (it’s default empty)
Database Host – “localhost”
Table Prefix – “wp_”

  • Now time to install WordPress, Press “Run the installation”.
Note: If you got an error message. you need to configure the database manually.

WordPress Installation (Manual Configurations)
  • Open the WordPress folder where you saved WordPress. (C:\xampp\htdocs\wordpress) and find a file called, “wp-config-sample.php” and rename it to “wp-config.php”
  • Open it using your, default text editor.


CtechF - How to create WordPress blog using xampp (Localy) - Screenshot
  • Find this section
  1. /** The name of the database for WordPress */
  2. define( 'DB_NAME', 'database_name_here' );
  3. /** MySQL database username */
  4. define( 'DB_USER', 'username_here' );
  5. /** MySQL database password */
  6. define( 'DB_PASSWORD', 'password_here' );
  7. /** MySQL hostname */
  8. define( 'DB_HOST', 'localhost' );
  • Change it like below and save changes.
  1. /** The name of the database for WordPress */
  2. define( 'DB_NAME', wpdb2019' );
  3. /** MySQL database username */
  4. define( 'DB_USER', 'root' );
  5. /** MySQL database password */
  6. define( 'DB_PASSWORD', '' );
  7. /** MySQL hostname */
  8. define( 'DB_HOST', 'localhost' );


CtechF - How to create WordPress blog using xampp (Localy) - Screenshot
  • Select a language and press Continue.

  • After installation complete, we need to fill our site information. (Don’t worry, you can change these settings anytime)


CtechF - How to create WordPress blog using xampp (Localy) - Screenshot
Site title – ‘Demo Site”
Username – “admin”
Password – “techie!@#”
Your Email –
demo@techieupgrader.in
Done, Step 4 Completed. It’s time to log in

Step 5 – WordPress Admin Control Panel.

Open a web browser and type http://localhost/wordpress/wp-admin/ it will redirect you to the WordPress admin login page.


CtechF - How to create WordPress blog using xampp (Localy) - Screenshot
Enter your credentials.
Username – admin
Password – techie!@#
This is WordPress Admin control panel.


CtechF - How to create WordPress blog using xampp (Localy) - Screenshot


Thursday 6 July 2017

Xampp Apache and MySQL Error Could Not Be Running


                                     xampp apache error tidak bisa running


Xampp Apache and MySQL Error Could Not Be Running -

Xampp is the installation package of open source software that is commonly used by web application developers to simplify the process of installation of the tools needed to develop web applications, with the help of the installation package xampp those tools more easy to be installed simultaneously without having to manually configure again. 

In the installation package xampp generally consists of several open source software that is very supportive for developing web applications using PHP programming language, the software include, apache (for the webserver), php interpreter (software interpreter programming language PHP) , mySQL (database software), application php my admin ( "applications to facilitate database administration mysql) etc, all packaged in a single installation package with the name xampp. 

to develop web applications, either for study or project real, xampp must be installed on your computer, after xampp successfully installed, at least you must enable Apache and mySQL, if the tool is successfully executed, then you can begin to try to run your web application, if it does not mean there are some things that cause Apache and also mysql can not be running. 

the following article will try to share about the causes apache could not walk or running, and also how to handle it. 

A. Apache Xampp Error

Cause Apache on xampp can not be running.


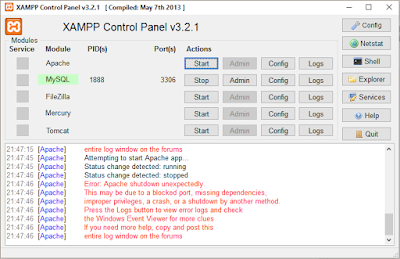
By default Apache will actively use port 80, while the tool mysql using port 3306, for some cases, there are times when the tools we tried to be activated, the program can not be running, even appeared an information message ERROR with red writing below: 
Error: Apache shutdown unexpectedly 
this my be due to a blocked port, missing dependencies, 
improver privileges, a crash, or a shutdown by another method. 
Press the log button to view error logs you check 
window event Viewer for more clues 
If you need more help, copy and post this 
entire log window on the forums.

, more or less will look like on the image below: 

xampp apache error tidak bisa running

case like the above, most likely caused by the following factors: 

1. the application is first run using port 80 and also port 3306, so port conflicts or crashes. 

This can happen when you use a window 8.x or when using windows 10, or if your computer is installed in a VM ware, or the Skype application is running, Apache can not be executed for their other application first run using the same port used by Apache and mySQL. 


How to Solve Apache on Xampp Error could not running

If you experiencing similar things, apache on xampp you error can not be running or running on port 80, I fix you can try to change the default port for Apache and mySQL to port as you wish that possibility has not been used, the steps are as follows: 

1.? Turn xampp control panel is already installed. 

2. Click Config button for Apache, then select the Apache (httpd.conf), as shown in the picture below: 

cara mengatasi apache xampp error


3. In the text document is open, please search? number 80, then change it to 8080, for the text below: 
Listen 80 to Listen 8080 
also 
ServerName localhost: 80 becomes ServerName localhost: 8080

4. save your changes, and please try to restart apache xampp you. 

If you still can not walk, exit xampp control panel, then turn back to the right click select "open as administrator" could be blocked by a firewall. 

If you still can not walk please uninstall xampp on your computer, then download xampp the latest version and re-install xampp on your computer. 

How to Run Localhost after changing the port?

Because the default port of apache has been changed from the previous 80 to port 8080, is also influential when we call localhost, when the port xampp still uses the default port (port 80), to call the page localhost simply by opening a browser and in the address bar to stay in the input localhost page then localhost will be open and accessible, but when port have been changed to 8080, then when you want to access the page localhost command is slightly different, do: 

a. open the browser 
b. Call in addressbar with command localhost: 8080 

In the above command, the localhost will be back accessible, if you want to run a web application that you created earlier, then to call the main page of the web app ( let's say you create a web application that you saved in folders example in .htaccess )? use the commandlocalhost: 8080 / example 


B. MySQL XAMPP Error

There are so many possibilities for errors that occur when you start mysql on xampp control panel , making it difficult to start mysql and can not be running, one error that occurred is an awful lot like the following error: 
12:19:12 PM [mysql] Attempting to start MySQL app ... 
12:19:12 PM [mysql] detected change Status: running 
12:19:13 PM [mysql] detected change Status: stopped 
12:19:13 PM [mysql] error: MySQL shutdown unexpectedly. 
12:19:13 PM [mysql] This may be due to a blocked port, missing dependencies, 
12:19:13 PM [mysql] improper privileges, a crash, or a shutdown by another method 
12:19:13 PM [mysql] Press the logs button to view error logs and check 
12:19:13 PM [mysql] the Windows Event Viewer for more clues 
12: 19:13 PM [mysql] If you need more help, copy and post this 
12:19:13 PM [mysql] entire log window on the forums

?

how to cope with MySQL error on Xampp

how to resolve the above error, you can try the following ways: 
1. Stop all servers running xampp, etc., then exit 

2. Log xampp installation folder, then go to the Data folder, eg 
C: xampp mysql data
3. How ibdata1 file, please change for example be ibdata1.bak, or remove. 

4. restat re xampp your control-panel, and then try again to start mysql. 


If you still can not walk, exit xampp control panel, then switch back by right click select "open as administrator" could be blocked by a firewall. 

If you still can not walk please uninstall xampp on your computer, then download xampp the latest version and re-install xampp on your computer.

Sunday 2 July 2017

XAMPP Apache Service not starting due to blocked port

                   XAMPP Apache Service not starting due to blocked port

Today, the Apache service installed with XAMPP shutdown on me. The following error was displayed on the XAMPP Control Panel -
Apache service not starting Shutdown Unexpectedly -may be due to blocked port
"Error: Apache Shutdown Unexpectedly -may be due to blocked port, missing dependencies, improper privileges, a crash, or shutdown by another method".
Check the Apache error logs which shows -
[Fri Oct 03 07:41:34.188511 2014] [ssl:warn] [pid 404:tid 400] AH01909: www.example.com:443:0 server certificate does NOT include an ID which matches the server name
[Fri Oct 03 07:41:34.360389 2014] [ssl:warn] [pid 404:tid 400] AH01909: www.example.com:443:0 server certificate does NOT include an ID which matches the server name 
Let's see how to resolve this issue.

Now, I noticed that this happened after the Microsoft OFfice Lync was upgraded to Skype for business. After a little research on Google, I realized that others too are facing an issue with Apache service when Skpye is installed on the same machine. So this issue is because Skype took over the ports 40 for HTTP and 443 for HTTPS (SSL).

So if you are facing the same issue, and Skype is also required on the computer, then you can change the ports for HTTP and HTTPS (SSL) for Apache so that both Apache service and the Skype application can run without interfering with each other.

Here is a short tutorial video describing the issue and how to change the port for HTTP and HTTPS for Apache:

Change the listen port for Apache HTTP:
  • Start XAMPP Control Panel
  • Click the "Config" button corresponding to Apache
  • Click "Apache (httpd.conf)" to open the Apache HTTPD.CONF file. The config file will open in the system's default notepad.
  •  Press CTRL+F and enter "80". Click "Find Next"
  • Look for "LISTEN 80"
  • Change to: "LISTEN 8080"
  • Save the httpd.conf file and close it
Chane the listen port for Apache HTTPS (SSL):
  • Start XAMPP Control Panel
  • Click the "Config" button corresponding to Apache
  • Click "Apache (httpd-ssl.conf)" to open the Apache HTTPD-SSL.CONF file. The config file will open in the system's default notepad.
  •  Press CTRL+F and enter "443". Click "Find Next"
  • Look for "LISTEN 443"
  • Change to: "LISTEN 444"
  • Save the httpd-ssl.conf file and close it
 Try starting the Apache service from the XAMPP Control Panel now. It should start without the error.

Hope you found this tip helpful.

Friday 23 June 2017

XAMPP Server | Apache Service Unable To Start Due To uTorrent

XAMPP Server Apache Service Unable To Start Due To uTorrent
Issue: XAMPP Server Apache Service unable to Start
Error:
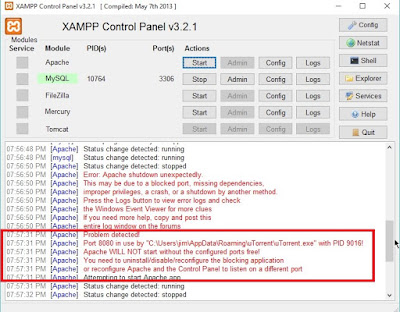
07:57:31 PM  [Apache]     Problem detected!
07:57:31 PM  [Apache]     Port 8080 in use by "C:\Users\jim\AppData\Roaming\uTorrent\uTorrent.exe" with PID 9016!
07:57:31 PM  [Apache]     Apache WILL NOT start without the configured ports free!
07:57:31 PM  [Apache]     You need to uninstall/disable/reconfigure the blocking application
07:57:31 PM  [Apache]     or reconfigure Apache and the Control Panel to listen on a different port


Cause:
HTTP Port required by Apache service is not free, as it is used by uTorrent. This also means that uTorrent service is also running.

Please Note: In the log above, the port configured for Apache is 8080. The default post is usually 80. But on my system, Apache is configured to listen to 8080. Port # 80 is used by IIS server.
See here how to configure Apache port when running along with IIS server on the same machine.

Issue Replication:
  •  Open XAMPP control panel (See here how to install XAMPP on Windows)
  • Click Start next to Apache service if it is not started automatically
  • See the error displayed on the XAMPP Control Panel
  • In this example, we see the error - " Port 8080 in use by "C:\Users\jim\AppData\Roaming\uTorrent\uTorrent.exe" with PID 9016!"
Solution:
  • As per the error message in the XAMPP Control Panel, we see that uTorrent has taken over the port number 8080. So, we will check uTorrent settings.
  • Open uTorrent. Since we get the error, it means it is already running.
  • Click on uTorrent Options > Preferences > Advanced > WebUI
  • You should see that "Enable WebUI" is usually "Disabled" but port number 8080 is set under "Connectivity" > "Alternative Listening Port", and is greyed out.
  • Enable / Check "Enable WebUI"
  • Change the port number under "Connectivity" from 8080 to something like 8088.
  • Disable /Uncheck "Enable WebUI"
  • Click Apply
  • Click OK
  • Now Open XAMPP Control Panel and try starting Apache Service. It should start.

uTorrent Options  Preferences  Advanced  WebUI connectivity port number 8080
 Hope this solution helps someone. Cheers!

How to download a website from live server to development local server?

download-move-website-from-live-server-to-local-development-server

In this post, we shall see how to download a website from live server to development local computer. I will be using a Drupal website as an example. On the local machine, I am running XAMPP stack on Windows. But the process would generally be the same for any other CMS or website for that matter. If you are looking for how to move or upload a website from local development computer to a live production server, following the steps here.

Usually most people develop website first on local development computer and then upload the website to a live server using FTP clients or directly from the web host interface. Some may then continue with further changes and developments on the live server instead of doing everything on local development computer and upload the changes/files. It is a good practice though – to develop and edit changes on local development computer as we would not want our websites to break due to some new changes. So, it is best to develop and test first on local development computer before uploading to live server. Though it is a duplication of work, it will save us the trouble if something should go wrong.

However, there may be cases where most common and non-risky changes might have been done on the production server more often than on the local development computer. And if you finally want to download the website to local development computer so that the local copy is exactly same as the one live, then you need to download the website. In the following steps, we shall see how to download a website from live server to development local server. As stated above, I will be using a Drupal website running on XAMPP on local machine running Windows. But the process would generally be the same for any other CMS or website for that matter. If it is a simple HTML website without any database involved, it is as simple as copying all the website files to the local machine and place the main website folder inside the WWW or htdocs directory for IIS and Apache respectively. 

How to move a Drupal Site from live server to development computer? 

This is an example on Drupal running on XAMPP on Windows, so the directory names etc. may be different if you are using another CMS or another development stack. In this example, "drupalsite" is the name of the website just for example.

1.    Download the website files from live server
a.    Login to web host control panel or by using an FTP program, download the website files.

For Drupal sites, just download the “sites” folder as that is where all the website files are. If there has been some customization done outside the “sites” folder, you should download all the website files under root or "site" folder plus the folder containing the customization done.

2.    Download the database of the live website
a.    Login to the Drupal website as an Admin and flush all cache before exporting database. It will make the database file smaller and may also save us from some errors during the import.
To clear all cache in Drupal- 
go to “/config/development/performance” and click on “Clear all cache”.
b.    Login to the website’s phpMyAdmin, select the database for the website
c.    Click “export” tab and export the database
d.    It will be exported as a “.sql” file.

3.    Put the downloaded website files to the local development computer.
As discussed above, for Drupal websites, you may download the complete website files or just the “sites” folder provided there are no customization done outside the “sites” folder and  provided there is a previous version of the same website on the local server. In that case, you just need to download the “sites” folder and replace on the local server.

If all website files were downloaded from live server then-
If you have downloaded all the website files or you want to replace all the website files, then just rename the existing website folder on the local server with “_old” appended to the website folder name for the time being. If we face issues, we can still rename and remove “_old” to use it again.

Go to C:\xampp\htdocs\drupalsite and rename it to “drupalsite_old”

a. Now move the website files downloaded from live server to C:\xampp\htdocs\drupalsite

If only "sites" folder was downloaded from live server then-
For Drupal, if there are no customization done outside the “Sites” directory, you may only replace the “sites” directory, since that folder contains all the website files necessary.

a. In that case, look for sites folder under C:\xampp\htdocs\drupalsite and simply rename the sites folder to say “sites_old”. We can delete this folder if not longer required later.
b.  Move the "sites" folder downloaded from live server to C:\xampp\htdocs\drupalsite

That is all regarding moving the website files from live server to development server.

As discussed above, for Drupal sites, you may download all the website files and folders or just the “sites” folder if you already have a previous copy of the same website on the local server.

Try accessing the website locally just to see what it displays?
At this stage, if we try accessing the Drupal website or any CMS based website locally, we should get a PDO Exception error – access denied etc. That is because the details in the Drupal (or other CMS) settings or configuration file do not match with the details required by the local database. The actual database name, the user, password are usually different on the live server and local server. Usually on local server, we mostly use “root” as the user along with whatever password set for the root user. On live server, we normally don’t or can’t use “root” user. Database names also may have some prefix assigned by the web host but that is not the case on local server.

Accessing the website without updating/replacing the old website database:
If you want to access the website (with the one downloaded from live server) with the same old database of the website existing on the local machine, you can change the following in setting.phpfile which is under \drupalsite\sites\default folder. You may edited the details in bold below as per the user, password and database name as on the local database.
$databases = array (
  'default' => 
  array (
    'default' => 
    array (
      'database' => 'mtcdb',
      'username' => 'root',
      'password' => 'root',
      'host' => 'localhost',
      'port' => '',
      'driver' => 'mysql',
      'prefix' => '',
    ),
  ),
);
4.    Import website database from live server to local server
So far we have downloaded a website from live server to local server. If this is a basic HTML website without a database, it will work. But for websites with database, such as CMS based websites, we also need to replace the existing database with the database downloaded from the live server.

a.    Start XAMPP, start Apache and MySQL services
b.    Open http://localhost/phyMyAdmin and login if password is set
c.    First export the database to keep a backup of the local website just in case. We can delete it later if not required.
d.    Now while in phpMyAdmin, select the database of the local website, scroll down and check how many tables there are in the database. We can compare later just in case.
e.    Now, “check all table” at the bottom of the page
f.    From the drop down menu next to “Check all Tables”, select “DROP”.  Click
“Yes” when prompted and wait for it to complete.

phpmyadmin-select-tables-drop
Dropping tables from database in phpMyAdmin

g.    Now, click on IMPORT to import the downloaded database.
h.    Click “BROWSE” and locate the SQL database downloaded from the live server and import.
i.    After the database is imported, click on “STRUCTURE” tab and check that the numbers of tables are the same.

Note. The number of tables may not be the same if there were significant changes done on the live server or if some modules were installed on the live server after it was last updated from local server. But since we have already replaced the “sites” folder, the modules updated on live server are also included under “sites” folder.
k. Though we cleared all cache before exporting database from live server, we may also select all the table with prefix “cache” and EMPTY the tables, just in case. After selecting all the cache tables and after selecting “EMPTY”, you should get  the below SQL query to be executed. Click Yes to continue.
TRUNCATE `cache`;
TRUNCATE `cache_admin_menu`;
TRUNCATE `cache_block`;
TRUNCATE `cache_bootstrap`;
TRUNCATE `cache_field`;
TRUNCATE `cache_filter`;
TRUNCATE `cache_form`;
TRUNCATE `cache_image`;
TRUNCATE `cache_libraries`;
TRUNCATE `cache_menu`;
TRUNCATE `cache_page`;
TRUNCATE `cache_panels`;
TRUNCATE `cache_path`;
TRUNCATE `cache_update`;
TRUNCATE `cache_variable`;
TRUNCATE `cache_views`;
TRUNCATE `cache_views_data`;
l. After the database is successfully imported, it is now time to check database login details on “settings.php” at \drupalsite\sites\default. Since we did not drop the entire database but only dropped the tables, the name of the database remains the same locally. So it need to be updated below if the live database name is different.

$databases = array (
  'default' => 
  array (
    'default' => 
    array (
      'database' => 'mtcdb',
      'username' => 'root',
      'password' => 'root',
      'host' => 'localhost',
      'port' => '',
      'driver' => 'mysql',
      'prefix' => '',
    ),
  ),
);

Update the database name, username and password for MySql as per the details configured on the local server.

m.    Test by accessing the website locally by access http://localhost/drupalsite

Note that the user account to log in to the website would be that of the live site, not the previous local website if they are different that is. But if the development started on the local machine initially, and was uploaded to the live sever, then the username should be the same. If password for users were change on live server, then use the same passwords as used on the live server.