Tuesday 25 July 2017

IONIC 3, ANGULAR 4 AND GOOGLE MAPS DIRECTIONS SERVICE


After play around with new Ionic 3 and Angular 4 in the previous tutorial, now we started the step by step tutorial of Ionic 3, Angular 4 and Google Maps Directions Service using Google Maps Javascript API.

1. Create New Ionic 3 and Angular 4 App

As usually, we are starting our tutorial from scratch. We assume that your computer or environment already have Node.js installed. Now, open the terminal or Node.js command line then type this command to install new Ionic 3 and Cordova.
sudo npm install -g cordova ionic
Now, go to project folders then type this command to make a new Ionic 3 App.
ionic start ionic3-googlemaps-directions blank --v2
Go to the newly created app folder.
cd ionic3-googlemaps-directions
This time we will modify few default files to implements lazy loading pages. Open and edit 'src/app/app.module.ts' then remove imports, NgModule-declaration and NgModule-entryComponents of page Home. So, this file will looks like this.
import { BrowserModule } from '@angular/platform-browser';
import { ErrorHandler, NgModule } from '@angular/core';
import { IonicApp, IonicErrorHandler, IonicModule } from 'ionic-angular';
import { SplashScreen } from '@ionic-native/splash-screen';
import { StatusBar } from '@ionic-native/status-bar';

import { MyApp } from './app.component';

@NgModule({
  declarations: [
    MyApp
  ],
  imports: [
    BrowserModule,
    IonicModule.forRoot(MyApp)
  ],
  bootstrap: [IonicApp],
  entryComponents: [
    MyApp
  ],
  providers: [
    StatusBar,
    SplashScreen,
    {provide: ErrorHandler, useClass: IonicErrorHandler}
  ]
})
export class AppModule {}
Add new file 'src/pages/home/home.module.ts'.
touch src/pages/home/home.module.ts
Open and edit that file then add this lines of codes.
import { NgModule } from '@angular/core';
import { HomePage} from './home';
import { IonicPageModule } from 'ionic-angular';

@NgModule({
  declarations: [HomePage],
  imports: [IonicPageModule.forChild(HomePage)],
  entryComponents: [HomePage]
})
export class HomePageModule { }
Now, open and edit 'src/pages/home/home.ts' then add this import.
import { IonicPage } from 'ionic-angular';
Then add annotation of IonicPage before component annotation.
@IonicPage()
@Component({
  selector: 'page-home',
  templateUrl: 'home.html'
})
Next, open and edit 'src/app/app.component.ts' then remove import of HomePage and change reference to HomePage component to be 'HomePage' string.
import { Component } from '@angular/core';
import { Platform } from 'ionic-angular';
import { StatusBar } from '@ionic-native/status-bar';
import { SplashScreen } from '@ionic-native/splash-screen';

@Component({
  templateUrl: 'app.html'
})
export class MyApp {
  rootPage: string = 'HomePage';

  constructor(platform: Platform, statusBar: StatusBar, splashScreen: SplashScreen) {
    platform.ready().then(() => {
      // Okay, so the platform is ready and our plugins are available.
      // Here you can do any higher level native things you might need.
      statusBar.styleDefault();
      splashScreen.hide();
    });
  }
}
Now, run the app.
ionic serve -l
You should see this page in the browser.
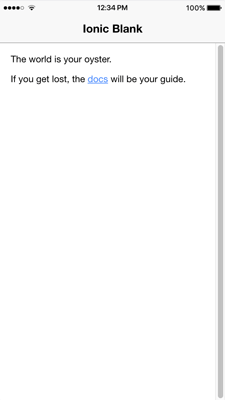
Step by Step Tutorial of Ionic 3, Angular 4 and Google Maps Directions Service - Ionic 3 Home Page

2. Setup Google Maps and Google Maps Directions Service on Google Developer Console
Before setup Google Maps and Directions Service in the Ionic 3 and Angular 4 app, we have to make sure that Google Maps Javascript API and Google Maps Directions Service is enabled on Google Developer console.
Open your browser then go to Google Developer Console then click Enable API to enable Google Maps Javascript API and Google Maps Directions.
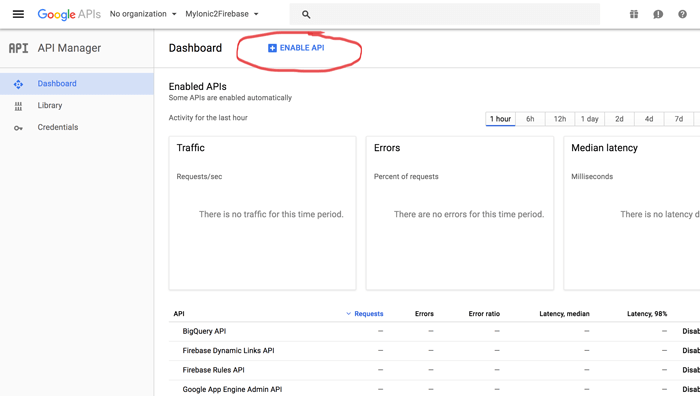
Step by Step Tutorial of Ionic 3, Angular 4 and Google Maps Directions Service - Google Developer Console
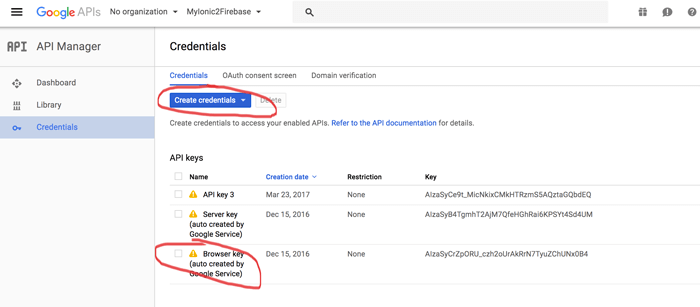
After enabling Google Maps and Google Maps Directions then Go to Credentials page by click on Credentials left the menu. Make sure that you have Browser Key, if not create Browser key by click on Create Credentials button.
Step by Step Tutorial of Ionic 3, Angular 4 and Google Maps Directions Service - Create Credentials
Write down the key on a notepad or any text editor, because we will use it later on the app.

3. Implement Google Maps and Google Maps Directions Service on The Ionic 3 App
Now, it's time to implement Google Maps and Google Maps Directions Service on the Ionic 3 app. Starting with reference Javascript library of Google Maps in 'src/index.html'. Open and edit 'src/index.html' then add this script reference before the closing of the body tag.
<script src="https://maps.googleapis.com/maps/api/js?key=YOUR_API_KEY"></script>
Change 'YOUR_API_KEY' with the key that previously written in the text editor.
Next, open and edit 'src/pages/home/home.html' then replace all tags inside 'ion-content' with this lines of tags.
<ion-content>
  <div id="floating-panel">
    <b>Start: </b>
    <select [(ngModel)]="start" id="start" (change)="calculateAndDisplayRoute()">
      <option value="chicago, il">Chicago</option>
      <option value="st louis, mo">St Louis</option>
      <option value="joplin, mo">Joplin, MO</option>
      <option value="oklahoma city, ok">Oklahoma City</option>
      <option value="amarillo, tx">Amarillo</option>
      <option value="gallup, nm">Gallup, NM</option>
      <option value="flagstaff, az">Flagstaff, AZ</option>
      <option value="winona, az">Winona</option>
      <option value="kingman, az">Kingman</option>
      <option value="barstow, ca">Barstow</option>
      <option value="san bernardino, ca">San Bernardino</option>
      <option value="los angeles, ca">Los Angeles</option>
    </select><br>
    <b>End: </b>
    <select [(ngModel)]="end" id="end" (change)="calculateAndDisplayRoute()">
      <option value="chicago, il">Chicago</option>
      <option value="st louis, mo">St Louis</option>
      <option value="joplin, mo">Joplin, MO</option>
      <option value="oklahoma city, ok">Oklahoma City</option>
      <option value="amarillo, tx">Amarillo</option>
      <option value="gallup, nm">Gallup, NM</option>
      <option value="flagstaff, az">Flagstaff, AZ</option>
      <option value="winona, az">Winona</option>
      <option value="kingman, az">Kingman</option>
      <option value="barstow, ca">Barstow</option>
      <option value="san bernardino, ca">San Bernardino</option>
      <option value="los angeles, ca">Los Angeles</option>
    </select>
    </div>
    <div #map id="map"></div>
</ion-content>
The most important thing when using Google Maps in HTML is specifying the height of the map element 'DIV', otherwise the maps will never shown. For that, open and edit 'src/pages/home/home.scss' then make it like this.
page-home {
  #floating-panel {
    position: absolute;
    top: 10px;
    right: 5px;
    z-index: 5;
    background-color: #fff;
    padding: 5px;
    border: 1px solid #999;
    text-align: center;
    font-family: 'Roboto','sans-serif';
    line-height: 30px;
    padding-left: 10px;
  }
  #map {
    height: 100%;
  }
}
Open and edit 'src/pages/home/home.ts' then replace all codes with this codes.
import { Component, ViewChild, ElementRef } from '@angular/core';
import { IonicPage } from 'ionic-angular';
import { NavController } from 'ionic-angular';

declare var google;

@IonicPage()
@Component({
  selector: 'page-home',
  templateUrl: 'home.html'
})
export class HomePage {

  @ViewChild('map') mapElement: ElementRef;
  map: any;
  start = 'chicago, il';
  end = 'chicago, il';
  directionsService = new google.maps.DirectionsService;
  directionsDisplay = new google.maps.DirectionsRenderer;

  constructor(public navCtrl: NavController) {

  }

  ionViewDidLoad(){
    this.initMap();
  }

  initMap() {
    this.map = new google.maps.Map(this.mapElement.nativeElement, {
      zoom: 7,
      center: {lat: 41.85, lng: -87.65}
    });

    this.directionsDisplay.setMap(this.map);
  }

  calculateAndDisplayRoute() {
    this.directionsService.route({
      origin: this.start,
      destination: this.end,
      travelMode: 'DRIVING'
    }, (response, status) => {
      if (status === 'OK') {
        this.directionsDisplay.setDirections(response);
      } else {
        window.alert('Directions request failed due to ' + status);
      }
    });
  }

}
4. Run Ionic 3 App on The Browser and Device
To run the Ionic 3 app on the browser, type this command.
ionic serve -l
You should see this page.
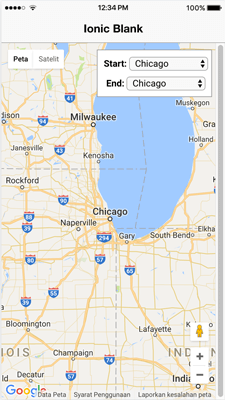
Step by Step Tutorial of Ionic 3, Angular 4 and Google Maps Directions Service - Google Maps
When you change to start, end or both select box, the map should show directions like this.
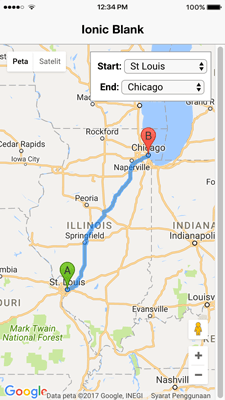
Step by Step Tutorial of Ionic 3, Angular 4 and Google Maps Directions Service - Directions
To run the Ionic 3 app on the device, don't forget to re-add platforms.
ionic platform rm ios
ionic platform add ios
ionic platform rm android
ionic platform add android
Finally, run the Ionic 3 app on the device.
ionic run android
or
ionic run ios
If you see same as the browser, then everything is working properly.

Thanks!

Saturday 22 July 2017

IONIC 3 AND ANGULAR 4 MULTI LEVEL ACCORDION MENU EXAMPLE

This is an example of a multi-level accordion menu with dynamic data using latest Ionic 3 and Angular 4.

1. Create New Ionic 3 and Angular 4 Side Menu App

We will start this tutorial by creating new Ionic 3 and Angular 4 app. This time we will use generated side menu app. Open and edit the terminal or Node.js command line then type this command.
ionic start ionic3-accordion-menu sidemenu --v2
That command will create new Ionic 3 app with the name 'ionic3-accordion-menu' using default template 'sidemenu'. Go to the newly created app folder.
cd ionic3-accordion-menu
Run the Ionic 3 app on the browser.
ionic serve -l
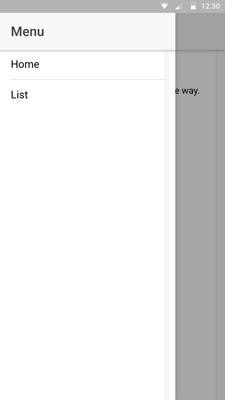
You should see this side menu.
Ionic 3 and Angular 4 Multi Level Accordion Menu Example - Side Menu
Right now, we will skip lazy loading pages configuration because we will focus only on the multilevel accordion menu. You can find more about lazy loading and Ionic 3 getting started here.


2. Create Nested Array of Objects

We have to create nested Array of objects which it's contains multilevel arrays. Create a new folder and JSON file in asset folder.
mkdir src/assets/data
touch src/assets/data/menus.json
Open and edit 'menus.json' then add this lines of data.
[
  {
    "category":"PC",
    "subs": [
      {
        "subcategory":"Processor",
        "manufactures": [
          {
            "manufacture":"Intel"
          },
          {
            "manufacture":"AMD"
          }
        ]
      },
      {
        "subcategory":"Motherboard",
        "manufactures": [
          {
            "manufacture":"Asus"
          },
          {
            "manufacture":"AMD"
          },
          {
            "manufacture":"GigaByte"
          },
          {
            "manufacture":"Intel"
          }
        ]
      },
      {
        "subcategory":"Memory",
        "manufactures": [
          {
            "manufacture":"Visipro"
          },
          {
            "manufacture":"Crucial"
          },
          {
            "manufacture":"VenomRX"
          }
        ]
      }
    ]
  },
  {
    "category":"Laptop",
    "subs": [
      {
        "subcategory":"Notebook",
        "manufactures": [
          {
            "manufacture":"Lenovo"
          },
          {
            "manufacture":"Dell"
          }
        ]
      },
      {
        "subcategory":"Netbook",
        "manufactures": [
          {
            "manufacture":"Lenovo"
          },
          {
            "manufacture":"Dell"
          },
          {
            "manufacture":"Acer"
          },
          {
            "manufacture":"HP"
          }
        ]
      }
    ]
  },
  {
    "category":"Printer",
    "subs": [
      {
        "subcategory":"Laserjet",
        "manufactures": [
          {
            "manufacture":"HP"
          },
          {
            "manufacture":"Brother"
          },
          {
            "manufacture":"Canon"
          },
          {
            "manufacture":"Samsung"
          }
        ]
      },
      {
        "subcategory":"Deskjet",
        "manufactures": [
          {
            "manufacture":"HP"
          },
          {
            "manufacture":"Canon"
          },
          {
            "manufacture":"Epson"
          }
        ]
      }
    ]
  }
]

3. Create and Call Service/Provider for Accessing Data
To access JSON data we have to create new service or provider to keep app modular. Type this command to create it.
ionic g provider DataService
Open and edit 'src/providers/data-service.ts' add 'Response' to 'Http' import.
import { Http, Response } from "@angular/http";
Create this function for call JSON data.
getMenus(){
  return this.http.get('assets/data/menus.json')
   .map((response:Response)=>response.json());
}
Register this service in 'app.module.ts' by open and edit 'src/app/app.module.ts' then add this import.
import { HttpModule } from '@angular/http';
import { DataService } from '../providers/data-service';
Add 'HttpModule' in '@NgModule' imports.
...
imports: [
  BrowserModule,
  IonicModule.forRoot(MyApp),
],
...
Add 'DataService' in '@NgModule' providers.
...
providers: [
  StatusBar,
  SplashScreen,
  {provide: ErrorHandler, useClass: IonicErrorHandler},
  DataService
]
...
Because menu holds by component, we have to edit it to call data for the menu from service/provider. Open and edit 'src/app/app.component.ts' then add this import.
import { DataService } from '../providers/data-service';
Replace this line.
pages: Array<{title: string, component: any}>;
With this.
pages: any;
Now, inject 'DataService' in constructor parameter and add this function for calling JSON data inside of constructor.
constructor(public platform: Platform, public statusBar: StatusBar, public splashScreen: SplashScreen, public dataService: DataService) {
  this.initializeApp();

  this.dataService.getMenus()
    .subscribe((response)=> {
        this.pages = response;
        console.log(this.pages);
    });

}


4. Create Multilevel Accordion Menu

Now, is the point. Creating multilevel Accordion Menu with Ionic 3 and Angular 4. Open and edit 'src/app/app.html' the add this lines of codes inside '<ion-content>'.
<ion-content>
  <ion-list>
    <ion-item *ngFor="let p of pages" text-wrap>
      {{p.category}}
      <ion-list>
        <ion-item *ngFor="let s of p.subs" text-wrap>
          {{s.subcategory}}
          <ion-list>
            <ion-item *ngFor="let m of s.manufactures" text-wrap>
              {{m.manufacture}}
            </ion-item>
          </ion-list>
        </ion-item>
      </ion-list>
    </ion-item>
  </ion-list>
</ion-content>
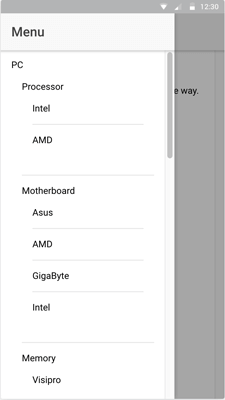
After we re-run the Ionic 3 app, the menu should look like this.
Ionic 3 and Angular 4 Multi Level Accordion Menu Example - Multi Level Menu
As you can see, there is 3 level of the menu. For that, we have to make accordion to hide child menus. Open and edit 'src/app/app.component.ts' then declare this variable.
showLevel1 = null;
showLevel2 = null;
Create new functions for toggle show/hide level 2 and level 3 of the menu.
toggleLevel1(idx) {
  if (this.isLevel1Shown(idx)) {
    this.showLevel1 = null;
  } else {
    this.showLevel1 = idx;
  }
};

toggleLevel2(idx) {
  if (this.isLevel2Shown(idx)) {
    this.showLevel1 = null;
    this.showLevel2 = null;
  } else {
    this.showLevel1 = idx;
    this.showLevel2 = idx;
  }
};
Also, create the function for check if level 2 and 3 is shown or hidden.
isLevel1Shown(idx) {
  return this.showLevel1 === idx;
};

isLevel2Shown(idx) {
  return this.showLevel2 === idx;
};
Now, open and edit 'src/app/app.html' then replace all list with this list.
<ion-content>
  <ion-list>
    <ion-item *ngFor="let p of pages; let i=index" text-wrap (click)="toggleLevel1('idx'+i)" [ngClass]="{active: isLevel1Shown('idx'+i)}">
      <h4>
        {{p.category}}
        <ion-icon color="success" item-right [name]="isLevel1Shown('idx'+i) ? 'arrow-dropdown' : 'arrow-dropright'"></ion-icon>
      </h4>
      <ion-list *ngIf="isLevel1Shown('idx'+i)">
        <ion-item *ngFor="let s of p.subs; let i2=index" text-wrap (click)="toggleLevel2('idx'+i+'idx'+i2)" [ngClass]="{active: isLevel2Shown('idx'+i+'idx'+i2)}">
          <h4>
            {{s.subcategory}}
            <ion-icon color="success" item-right [name]="isLevel2Shown('idx'+i+'idx'+i2) ? 'arrow-dropdown' : 'arrow-dropright'"></ion-icon>
          </h4>
          <ion-list *ngIf="isLevel2Shown('idx'+i+'idx'+i2)">
            <ion-item *ngFor="let m of s.manufactures" text-wrap>
              {{m.manufacture}}
            </ion-item>
          </ion-list>
        </ion-item>
      </ion-list>
    </ion-item>
  </ion-list>
</ion-content>
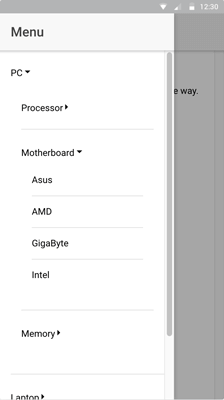
Then re-run the Ionic 3 app and see the results in the browser.
Ionic 3 and Angular 4 Multi Level Accordion Menu Example - Multi Level Accordion Menu
That it's for now, we are leaving this tutorial without action for click on each menu item. We know this isn't a best and simple way for creating multiple accordions. For that, we need suggestions and best algorithm to make this tutorial better and useful for everyone.

Thursday 13 July 2017

Facebook integration with ionic framework

In this module, you add Facebook integration to your application. You allow users to login with Facebook, view their profile, and share their favorite sessions on their feed.
In this tutorial, you use OpenFB to perform the integration. OpenFB is a micro-library that lets you integrate your JavaScript applications with Facebook. It works for both browser-based and Cordova/PhoneGap apps. It also doesn't have any dependency: You don't need the Facebook plugin when running in Cordova. You also don't need the Facebook SDK. More information here.

Step 1: Create a Facebook application

  1. Login to Facebook
  2. Access https://developers.facebook.com/apps, and click Add New App
  3. Select www as the platform
  4. Type a unique name for your app and click Create New Facebook App ID
  5. Specify a Category, and click Create App ID
  6. Click My Apps in the menu and select the app you just created
  7. Click Settings in the left navigation
  8. Click the Advanced Tab
  9. In the OAuth Settings section, add the following URLs in the Valid OAuth redirect URIs field:
  10. Click Save Changes

Step 2: Initialize OpenFB

  1. Add the OpenFB files to your application
    • Copy openfb.js and ngopenfb.js from ionic-tutorial/resources to conference/www/js.
    • Copy oauthcallback.html and logoutcallback.html from ionic-tutorial/resources toconference/www.
    • In conference/www/index.html, add script tags to include openfb.js and ngopenfb.js (before app.js):
      <script src="js/openfb.js"></script>
      <script src="js/ngopenfb.js"></script>
      
      ngOpenFB is just an Angular wrapper around the OpenFB library. It lets you use OpenFB "the Angular way": as an Angular service (called ngFB) instead of a global object, and using promises instead of callbacks.
  2. Open conference/www/js/app.js, and add ngOpenFB as a dependency to the starter module:
    angular.module('starter', ['ionic', 'starter.controllers', 'ngOpenFB'])
    
  3. Inject ngFB in the run() function declaration:
    .run(function ($ionicPlatform, ngFB) {
    
  4. Initialize OpenFB on the first line of the run() function. Replace YOUR_FB_APP_ID with the App ID of your Facebook application.
    ngFB.init({appId: 'YOUR_FB_APP_ID'});
    

Step 3: Add Facebook login

  1. Open login.html in the conference/www/templates directory. Add a Login with Facebook button right after the existing Log In button:
    <label class="item">
        <button class="button button-block button-positive" ng-click="fbLogin()">
        Login with Facebook
        </button>
    </label>
    
    Notice that fbLogin() is called on ng-click. You define the fbLogin() function in the next step.
  2. Open conference/www/js/controllers.js, and add ngOpenFB as a dependency to the starter.controllersmodule:
    angular.module('starter.controllers', ['starter.services', 'ngOpenFB'])
    
  3. Inject ngFB in the AppCtrl controller:
    .controller('AppCtrl', function ($scope, $ionicModal, $timeout, ngFB) {
    
  4. Add the fbLogin function in the AppCtrl controller (right after the doLogin function):
    $scope.fbLogin = function () {
        ngFB.login({scope: 'email,read_stream,publish_actions'}).then(
            function (response) {
                if (response.status === 'connected') {
                    console.log('Facebook login succeeded');
                    $scope.closeLogin();
                } else {
                    alert('Facebook login failed');
                }
            });
    };
    
  5. Test the application.
    • Make sure ionic serve (your local web server) is still running. If it's running but you closed your app page in the browser, you can reload the app by accessing the following URL: http://localhost:8100. If it's not running, open a command prompt, navigate (cd) to the ionic-tutorial directory and type:
      ionic serve
      
    • In the application, open the side menu and select Login
    • Click the Login with Facebook button
    • Enter your Facebook credentials on the Facebook login screen, and authorize the application
    • Open the browser console: you should see the Facebook login succeeded message
    The next time you login, you won't be asked for your credentials again since you already have a valid token. To test the login process again, simply logout from Facebook. The OpenFB library has additional methods to logout and revoke permissions that are beyond the scope of this tutorial.

Step 4: Display the User Profile

  1. Create a template for the user profile view. In the conference/www/templates directory, create a new file named profile.html and implement it as follows:
    <ion-view view-title="Profile">
        <ion-content class="has-header">
            <div class="list card">
                <div class="item">
                    <h2>{{user.name}}</h2>
                    <p>{{user.city}}</p>
                </div>
                <div class="item item-body">
                    <img src="http://graph.facebook.com/{{user.id}}/picture?width=270&height=270"/>
                </div>
            </div>
        </ion-content>
    </ion-view>
    
  2. Create a controller for the user profile view. Open controllers.js, and add the following controller:
    .controller('ProfileCtrl', function ($scope, ngFB) {
        ngFB.api({
            path: '/me',
            params: {fields: 'id,name'}
        }).then(
            function (user) {
                $scope.user = user;
            },
            function (error) {
                alert('Facebook error: ' + error.error_description);
            });
    });
    
  3. Create a route for the user profile view. Open app.js, and add the following route:
    .state('app.profile', {
        url: "/profile",
        views: {
            'menuContent': {
                templateUrl: "templates/profile.html",
                controller: "ProfileCtrl"
            }
        }
    })
    
  4. Open www/templates/menu.html, and add the following menu item:
    <ion-item menu-close href="#/app/profile">
        Profile
    </ion-item>
    
  5. Test the application:
    • Make sure ionic serve (your local web server) is still running. If it's running but you closed your app page in the browser, you can reload the app by accessing the following URL: http://localhost:8100. If it's not running, open a command prompt, navigate (cd) to the ionic-tutorial directory and type:
      ionic serve
      
    • Open the side menu and select Login
    • Login with Facebook
    • Open the side menu and select Profile

Step 5: Publish to your feed

  1. Open controllers.js, and inject ngFB in the SessionCtrl definition:
    .controller('SessionCtrl', function ($scope, $stateParams, Session, ngFB) {
    
  2. Add a share() function to the SessionCtrl controller:
    $scope.share = function (event) {
        ngFB.api({
            method: 'POST',
            path: '/me/feed',
            params: {
                message: "I'll be attending: '" + $scope.session.title + "' by " +
                $scope.session.speaker
            }
        }).then(
            function () {
                alert('The session was shared on Facebook');
            },
            function () {
                alert('An error occurred while sharing this session on Facebook');
            });
    };
    
  3. Open session.html in the templates directory and add an ng-click handler to the Share button: invoke the share function:
    <a class="tab-item" ng-click="share()">
        <i class="icon ion-share"></i>
        Share
    </a>
    
  4. Test the application:
    • Make sure ionic serve (your local web server) is still running. If it's running but you closed your app page in the browser, you can reload the app by accessing the following URL: http://localhost:8100. If it's not running, open a command prompt, navigate (cd) to the ionic-tutorial directory and type:
      ionic serve
      
    • Open the side menu and select Login
    • Login with Facebook
    • Open the side menu, select Sessions, and select a session in the list
    • Click/Tap the Share button
    • Check your feed on Facebook

Step 6: Test Facebook integration on device (optional)

  1. Add the InAppBrowser plugin used by OpenFB when running in Cordova. On the command line, navigate to the ionic-tutorial/conference directory and type:
    cordova plugins add org.apache.cordova.inappbrowser
    
  2. Build your application for a specific platform following the steps described in module 8:
    ionic build ios
    
    and/or
    ionic build android
    
    If the build fails after adding the plugin, try removing and re-adding the platform. For example:
    ionic platform remove ios
    ionic platform add ios
    ionic build ios
    
  3. Run and test your application on an iOS or Android device or emulator
This blog post was written by RajeshKumar - at Jempoints. For more on how to design and clarifications on Digital and Mobility contact us at www.jempoints.com

Install and create project in ionic framework

Step 1: Install Ionic

In this module, you install the Ionic Framework and Cordova using npm (the Node Package Manager).

Steps

  1. Make sure you have an up-to-date version of Node.js installed on your system. If you don't have Node.js installed, you can install it from here.
  2. Open a terminal window (Mac) or a command window (Windows), and install Cordova and Ionic:
    npm install -g cordova ionic
    
    On a Mac, you may have to use sudo depending on your system configuration:
    sudo npm install -g cordova ionic
    
  3. If you already have Cordova and Ionic installed on your computer, make sure you update to the latest version:
    npm update -g cordova ionic
    
    or
    sudo npm update -g cordova ionic

step 2: Starting the Node Server

In this module, you install and start a Node.js server that exposes the conference data (sessions and speakers) through a set of REST services.

Steps

  1. Download the supporting files for this tutorial here, or clone the repository:
    git clone https://github.com/ccoenraets/ionic-tutorial
    
    If you downloaded the zip file, unzip it anywhere on your file system.
  2. Open a terminal window (Mac) or a command window (Windows), and navigate (cd) to the ionic-tutorial/serverdirectory
  3. Install the server dependencies:
    npm install
    
  4. Start the server:
    node server
    
    If you get an error, make sure you don't have another server listening on port 5000.
  5. Test the REST services. Open a browser and access the following URLs:

step 3: Creating an Ionic Application

In this module, you use the Ionic CLI (command line interface) to create a new application based on the sidemenu starter app.

Steps

  1. Open a new terminal window (Mac) or a command window (Windows), and navigate (cd) to the ionic-tutorialdirectory
  2. Using the Ionic CLI, create an application named conference based on the sidemenu starter app:
    ionic start conference sidemenu
    
  3. Navigate to the conference folder
    cd conference
    
  4. Start the application in a browser using ionic serve.
    ionic serve
    
    NOTE: Because of cross domain policy issues (specifically when loading templates), you have to load the application from a server (using the http protocol and not the file protocol). ionic serve is a lightweight local web server with live reload.
  5. In the application, open the side menu ("hamburger" icon in the upper left corner) and select Playlists. Select a playlist in the list to see the details view (not much to see at this point).
    In the next modules, you will replace the playlists with a list of conference sessions retrieved from the server using the REST services you experimented with in the previous module.
  6. Open the side menu again and select Login. Click the Login button to close the window (Login is not implemented in the starter app).
    In the last module of this tutorial you will implement Login using Facebook.

step 4: Creating the Session Service

In the sidemenu starter app, the playlists are hardcoded in controllers.js. In this module, you create a Session service that uses the Angular resource module (ngResource) to retrieve the conference sessions using REST services.

Steps

  1. In the conference/www/js directory, create a file named services.js
  2. In services.js, define a module named starter.services with a dependency on ngResource:
    angular.module('starter.services', ['ngResource'])
    
  3. In that module, define a service named Session that uses the Angular resource module to provide access to the REST services at the specified endpoint:
    angular.module('starter.services', ['ngResource'])
    
    .factory('Session', function ($resource) {
        return $resource('http://localhost:5000/sessions/:sessionId');
    });
    
    In a real-life application, you would typically externalize the server parameters in a config module.
  4. The starter.services module you just created has a dependency on the Angular resource module which is not included by default. Open index.html and add a script tag to include angular-resource.min.js (right after ionic-bundle.js):
    <script src="lib/ionic/js/angular/angular-resource.min.js"></script>
    
  5. Add a script tag to include the services.js file you just created (right after app.js):
    <script src="js/services.js"></script>

step 5: Creating the Session Controllers

AngularJS controllers act as the glue between views and services. A controller often invokes a method in a service to get data that it stores in a scope variable so that it can be displayed by the view. In this module, you create two controllers: SessionsCtrl manages the session list view, and SessionCtrl manages the session details view.

Step 1: Declare starter.services as a Dependency

The two controllers you create in this module use the Session service defined in the starter.services module. To add starter.services as a dependency to the starter.controller module:
  1. Open conference/www/js/controllers.js
  2. Add starter.services as a dependency to make the Session service available to the controllers:
    angular.module('starter.controllers', ['starter.services'])
    

Step 2: Implement the Session List Controller

  1. In controllers.js, delete PlayListsCtrl (plural)
  2. Replace it with a controller named SessionsCtrl that retrieves the list of conference sessions using the Session service and stores it in a scope variable named sessions:
    .controller('SessionsCtrl', function($scope, Session) {
        $scope.sessions = Session.query();
    })
    

Step 3: Implement the Session Details Controller

  1. In controllers.js, delete PlayListCtrl (singular)
  2. Replace it with a controller named SessionCtrl that retrieves a specific session using the Session service and stores it in a scope variable named session:
    .controller('SessionCtrl', function($scope, $stateParams, Session) {
        $scope.session = Session.get({sessionId: $stateParams.sessionId});
    });
    

step 6: Creating Templates

In this module, you create two templates: sessions.html to display a list of sessions, and session.html to display the details of a particular session.

Step 1: Create the sessions template

  1. In the conference/www/templates directory, rename playlists.html (plural) to sessions.html
  2. Implement the template as follows:
    <ion-view view-title="Sessions">
      <ion-content>
        <ion-list>
          <ion-item ng-repeat="session in sessions"
                    href="#/app/sessions/{{session.id}}">{{session.title}}</ion-item>
        </ion-list>
      </ion-content>
    </ion-view>
    
    Notice the use of the ng-repeat directive to display the list of sessions

Step 2: Create the session template

  1. Rename playlist.html (singular) to session.html
  2. Implement the template as follows:
    <ion-view view-title="Session">
      <ion-content>
        <div class="list card">
          <div class="item">
            <h3>{{session.time}}</h3>
            <h2>{{session.title}}</h2>
            <p>{{session.speaker}}</p>
          </div>
          <div class="item item-body">
            <p>{{session.description}}</p>
          </div>
          <div class="item tabs tabs-secondary tabs-icon-left">
            <a class="tab-item">
              <i class="icon ion-thumbsup"></i>
              Like
            </a>
            <a class="tab-item">
              <i class="icon ion-chatbox"></i>
              Comment
            </a>
            <a class="tab-item">
              <i class="icon ion-share"></i>
              Share
            </a>
          </div>
        </div>
      </ion-content>
    </ion-view>
    

Module 7: Implementing Routing

In this module, you add two new routes (states) to the application: app.sessions loads the session list view, and app.session loads the session details view.

Step 1: Define the app.sessions route

  1. Open app.js in conference/www/js
  2. Delete the app.playlists state
  3. Replace it with an app.sessions state defined as follows:
    .state('app.sessions', {
      url: "/sessions",
      views: {
          'menuContent': {
              templateUrl: "templates/sessions.html",
              controller: 'SessionsCtrl'
          }
      }
    })
    

Step 2: Define the app.session route

  1. Delete the app.single state
  2. Replace it with an app.session state defined as follows:
    .state('app.session', {
        url: "/sessions/:sessionId",
        views: {
            'menuContent': {
              templateUrl: "templates/session.html",
              controller: 'SessionCtrl'
          }
        }
    });
    

Step 3: Modify the default route

Modify the fallback route to default to the list of sessions (last line in app.js):
$urlRouterProvider.otherwise('/app/sessions');

Step 4: Modify the side menu

  1. Open menu.html in conference/www/templates
  2. Modify the Playlists menu item as follows (modify both the item label and the href):
    <ion-item menu-close href="#/app/sessions">
        Sessions
    </ion-item>
    

Step 5: Test the application

  1. Make sure ionic serve (your local web server) is still running.
    • If it's running but you closed your app page in the browser, you can reload the app by loading the following URL: http://localhost:8100
    • If it's not running, open a command prompt, navigate (cd) to the ionic-tutorial directory and type:
      ionic serve
      
  2. In the conference application, open the side menu ("Hamburger" icon in the upper left corner) and selectSessions. Select a session in the list to see the session details.

This blog post was written by RajeshKumar - at Jempoints. For more on how to design and clarifications on Digital and Mobility contact us at www.jempoints.com

IONIC INSTALL ON OSX / MAC


If you are like me and just starting to work with the Ionic Framework and don’t already have a machine setup to do Android, iOS, Node, etc development then many of the guides out there leave out a number of steps that you need to do in order to get everything working.
Even being a windows user I was able to pretty easily get Ionic working on a Mac. The only difference between the Windows setup and the OSx setup is that you can only add iOS to Ionic on a Mac.

Software to be installed

General Install Steps

  1. Install homebrew and node js via http://www.johnpapa.net/how-to-use-npm-global-without-sudo-on-osx/
  2. NPM packages
    • npm install -g cordova
    • npm install -g ionic
    • npm install -g gulp
  3. Google Chrome - Download from https://www.google.com/chrome/browser/desktop/

Android Setup Steps

  1. JDK 7

export JAVA_HOME=/Library/Java/JavaVirtualMachines/jdk1.7.0_72.jdk/Contents/Home

  1. Android Studio
  2. Ant

export ANT_HOME=/users/jpjames/Development/apache-ant-1.9.4

  1. Android SDK
    • Download from [http://developer.android.com/sdk/index.html#Other](http://developer.android.com/sdk/index.html#Other_
    • Unzip to /users/[Your username]/Development
    • Open ~/.bash_profile and add the following line:

export PATH=${PATH}:/users/[Your UserName/Development/android-sdk-macosx/tools:/users/[Your UserName/Development/android-sdk-macosx/platforms:${ANT_HOME}/bin

  1. Download correct Android API
    • in terminal type source ~/.bash_profile to load the ~/.bash_profile changes.
    • type android from terminal. If everything is working correct it will open up the Android SDK Manager.
    • Install API 22 with SDK Platforms and Arm Image checked
  2. Configure Android Emulator
    • In terminal type android avd. If everything is working correct it will open up the Android AVD Manager.
    • Click the create button and add at least 1 device to emulate
  3. Configure Genymotion Setup
    • After Genymotion is installed, open up the Genymotion UI and click on the Add Button.
    • Then click the Sign in button and follow the login instructions to login with the account that you create as part of the Genymotion download.
    • After you are logged in, select from the Android Version drop down 4.4.4
    • From the Device model drop down select a device type
    • Then select a device from the available list
    • Click the Next button.
    • Click the Next button and wait for the device to download
    • Click the Finish button.

iOS Setup Steps

  1. Install Xcode from app store. This will take awhile since it is ~2 gigs in size.
    • Once install is completed, open xcode and accept the license
  2. Install the IOS Simulator that Ionic will use.

npm install -g ios-sim

Verifying that everything works

  1. Open terminal
  2. Navigate the directory where you store you development projects (I use /users/[Your Username]/projects)
  3. From c:\projects type: ionic start todo blank
  4. cd into c:\projects\todo (directory was created by the ionic start command)
  5. Run the commands:

ionic platform add android
ionic platform add ios

  1. Run the command:

ionic build android
ionic build ios

  1. If using emulator run the command:
    • Note: The Genymotion emulator is seen as a device and not an emulator.

ionic emulate android
ionic emulate ios

  1. If running on a device run the command:
    • For Android, if using the Genymotion emulator, make sure to start the Genymotion device you downloaded before running the command below. You can start the device by selecting the device that you downloaded and clicking the start button.
    • For iOS: In order to run on an iOS device you must go through the Apple provisioning process.

ionic run android
ionic run ios