Wednesday 28 June 2017

Ionic 3 and Angular 4 connection with a REST web service


Announcement of Ionic 3

Wait, the Ionic 2 has just been launched a few months ago, is not it? Do not worry! Ionic 3 is Ionic 2 with some break changes. Like Angular, which arrives at its 4th version a few days ago, which means that when some updates require structural changes, the number of major versions increases accordingly.
This version comes with support for Angular 4 and an experimental support for Lazy Loading. 
More details on the Ionic blog:  http://blog.ionic.io/ionic-3-0-has-arrived/ 

Create desktop applications with Ionic Split Pane and Grid


Create applications that work on a mobile, tablet, and now desktop application with the new Ionic Split Pane and Grid controls. We are getting closer to our vision of an ionic application running wherever your users are, and these two components are major pieces of this puzzle.

Discover  Split Pane  and the new  Responsive Grid ! 
The Ionic 3 is still in beta. Before you start, you have to make a checklist.

- Node.js already installed with the command prompt.

- Ionic must be updated with this command.
npm install -g ioni

Create an Ionic 3 application

Always like the previous version of Ionic. Type this command to create a new Ionic 3 application.

ionic start ionic3 --v2
This command always uses the prefix "--v2", but do not worry if you check the dependencies in "package.json", you will see the difference.
Now you have to place yourself, with the command prompt, in the folder of your project (ionic3) and run on the browser after typing this command.
ionic serve -l

You are going to have an ionic 3 project with 3 tabs: Home, about and contact.

In this project we will try to display a list of countries that exist in this link which displays the data in JSON format:  https://restcountries.eu/rest/v2/all 

Ionic 3: connection with a REST web service


First, to be able to access a REST API, we must create a service or a Provider by this command.

ionic g provider rest
You will get a folder provider in which there is a file rest.ts
Open this file and put the following code in this file:
Import { Injectable } from '@ angular / core' ;
Import { Http } from '@ angular / http' ;
Import 'rxjs / add / operator / map' ;
@ Injectable ()
Export class Rest
{
Constructor ( public http : Http )
{
This . Http = http ;
}
GetAll ()
{
Return this . Http . Get ( 'https://restcountries.eu/rest/v2/all' ). Map ( res => res . Json ());
}
}
We need to register "HttpModule" in "app.module.ts", add this import to "app.module.ts".
import { HttpModule } from '@angular/http';
In the @NgModule imports section, add "HttpModule" so that it looks like this.
imports: [
  BrowserModule,HttpModule,
  IonicModule.forRoot(MyApp)
  ],
Always in "app.module.ts", save the Provider "Rest" first.
import { Rest } from '../providers/rest';
In the @NgModule providers section, add "Rest".
providers: [
  StatusBar,
  SplashScreen,
  {provide: ErrorHandler, useClass: IonicErrorHandler}, Rest
 ]
Now it's time to display the list of countries in the Home page. First, we need to change "home.ts" and put this code.
Import { Component } from '@ angular / core' ;
Import { NavController } from 'ionic-angular' ;
Import { Rest } from '../../providers/rest' ;
@ Component ({
Selector: 'page-home' ,
TemplateUrl: 'home.html'
})
Export class HomePage {
Items : string [];
Constructor ( public navCtrl : NavController , public rest : Rest ) {
This . GetPays ();
}
GetPays ()
{
This . Rest . GetAll (). Subscribe ( res => {
This . Items = res ;
});
}
}
Now change the code of the home.html file and put this code:
< Ion-header >
< Ion-navbar >
< Title-title > Home </ ion-title >
</ Ion-navbar >
</ Ion-header >
< Ion-content padding >
< Ion-list >
< Ion-item * ngFor = "let item of items" >
< Ion-avatar item-left >
< Img src = "{{item.flag}}" >
</ Ion-avatar >
< H2 > Country: </ h2 > < h2 > {{item.name}} </ h2 >
< P > Capital: {{item.capital}}, Region: {{item.region}} </ p >
</ Ion-item >
</ Ion-list >
</ Ion-content >

Monday 26 June 2017

Android O introduced an Animated clock icon

Android O third developers preview comes with a lots of new features like media notification color change, background app running notification etc. But, now Android O will get a new animated clock icon very soon.
According to developers, Pixel Launcher will soon support the new animated clock icon. The animated clock icon is currently available in Action Launcher latest version. The animated clock feature gives you a animated app icon and a animated clock widget.

So, this feature will be available for Android O soon. But, for get this feature on your device download the Action Launcher. For download the app click the download link given below.

Download Action Launcher 

So, this is for now, for more latest Android updates follow me on Facebook, Twitter and Google Plus, links are given below and don't forget to share, thank you. 

Friday 23 June 2017

XAMPP Server | Apache Service Unable To Start Due To uTorrent

XAMPP Server Apache Service Unable To Start Due To uTorrent
Issue: XAMPP Server Apache Service unable to Start
Error:
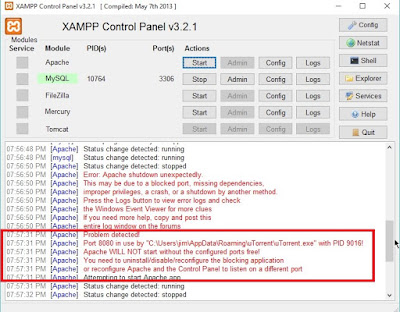
07:57:31 PM  [Apache]     Problem detected!
07:57:31 PM  [Apache]     Port 8080 in use by "C:\Users\jim\AppData\Roaming\uTorrent\uTorrent.exe" with PID 9016!
07:57:31 PM  [Apache]     Apache WILL NOT start without the configured ports free!
07:57:31 PM  [Apache]     You need to uninstall/disable/reconfigure the blocking application
07:57:31 PM  [Apache]     or reconfigure Apache and the Control Panel to listen on a different port


Cause:
HTTP Port required by Apache service is not free, as it is used by uTorrent. This also means that uTorrent service is also running.

Please Note: In the log above, the port configured for Apache is 8080. The default post is usually 80. But on my system, Apache is configured to listen to 8080. Port # 80 is used by IIS server.
See here how to configure Apache port when running along with IIS server on the same machine.

Issue Replication:
  •  Open XAMPP control panel (See here how to install XAMPP on Windows)
  • Click Start next to Apache service if it is not started automatically
  • See the error displayed on the XAMPP Control Panel
  • In this example, we see the error - " Port 8080 in use by "C:\Users\jim\AppData\Roaming\uTorrent\uTorrent.exe" with PID 9016!"
Solution:
  • As per the error message in the XAMPP Control Panel, we see that uTorrent has taken over the port number 8080. So, we will check uTorrent settings.
  • Open uTorrent. Since we get the error, it means it is already running.
  • Click on uTorrent Options > Preferences > Advanced > WebUI
  • You should see that "Enable WebUI" is usually "Disabled" but port number 8080 is set under "Connectivity" > "Alternative Listening Port", and is greyed out.
  • Enable / Check "Enable WebUI"
  • Change the port number under "Connectivity" from 8080 to something like 8088.
  • Disable /Uncheck "Enable WebUI"
  • Click Apply
  • Click OK
  • Now Open XAMPP Control Panel and try starting Apache Service. It should start.

uTorrent Options  Preferences  Advanced  WebUI connectivity port number 8080
 Hope this solution helps someone. Cheers!

How to download a website from live server to development local server?

download-move-website-from-live-server-to-local-development-server

In this post, we shall see how to download a website from live server to development local computer. I will be using a Drupal website as an example. On the local machine, I am running XAMPP stack on Windows. But the process would generally be the same for any other CMS or website for that matter. If you are looking for how to move or upload a website from local development computer to a live production server, following the steps here.

Usually most people develop website first on local development computer and then upload the website to a live server using FTP clients or directly from the web host interface. Some may then continue with further changes and developments on the live server instead of doing everything on local development computer and upload the changes/files. It is a good practice though – to develop and edit changes on local development computer as we would not want our websites to break due to some new changes. So, it is best to develop and test first on local development computer before uploading to live server. Though it is a duplication of work, it will save us the trouble if something should go wrong.

However, there may be cases where most common and non-risky changes might have been done on the production server more often than on the local development computer. And if you finally want to download the website to local development computer so that the local copy is exactly same as the one live, then you need to download the website. In the following steps, we shall see how to download a website from live server to development local server. As stated above, I will be using a Drupal website running on XAMPP on local machine running Windows. But the process would generally be the same for any other CMS or website for that matter. If it is a simple HTML website without any database involved, it is as simple as copying all the website files to the local machine and place the main website folder inside the WWW or htdocs directory for IIS and Apache respectively. 

How to move a Drupal Site from live server to development computer? 

This is an example on Drupal running on XAMPP on Windows, so the directory names etc. may be different if you are using another CMS or another development stack. In this example, "drupalsite" is the name of the website just for example.

1.    Download the website files from live server
a.    Login to web host control panel or by using an FTP program, download the website files.

For Drupal sites, just download the “sites” folder as that is where all the website files are. If there has been some customization done outside the “sites” folder, you should download all the website files under root or "site" folder plus the folder containing the customization done.

2.    Download the database of the live website
a.    Login to the Drupal website as an Admin and flush all cache before exporting database. It will make the database file smaller and may also save us from some errors during the import.
To clear all cache in Drupal- 
go to “/config/development/performance” and click on “Clear all cache”.
b.    Login to the website’s phpMyAdmin, select the database for the website
c.    Click “export” tab and export the database
d.    It will be exported as a “.sql” file.

3.    Put the downloaded website files to the local development computer.
As discussed above, for Drupal websites, you may download the complete website files or just the “sites” folder provided there are no customization done outside the “sites” folder and  provided there is a previous version of the same website on the local server. In that case, you just need to download the “sites” folder and replace on the local server.

If all website files were downloaded from live server then-
If you have downloaded all the website files or you want to replace all the website files, then just rename the existing website folder on the local server with “_old” appended to the website folder name for the time being. If we face issues, we can still rename and remove “_old” to use it again.

Go to C:\xampp\htdocs\drupalsite and rename it to “drupalsite_old”

a. Now move the website files downloaded from live server to C:\xampp\htdocs\drupalsite

If only "sites" folder was downloaded from live server then-
For Drupal, if there are no customization done outside the “Sites” directory, you may only replace the “sites” directory, since that folder contains all the website files necessary.

a. In that case, look for sites folder under C:\xampp\htdocs\drupalsite and simply rename the sites folder to say “sites_old”. We can delete this folder if not longer required later.
b.  Move the "sites" folder downloaded from live server to C:\xampp\htdocs\drupalsite

That is all regarding moving the website files from live server to development server.

As discussed above, for Drupal sites, you may download all the website files and folders or just the “sites” folder if you already have a previous copy of the same website on the local server.

Try accessing the website locally just to see what it displays?
At this stage, if we try accessing the Drupal website or any CMS based website locally, we should get a PDO Exception error – access denied etc. That is because the details in the Drupal (or other CMS) settings or configuration file do not match with the details required by the local database. The actual database name, the user, password are usually different on the live server and local server. Usually on local server, we mostly use “root” as the user along with whatever password set for the root user. On live server, we normally don’t or can’t use “root” user. Database names also may have some prefix assigned by the web host but that is not the case on local server.

Accessing the website without updating/replacing the old website database:
If you want to access the website (with the one downloaded from live server) with the same old database of the website existing on the local machine, you can change the following in setting.phpfile which is under \drupalsite\sites\default folder. You may edited the details in bold below as per the user, password and database name as on the local database.
$databases = array (
  'default' => 
  array (
    'default' => 
    array (
      'database' => 'mtcdb',
      'username' => 'root',
      'password' => 'root',
      'host' => 'localhost',
      'port' => '',
      'driver' => 'mysql',
      'prefix' => '',
    ),
  ),
);
4.    Import website database from live server to local server
So far we have downloaded a website from live server to local server. If this is a basic HTML website without a database, it will work. But for websites with database, such as CMS based websites, we also need to replace the existing database with the database downloaded from the live server.

a.    Start XAMPP, start Apache and MySQL services
b.    Open http://localhost/phyMyAdmin and login if password is set
c.    First export the database to keep a backup of the local website just in case. We can delete it later if not required.
d.    Now while in phpMyAdmin, select the database of the local website, scroll down and check how many tables there are in the database. We can compare later just in case.
e.    Now, “check all table” at the bottom of the page
f.    From the drop down menu next to “Check all Tables”, select “DROP”.  Click
“Yes” when prompted and wait for it to complete.

phpmyadmin-select-tables-drop
Dropping tables from database in phpMyAdmin

g.    Now, click on IMPORT to import the downloaded database.
h.    Click “BROWSE” and locate the SQL database downloaded from the live server and import.
i.    After the database is imported, click on “STRUCTURE” tab and check that the numbers of tables are the same.

Note. The number of tables may not be the same if there were significant changes done on the live server or if some modules were installed on the live server after it was last updated from local server. But since we have already replaced the “sites” folder, the modules updated on live server are also included under “sites” folder.

k. Though we cleared all cache before exporting database from live server, we may also select all the table with prefix “cache” and EMPTY the tables, just in case. After selecting all the cache tables and after selecting “EMPTY”, you should get  the below SQL query to be executed. Click Yes to continue.
TRUNCATE `cache`;
TRUNCATE `cache_admin_menu`;
TRUNCATE `cache_block`;
TRUNCATE `cache_bootstrap`;
TRUNCATE `cache_field`;
TRUNCATE `cache_filter`;
TRUNCATE `cache_form`;
TRUNCATE `cache_image`;
TRUNCATE `cache_libraries`;
TRUNCATE `cache_menu`;
TRUNCATE `cache_page`;
TRUNCATE `cache_panels`;
TRUNCATE `cache_path`;
TRUNCATE `cache_update`;
TRUNCATE `cache_variable`;
TRUNCATE `cache_views`;
TRUNCATE `cache_views_data`;
l. After the database is successfully imported, it is now time to check database login details on “settings.php” at \drupalsite\sites\default. Since we did not drop the entire database but only dropped the tables, the name of the database remains the same locally. So it need to be updated below if the live database name is different.

$databases = array (
  'default' => 
  array (
    'default' => 
    array (
      'database' => 'mtcdb',
      'username' => 'root',
      'password' => 'root',
      'host' => 'localhost',
      'port' => '',
      'driver' => 'mysql',
      'prefix' => '',
    ),
  ),
);

Update the database name, username and password for MySql as per the details configured on the local server.

m.    Test by accessing the website locally by access http://localhost/drupalsite

Note that the user account to log in to the website would be that of the live site, not the previous local website if they are different that is. But if the development started on the local machine initially, and was uploaded to the live sever, then the username should be the same. If password for users were change on live server, then use the same passwords as used on the live server.

Wednesday 21 June 2017

How to website from XAMPP on one computer to XAMPP on another computer?

How to website from XAMPP on one computer to XAMPP on another computer?

I normally use XAMPP for web development on my local Windows machine. And I needed to move the website files from one computer to another as I have a new Windows laptop on which I would be doing my web development activities from now on. So, I needed to move the existing website files from the older computer to the new computer, along with the database of the website. If you are in a similar situation, refer to the steps below how to move the websites from XAMPP on one computer to XAMPP on another computer


XAMPP is a free and open source cross-platform web server solution stack package developed by Apache Friends, consisting mainly of the Apache HTTP Server, MariaDB database (supports MySQL) , and interpreters for scripts written in the PHP and Perl programming languages.
  • X = Cross Platform / Any Operating System
  • A = Apache Web Server
  • M = MySQL / Maria DB
  • P = PHP Programming Language
  • P = Perl Programming Language
XAMPP is easy to install and packages all the above requirements of web development out of the box. There is minimal configuration required to kick start web development on local machine instead of installing all the above requirements manually. 

How to move websites from XAMPP on one computer to XAMPP on another computer. 

Assumptions / Pre-Requisites:
So, I have been using XAMPP for web development on my local computer. I use WordPress and Drupal mostly, but there are some custom PHP sites too. In this post, I will be using one of the WordPress CMS site for the purpose of illustration in this post. On my system, XAMPP is installed at C drive at C:/xampp. Thus, website files are located under C:\xampp\htdocs directory.

For the steps explained below, it is assumed that XAMPP is installed on both the computers already.

Steps to move websites from XAMPP on one computer to XAMPP on another computer. 
This method is not only for WordPress shown in this example. It can be used for any other CMS or sites. The basic process in a nutshell is to move the website folder to the new computer under the same folder, that is under C:\xampp\htdocs and move the database to the new computer

1) Move website files from computer 1 to computer 2:
  • Copy the website folder you want to move from C:\xampp\htdocs\. For this example, the website folder to be copied is "techblog". Thus, I copied the folder C:\xampp\htdocs\techblog
  • Move the website folder from the computer 1 to C:\xampp\htdocs\ on the computer 2 using any medium. For this example, the website folder copied is "techblog". So, we should have the website files in C:\xampp\htdocs\techblog. 
That is all that is required as far as moving the website files from one computer to another for using with XAMPP is concerned.

2) Export database of the website from computer 1
  • Open phpMyAdmin in a browser on computer 1 by accessing http://localhost/phpmyadmin
  • Login to phpMyAdmin if a password is set for root
  • Select the  database from the left sidebar of phpMyAdmin
  • Click on STRUCTURE and check how many tables the database has. It is displayed at the bottom of the STRUCTURE page. Compare  the number of tables during import on computer 2.
  • Now to export, click on EXPORT tab
Note: For some CMS (such as Drupal, WordPress etc.) it is recommended to clear cache from the admin interface before exporting database to avoid any import issues and/or site issues after import.
  • Keep default settings and just click "GO" to export and download the database.
  • An SQL file will be exported. Save it to computer 1

 3) Import the exported database from computer 1 into computer 2 
  • On computer 2, access http://localhost/phpMyAdmin and login if a password is set.
  • Once logged in to phpMyAdmin, click on "databases" and create a new database. 
  • You can name the database whatever you want but preferably keep the same name so that settings need not be changed.
  • Select the new database from the left sidebar
  • Click Import.
  • Click on the "Browse" button and locate the database we exported from the old computer.
  • Keep default settings and just click "GO" to import the database.
  • Once the database is installed, check the website on computer 2 by accessing http://localhost/techblog. If the database name was kept the same during new database creation on computer 2, there is no need to change database name in the website settings file.
Database import issues? 

Unable to import database into phpMyAdmin due to an error?
If this is a new  XAMPP installation on the new computer without any setting changes so far, then the database might not have uploaded due to size limit. In that case, upload size need to be changed in php.ini file on computer 2.

Error: No data was received to import. Either no file name was submitted, or the file size exceeded the maximum size permitted by your PHP configuration
If you are unable to import database into phpMyAdmin due to the above error, you would need to edit some settings in php.ini configuration file at C:\xampp\php\php.ini.

  • Open php.ini in a notepad, preferably Notepad++ and edit the values of the following parameters. I increased the following parameters to:
post_max_size = 50M
upload_max_filesize =50M
max_execution_time=200
max_input_time=200
Since it is a development environment, you can set it to any reasonable value. On live server, these parameters will usually be controlled by your web host service provider. and you may not have access to php.ini. 
  • After changing the values of the above parameters, restart Apache from XAMPP control panel.
  • Retry the import of SQL database into phpMyAdmin. It should be resolved now.

How to prepare the SQL database file before import if the XAMPP on the previous computer was using another port for such as "localhost:8080" instead of the default "localhost"
If on the previous computer 1, XAMPP was set to use "localhost:8080" instead of "localhost" to access web pages but on the new computer it is using the default "localhost" to access web pages, then the website on computer 2 will not work properly as the database has referenced to "http://localhost:port-number/websitename". Sometimes, people have multiple web servers on a single computer such as IIS and Apache from XAMPP. In that case, the default HTTP port 80 may already be used by the other web server. So, Apache is assigned another port to use.

We can edit the URLs containing the "localhost:8080" from phpMyAdmin with simple SQL querries but I find it easier to edit it using text editors by using simpler "find and replace" feature. We can find all reference of "localhost:8080" and replace them with "localhost" only. For this purpose Notepad++ is good instead of Notepad.
  • Open the databasename.sql exported from the previous XAMPP in a Notepad or Notepad++
  • Press CTRL+F and search for "localhost:8080". You should be able to see some results.
  • Now replace all instances of "localhost:8080" with "localhost" by doing replace all.
  • Save the edited SQL file or "Save As" with a new name
  • Use this edited SQL file in the phpMyAdmin import (described above).

Tuesday 20 June 2017

Bitcoin Coinbase API for PHP - Example

Bitcoin Coinbase API for PHP - Example

Bitcoin is an innovative payment network and a new kind of money. Bitcoin is the world's most widely used alternative currency with a total market cap of approximately $10 billion. The bitcoin network is made up of thousands of computers run by individuals all over the world.
Here i am going to present a small example to send money with Coinbase API. You can create a new payment button with Coinbase api. Let see step by step how it will work.

Step 1: Create a payment.php file


<?phprequire __DIR__ . '/vendor/autoload.php';
use Coinbase\Wallet\Client;
use Coinbase\Wallet\Configuration;
use Coinbase\Wallet\Value\Money;
use Coinbase\Wallet\Resource\Checkout;
use Coinbase\Wallet\Resource\Order;
    
$apiKey = 'API KEY';
$apiSecret = 'API SECRET';

$configuration = Configuration::apiKey($apiKey, $apiSecret);
$client = Client::create($configuration);

$amount = 0.1;
$orderId = "YOUR ORDER ID";

$params = array(
    'name'          => 'Site order ID: '.$orderId,
    'amount'        => new Money($amount, 'USD'),
    'metadata'      => array('order_id' => $orderId),
    'auto_redirect' => true
);

$checkout = new Checkout($params);
$client->createCheckout($checkout);
$code = $checkout->getEmbedCode();

$redirect_url = "https://www.coinbase.com/checkouts/$code";
?>

Step 2: Create a notification.php file


<?php require __DIR__ . '/vendor/autoload.php';
use Coinbase\Wallet\Client;
use Coinbase\Wallet\Configuration;
use Coinbase\Wallet\Value\Money;
use Coinbase\Wallet\Resource\Checkout;
use Coinbase\Wallet\Resource\Order;

$apiKey = 'API KEY';
$apiSecret = 'API SECRET';
$configuration = Configuration::apiKey($apiKey, $apiSecret);
$client = Client::create($configuration);

$raw_body = file_get_contents('php://input');
$signature = $_SERVER['HTTP_CB_SIGNATURE'];
$authenticity = $client->verifyCallback($raw_body, $signature); // boolean
if($authenticity){
 $order = json_decode($raw_body, true);
    mail("YOUR EMAIL ID","Coinbase Patment Notifications",print_r($order, true));
}
?>

Step 3: Create a success.php file


<?php
$order = $_GET['order'];
var_dump($order);
?>

Note: You need to set these all files url in your coinbase merchant account