Tuesday 16 June 2020

create an npm package with a simple node.js module on ubuntu

Today I want to create a npm package for a simple javascriptlibrary with modules and some tests. Src:https://egghead.io/lessons/javascript-how-to-write-a-javascript-library-configuring-npm-and-creating-a-package-json

At first we need a git repository on github.

Create a repository named "starwarsNames"

Login into your github account and create a new repository "starwarsNames"

echo "# starwarsNames" >> README.md
git init
git add README.md
git commit -m "first commit"
git remote add origin https://github.com/pboethig/starwarsNames.git
git push -u origin master

create an account on https://www.npmjs.com, if you dont have one
You will need an account there to publish your extension. 

Remember your <npm-username> you will need it.

Install nodejs
$ apt-get install nodejs
$ sudo ln -s /usr/bin/nodejs /usr/bin/node  

Install npm, if npm is not installed 
$ apt-get install npm 


If you are on windows you have to install it manualy, If you are on mac, you can use the packagemanager,

At next we inititialize the npm project. 
$ npm set init-author-name 'Your Name'
$ npm set init-author-email 'your email'
$ npm set init-author-license 'MIT'
$ npm set save-exact true

If you want to check that config, you can do it with
$ cat ~/.npmrc

Add your npm user to your project 
$ npm adduser
Username: <your npm-username>
Password: <your npm-password>
Email: (this IS public) <your npm-email>

Initilize your npm project
$ npm init

this will ask some data from you, and puts outs the package.json for you

name: (starwars-names-<your npm username>)
version: (1.0.0)
license: (MIT)
About to write to /var/www/html/starwarsNames/package.json:

{
  "name": "starwars-names",
  "version": "1.0.0",
  "description": "get random starwars names",
  "main": "src/index.js",
  "scripts": {
    "test": "echo \"Error: no test specified\" && exit 1"
  },
  "repository": {
    "type": "git",
    "url": "git+ssh://git@github.com/pboethig/starwarsNames.git"
  },
  "keywords": [
    "random",
    "starwars"
  ],
  "author": "pboethig",
  "license": "MIT",
  "bugs": {
    "url": "https://github.com/pboethig/starwarsNames/issues"
  },
  "homepage": "https://github.com/pboethig/starwarsNames#readme"
}

Okay. Lets create our first module:
- create a folder "src" in your projectroot to store our module sources.
- now , create a file "index.js" in the new src folder

Open this new file in your code editor. I am using vscode for it. That editor  has great node.js plugins.

Now we want to define our modulestructure. 
Type following code in index.js

var starWarsNames = require('./starwars-names.json');
module.exports =
{
    all,
    random
};


This tells node that you want to store the "starwars-names.json" list in a variable, that your module will use and it exports 2 properties ("all" and "random")

At next save the starwarsnames in a file "starwars-names.json" in your "src" folder:
 
 
[
  "4-LOM",
  "Ayla Secura",
  "Admiral Ackbar",
  "Ahsoka Tano",
  "Anakin Solo",
  "Asajj Ventress",
  "Aurra Sing",
  "Senator Bail Organa",
  "Barris Offee",
  "Bastila Shan",
  "Ben Skywalker",
  "Bib Fortuna",
  "Boba Fett",
  "Bossk",
  "Brakiss",
  "C-3PO",
  "Cad Bane",
  "Cade Skywalker",
  "Callista Ming",
  "Captain Rex",
  "Carnor Jax",
  "Chewbacca",
  "Clone Commander Cody",
  "Count Dooku",
  "Darth Bane",
  "Darth Krayt",
  "Darth Malgus",
  "Darth Maul",
  "Darth Nihilus",
  "Darth Vader",
  "Dash Rendar",
  "Dengar",
  "Durge",
  "Emperor Palpatine",
  "Exar Kun",
  "Galen Marek",
  "General Crix Madine",
  "General Dodonna",
  "General Grievous",
  "General Veers",
  "Gilad Pellaeon",
  "Grand Moff Tarkin",
  "Greedo",
  "Han Solo",
  "IG 88",
  "Jabba The Hutt",
  "Jacen Solo",
  "Jaina Solo",
  "Jango Fett",
  "Jarael",
  "Jerec",
  "Joruus CBaoth",
  "Kent C. Dodds",
  "Ki-Adi-Mundi",
  "Kir Kanos",
  "Kit Fisto",
  "Kueller",
  "Kyle Katarn",
  "Kyp Durron",
  "Lando Calrissian",
  "Luke Skywalker",
  "Luminara Unduli",
  "Lumiya",
  "Mace Windu",
  "Mara Jade",
  "Mission Vao",
  "Natasi Daala",
  "Nom Anor",
  "Obi-Wan Kenobi",
  "Padmé Admidala",
  "Plo Koon",
  "Pre Vizsla",
  "Prince Xizor",
  "Princess Leia",
  "Proxy",
  "Qui-Gon Jinn",
  "Quinlan Vos",
  "R2-D2",
  "Rahm Kota",
  "Satele Shan",
  "Savage Opress",
  "Sebulba",
  "Shaak Ti",
  "Shmi Skywalker",
  "Talon Karrde",
  "Ulic Qel-Droma",
  "Visas Marr",
  "Watto",
  "Wedge Antilles",
  "Yoda",
  "Zam Wesell",
  "Zayne Carrick",
  "Zuckuss"
]

At next we need a further npm library called unique-random-array.
Lets install it with:

$ npm install --save unique-random-array

This will save the new library to our dependency definition in package.json

Now lets use the new array library in our index.js
 
var uniqueRandomArray = require('unique-random-array');
var starWarsNames = require('./starwars-names.json');
module.exports =
{
    all,
    random
};


Our index.js now looks like that

var uniqueRandomArray = require('unique-random-array');
var starWarsNames = require('./starwars-names.json');
module.exports =
{
    all: starWarsNames,
    random:uniqueRandomArray(starWarsNames)
};
Now that we have the library included, lets use it in our module.

In the export function, we want to reference all starwars-names to the property "all" and a random startwars-name to the property "random".

To to that we only have to export the local variable "starwarsNames" to the global scope by referencing the  exportproperty "all" and the array-function uniqueRandomArray(starwarsNames) from our new library to the export-property "random". Here is the code of "index.js".
Now our index.js looks like that 

 var uniqueRandomArray = require('unique-random-array');
var starWarsNames = require('./starwars-names.json');
module.exports =
{
    all: starWarsNames,
    random:uniqueRandomArray(starWarsNames)
};

Yeah, we havehacked our first node module.

Lets test it!
- open a terminal and navigate to the root folder of your app 
$ node
$ var starwarsNames = require('./src/index.js');
$ starwarsNames.all
$ starwarsNames.random()  

The single commands will output the whole list of names and a random name from the list. Thats realy great!


Now we want to publish it in npm as an own package. 
For that, we have to commit it to our git repository.

open a terminal:
$ cmd to your projectroot
$ touch .gitignore
$ nano .gitignore

add "node_modules" to your .gitignore to prevent commiting the node_modules.

$ git add *
$ git commit -m "init"
$ git push origin master

Thats it.

Now we can publish it to npm.
Thats realy simple.

Just type:
$ npm publish

That it. Now you should directly see your new package on npm !

This is awesome!

Now we want to test, if our module is directly usable via npm.
- open a terminal to the desktop 
$ npm install starwars-names-<your npm_user> 

Super. Now you can use your library, from anywhere in the world.
switch to the desktop and create a file named "test.js" with following content:

var starwarsNames = require('starwars-names-mittax');
console.log(starwarsNames.all);
console.log(starwarsNames.random());

Now run a terminal and cd to the directory where you have stored test.js and run:
$ node test.js

You will now see the results from your library.

This is realy cool!


Thanky to Kent.C.Dotts for the great video! 

Sunday 10 June 2018

Build a Node.js REST API with Swaggerize-express and host it into an Azure App Service


INTRODUCTION

In the 2 previous posts, I showed how to deploy a simple (just 2 GET actions) REST API based on Node.js, Express and Swaggerize-express
I found the Node.js REST API in a Microsoft documentation, cleaned the code and pushed it in a personal reporitory on Github
Now's time to show how to generate that code, and I use the word "generate" on purpose because we are going to see that the magic of swaggerize-express is to build a complete Node.js REST API in a few seconds based on the providing of a json template that describes the API. So let's do this now an end to end project: 

starting the development of an API from scratch and finally deploying it into Azure so that it be available for anybody! 

Prerequisites

  • Node.js
  • Git
  • Visual Studio Code
All the references for installing all that, are in the beginning of my two previous posts. 

BUILDING THE REST API

Installing Swaggerize-express

As described in the Swaggerize-express documentation, first, open a command prompt. 
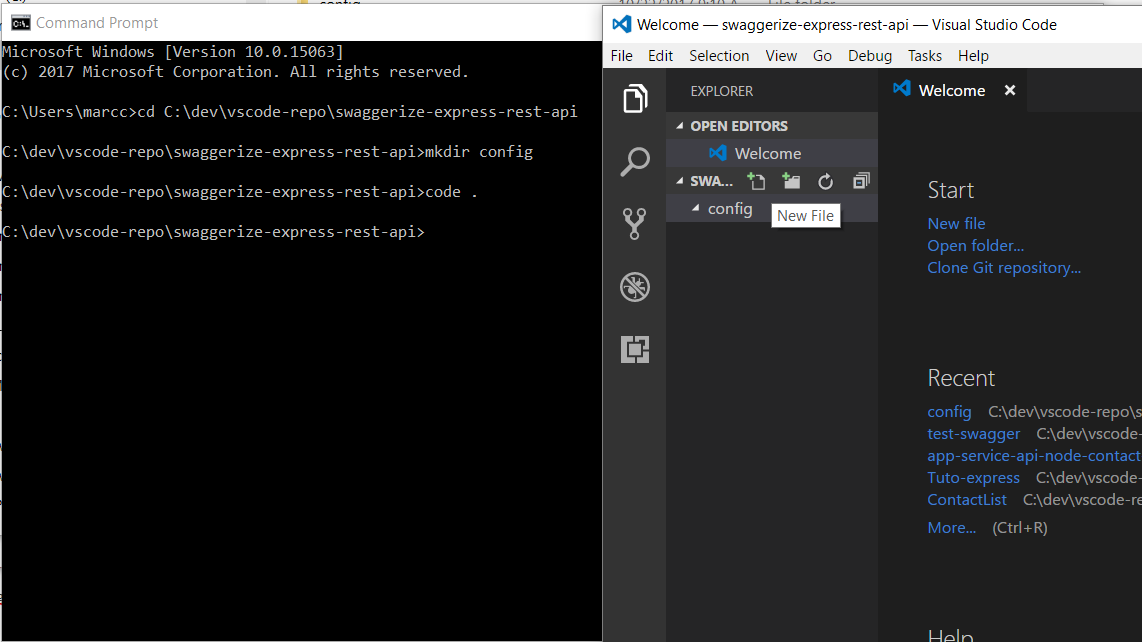
I navigated to my code repository and created a new folder for the project, then I installed swaggerize-express locally. 
$ npm install -g yo 
$ npm install -g generator-swaggerize 


As I had already swaggerize-express installed, it just updated my installed package. 

Generating the REST API

Now we are going to generate a complete node.js REST API (although there is just 2 actions using GET verb) based on this descriptive json template. So copy next code (it is not a picture :-)): 

{
    "swagger""2.0",
    "info": {
        "version""v1",
        "title""Contact List",
        "description""A Contact list API based on Swagger and built using Node.js"
    },
    "paths":{
        "/contacts":{
            "get": {
                "tags": ["Contacts"],
                "operationId""contacts_get",
                "consumes":[],
                "produces":["application/json",
                "text/json"],
                "responses":{
                    "200":{
                        "description":"OK",
                        "schema":{
                            "type""array",
                            "items": {
                                "$ref""#/definitions/Contact"
                            }
                        }
                    }
                },
                "deprecated"false
            }
        },
        "/contacts/{id}": {
            "get": {
                "tags": ["Contacts"],
                "operationId""contacts_getById",
                "consumes":[],
                "produces":["application/json",
                "text/json"],
                "parameters":[{
                    "name":"id",
                    "in""path",
                    "required"true,
                    "type""integer",
                    "format""int32"
                }],
                "responses": {
                    "200": {
                        "description""OK",
                        "schema": {
                            "type""array",
                            "items": {
                                "$ref""#/definitions/Contact"
                            }
                        }
                    }
                },
                "deprecated"false
            }
        }
    },
    "definitions": {
        "Contact": {
            "type""object",
            "properties": {
                "id": {
                    "format""int32",
                    "type""integer"
                },
                "name": {
                    "type""string"
                },
                "email": {
                    "type""string"
                }
            }
        }
    }
}

Create a subfolder in your project folder. It is important to name it "config" 
Open the main project folder with Visual Studio Code 
Create an api.json empty file in the "config" sub-folder within Visual Studio Code 


Paste the template json code in it and save it 


We can now generate the REST API. 
Go back to your command prompt and type: 
$ yo swaggerize 
Follow the prompts (note: make sure to choose express as your framework choice). 
When asked for a swagger document, give the complete path of your api.json file. In my case 
C:\dev\vscode-repo\swaggerize-express-rest-api\config\api.json 
Then the magic is starting and Swaggerize-express creates a complete REST API project. 


Testing the first version of our REST API generated with Swaggerize-express

and we can test it right now by typing: 
node server.js 


and hitting the API within Chrome to have the json display in the browser, as defined in the server.js file: 
http://localhost:8000/contacts 


A mocked data generator is integrated with swaggerize-express that allows to test the API right after its creation. 
Next step we are going to adapt this first project into an API with real data, and modify it to make it work within an Azure App Service. 

PLACING REAL (MOCK) DATA IN THE API

Understanding the code

Let's try to understand how the API works. 
All the calls go first to sever.js, so let's open it. We see this code:
App.use(Swaggerize({
    api: Path.resolve('./config/swagger.json'),
    handlers: Path.resolve('./handlers')
}));
So the calls to the API are driven by the handlers. 
  • If we hit the API url/contacts, the handlers\contacts.js file is processing the call.
  • If we hit the API url/contacts/anId, the handlers\contacts\{id}.js file is processing the call.
So let's open first the handlers\contacts.js file to see how it is processing the call. Doing that we learn that it is redirecting the call to data\contact.js. 
So let's open this file too. We see that at this location that the mock data is generated by the swaggerize mock data generator and it is said that is the place to connect with our real datas. 
We are going to go up from the data source toward the handlers and to develop the capability of our REST API to send our data.

Adding the contacts.json file hosting our mock data

Let's create a contacts.json file under the data folder and place this json data in it:
[
 {
  "id":1,
  "name":"Barney Poland",
  "email":"barney@contoso.com"
 },
 {
  "id":2,
  "name":"Lacy Barrera",
  "email":"lacy@contoso.com"
 },
 {
  "id":3,
  "name":"Lora Riggs",
  "email":"lora@contoso.com"
 }
]


Adding the contactsDataHandler.js file for serving our mock data

Rename the \data\contacts.js file to contactsDataHandler.js and add this code in it:
'use strict';

var contacts = require('./contacts.json');

module.exports = {
    all: function () {
        return contacts;
    }
};


Updating the code in handler\contacts.js file for serving our mock full data

Then, replace the code of the handlers\contacts.js file (a kind of controller) by this one:
 
'use strict';

 var contactsDataHandler = require('../data/contactsDataHandler');

 module.exports = {
     get: function contacts_get(req, res) {
         res.json(contactsDataHandler.all())
     }
 };


Open a command prompt, navigate to your project folder and launch the server by typing: 
node server.js 
(for newbies, to stop the server on Windows type "ctrl c" like if you want to copy something) 
At this step, as the js code is compiled by node.js before launching the server, if you had made a big coding error, the server wouldn't have started and you would have been provided within the command prompt with a error message with all the stack. 


Then, hit localhost:8000/contacts on any browser but Internet Explorer (that serves the json as a file so not very useful for testing) 
Hurrah! We can see our real data sent back from the REST API for the first time! 


We didn't break the feature for requesting a single contact by its id. It's still working with auto-generated swaggerize mock data. 


Now we have to connect the GET contacts/id action to our real data.

Updating the code of contactsDataHandler.js

open contactsDataHandler.js in Visual Studio code and add: 
a refence to the npm module jsonpath that will serve us to retrieve a contact based on its id. a function with the id in parameter to retrieve the contact. 

here is the updated complete code:
'use strict';

var contacts = require('./contacts.json');
var jp = require('jsonpath')

module.exports = {
    get: function (id) {
        return jp.query(contacts, '$..[?(@.id=='+id+')]');
    },
    all: function () {
        return contacts;
    }
};


Updating the code of contacts\{id}.js

open contacts\{id}.js file in Visual Studio code and replace the code in it by this one:
 'use strict';

 var repository = require('../../data/contactsDataHandler');

 module.exports = {
     get: function contacts_get(req, res) {
         res.json(repository.get(req.params['id']))
     }    
 };


testing the action GET/contacts/id

We can test the developed code now but before to do that we have to install the npm jsonpath module we declared and used in the contacts dataHandler. 
So type: npm install jsonpath in your command prompt. 


Then we can test and get the expected result 


Deleting mockgen.js

we can now delete the mockgen.js file because we don't need it anymore since all is pointing on our real data stored in our contacts.json file. 
At this step the project should look like this on your machine: 


Well done! the last thing to do is to deploy all this in Azure and the job is done. 

DEPLOYING THE SWAGGERIZE REST API INTO AN AZURE APP SERVICE

Last update before deploying, server.js file

We are going to use for this deployment the "Try Azure App Service" feature that offers to take benefit of the Azure portal very quickly for one hour. You just have to have one of this social account (Microsoft, Google, Facebook, Github). 

But before opening an one hour trial for the Azure App Services we have to prepare our project for the deployment. 
The App Service we are targetting for deploying is a Node.js Web App. It is not empty and has allready a lot of files, and by chance its main file is also a file called server.js so that it will be overwritten by the server.js file of our project when deploying. 
Unfortunately, our server.js file generated automatically by Swaggerize-express isn't totally compliant with this Azure Node.js Web App we are tragetting for deploying. We thus have to update our server.js file. 
So open it in your editor and replace its code with the following:
'use strict';

var port = process.env.PORT || 8000; // first change

var http = require('http');
var express = require('express');
var bodyParser = require('body-parser');
var swaggerize = require('swaggerize-express');
var swaggerUi = require('swaggerize-ui'); // second change
var path = require('path');

var app = express();

var server = http.createServer(app);

app.use(bodyParser.json());

app.use(swaggerize({
    api: path.resolve('./config/api.json'), // third change
    handlers: path.resolve('./handlers'),
    docspath: '/swagger' // fourth change
}));

// change four
app.use('/docs', swaggerUi({
  docs: '/swagger'  
}));

server.listen(port, function () { // fifth and final change
});


If we want to test locally a last time before deploying we have first to install swaggerize-ui npm module. It is also important for Azure because this local installation will be tracked in our local project and tell Azure that the module is needed within the Azure environment. 


Creating the "Try Azure App Service" Azure App Service to host the project

So let's deploy our Node.js REST API into this type of Azure App Service, totally free and without any commitment For enjoying this Azure feature, reach the welcome page of "Try Azure App Service" 


You are then invited to choose the type of App Service you want to try. Let's start with a Web App. You will see that you can totally use a Web App for hosting a REST API, Node.js will appear at the next step. Select the Web App, then click Next. 


Let's choose the Node.js + Express now. Click on "Create". 
As wrritten previously you can use one of the 4 social networks account to sign in : Microsoft (live), Google +, Facebook, Github. For the demonstration I will use my Live account. 


Then, Azure is provisionning your App Service in a few seconds. 


And an ONE Hour countdown is starting lettting you play with the Azure App Service and the Azure Portal within this hour. 


Creating a .gitignore file

We have to prepare the deployment with another step. We have to exclude the thousand files of the npm modules installed locally in our project to prevent them to be deployed in Azure. Azure has them anyway or can get them at the deployment time much more faster than to deploy them from our local machine. 
Create a gitignore.txt file at the root of your project and paste (my screenshot is wrong I forgot the "s" to "moduleS"):
node_modules/ 
in it 


Then if you are on Windows OS, press the right-shift key of your keyboard and right-click a blank space inside your folder (not a file) and select "open a powershell window from here" in the contextual menu. 


In the powershell prompt type: 
ren gitignore.txt .gitignore. 


Deploying the Swaggerize-express API into Azure

Open the Integrated Terminal of visual studio code. 


type 
git init . 
to initialize the git feature for the deployment 


Check with
git status
that the files under node_modules would be excluded 


then type
git add . 
to add all the files references to the future deployment 
All the files of node_modules should not be taken into account but they were added to the .git repo anyway and a warning occured. Don't worry about that. I think they won't be deployed at the push moment. (my mistake I forgot the "s" to "node_moduleS") 


Now commit all the changes to prepared them to be pushed in Azure. All is new so type: 
git commit -m "initial version" 


While the commit is finished (there again all the files even those of the node_modules were processed (normal, the mistake again)), it's time to deploy, so we are going to add the reference to our Azure App Service 
Go back to the "Try Azure App Service" welcome page were the countdown is running and pick the git url by clicking on the "clone or push with git" button. Copy the url in your clipboard. 


Then type 
git remote add azure
and right click the Integrated Terminal to paste the Azure App Service git url 


then for deploying, type: 
git push azure master 


The deployment was successful although all was deployed even the files under the node_modules folder. 
We can check the deployment by visiting the Visual Studio Code online and notice that we are retrieving exactly the same experience than locally 


If we hit the run button of the editor the Web App is launched and some traces are written on the Output console. 
You will get an error on the root site because we didn't implement the GET site/ route, but if you complete the root site url with /contacts you will have the pleasure to notice that everyhting is ok. 


and also for the GET contcts/id action 


Performing development tasks on line

What is super cool with Node.js and Azure Web App is that you can modify everything online. I add myself as a new contact. 


and it worked perfectly well 


Testing the Azure REST API with swagger

Last we can use swagger to test our API online. 
The correct syntax for the Url to display our API in Swagger UI is 

yourAzureAppUrl/docs/?url=/swagger#/contacts 


If you do this end to end it would be nice to tell me how long it took so as I can refer an average time at the beginning of this tutorial. 
Enjoy folks!