Introduction :
ExpressJS is one of the most popular and widely used web frameworks in the Node.js development zone. ExpressJS allows you to handle Routes, Server and I/O stuff very easily.
ExpressJS provides a smooth transition for legacy websites to use Node.js as their middle layer. So, if you have a website running on Apache or Nginx, then without much change in source code you can convert them into super fast ExpressJS website.
Project Setup:
We are going to develop a website using Bootstrap and ExpressJS. Express will work as the web server and routing handler, whereas we will use Bootstrap and basic HTML for the view.
Directory Structure:
-- lib
-- views
   + -- index.html
   + -- about.html
   + -- contact.html
   + -- 404.html
-- node_modules
   + -- express
package.json
Package.json
{
  "name" : "website-using-express",
  "version" : "0.0.1",
  "scripts" : {
    "start" : "node Server.js"
  },
  "dependencies" : {
    "express" : "latest"
  }
}
Switch to your project folder and type
npm install
This will install the dependency we require, which is express. The "scripts" tag will allow you to start your entry script, which is Server.js.
Server.js :
var express = require("express");
var app = express();
var router = express.Router();
var path = __dirname + '/views/';

router.use(function (req,res,next) {
  console.log("/" + req.method);
  next();
});

router.get("/",function(req,res){
  res.sendFile(path + "index.html");
});

router.get("/about",function(req,res){
  res.sendFile(path + "about.html");
});

router.get("/contact",function(req,res){
  res.sendFile(path + "contact.html");
});

app.use("/",router);

app.use("*",function(req,res){
  res.sendFile(path + "404.html");
});

app.listen(3000,function(){
  console.log("Live at Port 3000");
});
For the first 3 lines, we are loading the dependency (express). We are using Express Router(), which is a built-in and powerful middle layer Routing service provided by ExpressJS.
We have stored the views (i.e HTML files) in the "views" folder. We are assigning that path using "__dirname" keyword, which points to your current working directory.
On line no. 5, we have defined the Router middle layer, which will be executed before any other routes. This route will be used to print the type of HTTP request the particular Route is referring to.
router.use(function (req,res,next) {
  console.log("/" + req.method);
  next();
});
Once the middle layer is defined, you must pass "next()" so that next router will get executed.
The "sendFile()" function is a built-in function in ExpressJS and is designed to send files to a web browser. In our case, we are sending the HTML file.
The line
app.use("/",router);
is telling Express to use the Routes we have defined above.
The magic of Express Routing is we can assign the routes in order, so the last one will get executed when the incoming request is not matching any route. Well for us, its the 404 case.
app.use("*",function(req,res){
  res.sendFile(path + "404.html");
});
Views :
index.html :
<!doctype html>
<html lang="en">
<head>
<meta charset="UTF-8">
<title>Single page web app using Angularjs</title>
<script src="//ajax.googleapis.com/ajax/libs/angularjs/1.3.3/angular.min.js"></script>
<script src="//cdnjs.cloudflare.com/ajax/libs/angular.js/1.3.3/angular-route.min.js"></script>
<script src="//ajax.googleapis.com/ajax/libs/jquery/1.11.1/jquery.min.js"></script>
<link rel="stylesheet" href="http://maxcdn.bootstrapcdn.com/bootstrap/3.3.1/css/bootstrap.min.css">
<script src="//maxcdn.bootstrapcdn.com/bootstrap/3.3.1/js/bootstrap.min.js"></script>
<script src="script.js"></script>
</head>
<body>
<div>
<div>
<nav class="navbar navbar-inverse" role="navigation" style="padding-left:130px;">
<ul class="nav navbar-nav">
<li class="active"><a href="/">Home<span class="sr-only">(current)</span></a></li>
<li><a href="/about">About us</a></li>
<li><a href="/contact">Contact us</a></li>
</ul>
</nav>
</div>
<br/>
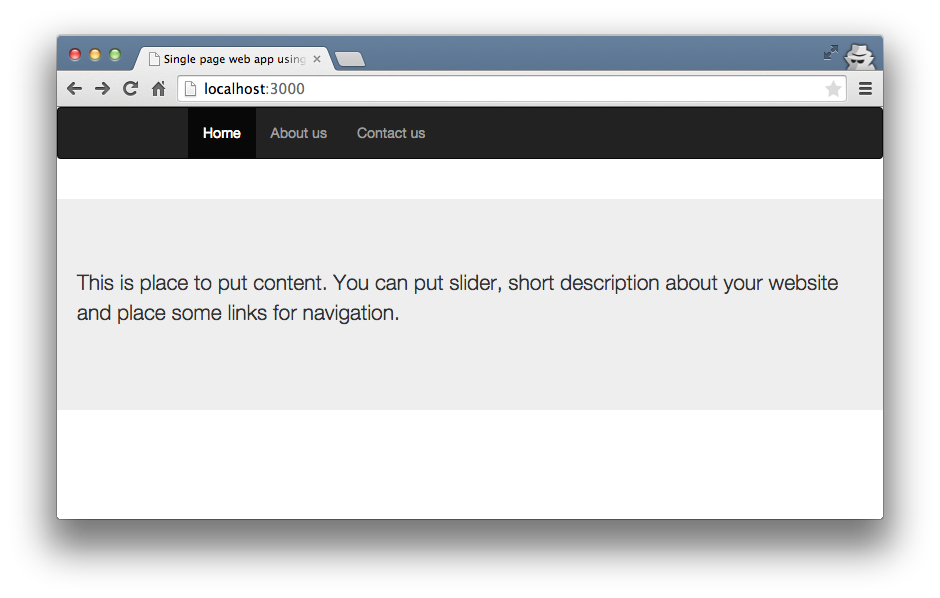
<div class="jumbotron"> <p>
This is place to put content. You can put slider, short description about your website and place some links for navigation.
</p></div>
</div>
</body>
</html>
This is how it looks like :
about.html
<html>
<head>
<link rel="stylesheet" href="http://maxcdn.bootstrapcdn.com/bootstrap/3.3.1/css/bootstrap.min.css">
<script src="//maxcdn.bootstrapcdn.com/bootstrap/3.3.1/js/bootstrap.min.js"></script>
</head>
<body>
  <div>
  <div>
  <nav class="navbar navbar-inverse" role="navigation" style="padding-left:130px;">
         <ul class="nav navbar-nav">
        <li><a href="/">Home</a></li>
        <li class="active"><a href="/about">About us<span class="sr-only">(current)</span></a></li>
        <li><a href="/contact">Contact us</a></li>
      </ul>
</nav>
</div>
  <br/>
  <div class="jumbotron">
  <p>
    Put detail description about you and your company.
  </p>
</div>
  </div>
</body>
</html>
<html>
<head>
<link rel="stylesheet" href="http://maxcdn.bootstrapcdn.com/bootstrap/3.3.1/css/bootstrap.min.css">
<script src="//maxcdn.bootstrapcdn.com/bootstrap/3.3.1/js/bootstrap.min.js"></script>
</head>
<body>
<div>
<div>
<nav class="navbar navbar-inverse" role="navigation" style="padding-left:130px;">
<ul class="nav navbar-nav">
<li><a href="/">Home</a></li>
<li><a href="/about">About us</a></li>
<li class="active"><a href="/contact">Contact us<span class="sr-only">(current)</span></a></li>
</ul>
</nav>
</div>
<br/>
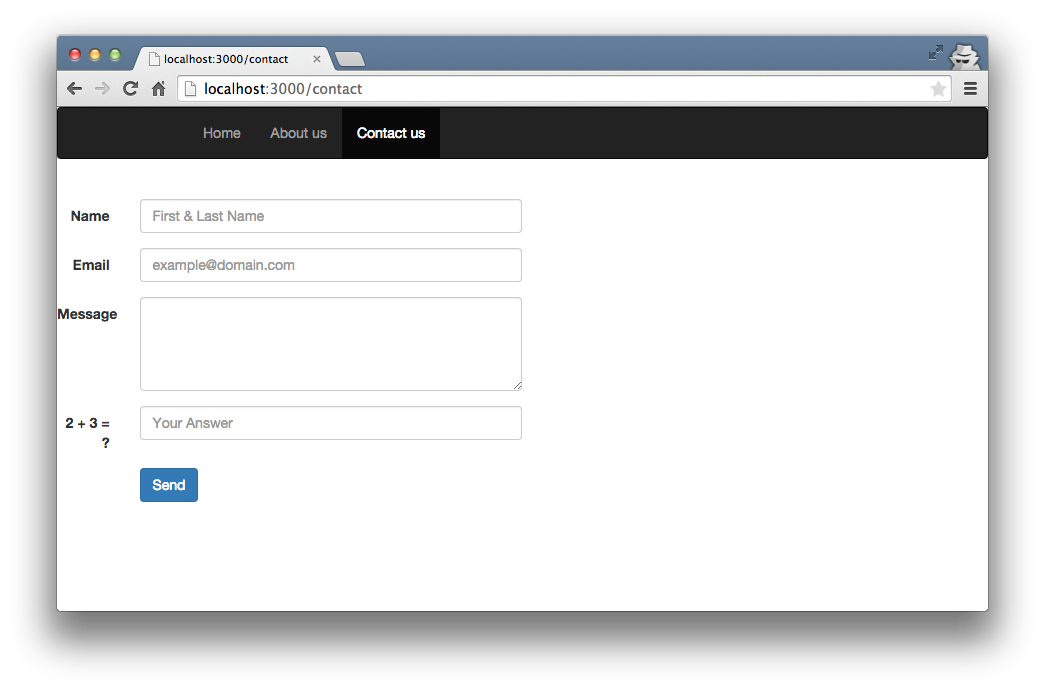
<form class="form-horizontal" role="form" style="width: 50%;">
<div class="form-group">
<label for="name" class="col-sm-2 control-label">Name</label>
<div class="col-sm-10">
<input type="text" class="form-control" id="name" name="name" placeholder="First & Last Name" value="">
</div>
</div>
<div class="form-group">
<label for="email" class="col-sm-2 control-label">Email</label>
<div class="col-sm-10">
<input type="email" class="form-control" id="email" name="email" placeholder="example@domain.com" value="">
</div>
</div>
<div class="form-group">
<label for="message" class="col-sm-2 control-label">Message</label>
<div class="col-sm-10">
<textarea class="form-control" rows="4" name="message"></textarea>
</div>
</div>
<div class="form-group">
<label for="human" class="col-sm-2 control-label">2 + 3 = ?</label>
<div class="col-sm-10">
<input type="text" class="form-control" id="human" name="human" placeholder="Your Answer">
</div>
</div>
<div class="form-group">
<div class="col-sm-10 col-sm-offset-2">
<input id="submit" name="submit" type="submit" value="Send" class="btn btn-primary">
</div>
</div>
<div class="form-group">
<div class="col-sm-10 col-sm-offset-2">
<! Will be used to display an alert to the user>
</div>
</div>
</form>
</div>
</body>
</html>
How to run the code :
Open up your terminal and switch to the project folder and type
npm start
You should see screen similar to this :
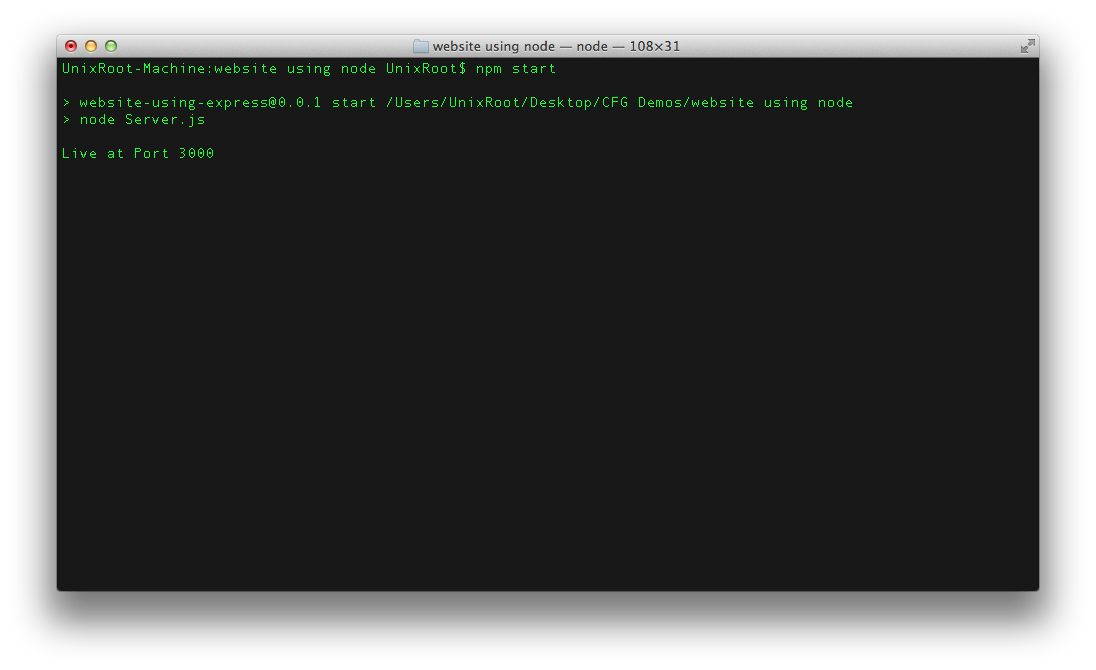
Visit localhost:3000 and view your first website.
Conclusion :
We have learned how to configure the Express to handle view rendering and router. We can use same technique to perform the transition from legacy to Express website.


0 comments: