Now as google has officially announced kotlin as official language for Android Development, today I am writing a tutorial about creating Android Recycler View with kotlin. Though Android Studio 3.0 is not released yet, but you can get the beta release for android development in kotlin. Visit the link to download android studio 3.0 beta release (get the stable build if released).
Here is the final image of our recyclerview.
list_item.xml
Now we will add the data class or you can say POJO class in kotlin. It is very very simple in kotlin. You don't have to write any boilerplate code.
MyData.kt
Next step is to create our RecyclerViewAdapter.kt. It is pretty much same as we usually do in java.
RecyclerViewAdapter.kt
Its time to use our custom adapter and display the list of items on the screen. In your main activity, set the adapter for the recycler view.
MainActivity.kt
Here is the final image of our recyclerview.
Recycler View Using Kotlin - Android Tech Point
Steps to Create Recycler View
You can create your recycler view by following these simple steps
- Add the recycler view in your xml.
- Add a new layout xml file for the list item and add card view in it.
- Create your data class.
- Write your adapter class.
- Set the adapter for the recycler view.
And that's all. Now we will see the implementation in a bit details with the actual code.
Implementation for Recycler View with Kotlin
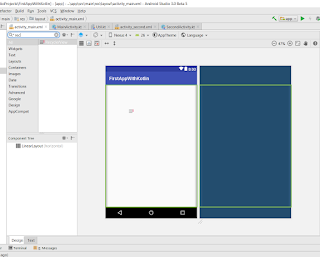
Drag and drop the recycler view, android studio will automatically add the dependency for recycler view in the Build,gradle(app).

Recycler View - Android Tech Point
Here is the code for the recycler view in activity_main.xml
activity_main.xml
Create a new xml layout file and name it list_item.xml. Drag and drop the card view in the design section (Android Studio will automatically add the dependency for card view) create the design for a single row.
Recycler View - Android Tech Point
Here is the code for the recycler view in activity_main.xml
activity_main.xml
| <?xml version="1.0" encoding="utf-8"?> | |
| <LinearLayout xmlns:android="http://schemas.android.com/apk/res/android" | |
| xmlns:app="http://schemas.android.com/apk/res-auto" | |
| xmlns:tools="http://schemas.android.com/tools" | |
| android:layout_width="match_parent" | |
| android:layout_height="match_parent" | |
| tools:context="com.example.farooq.firstappwithkotlin.MainActivity"> | |
| <android.support.v7.widget.RecyclerView | |
| android:id="@+id/recyclerview" | |
| android:layout_width="match_parent" | |
| android:layout_height="match_parent" /> | |
| </LinearLayout> |
list_item.xml
| <?xml version="1.0" encoding="utf-8"?> | |
| <LinearLayout xmlns:android="http://schemas.android.com/apk/res/android" | |
| xmlns:tools="http://schemas.android.com/tools" | |
| android:layout_width="match_parent" | |
| android:layout_height="wrap_content" | |
| android:orientation="horizontal"> | |
| <android.support.v7.widget.CardView | |
| android:layout_width="match_parent" | |
| android:layout_margin="4dp" | |
| android:layout_height="wrap_content"> | |
| <LinearLayout | |
| android:layout_width="match_parent" | |
| android:layout_height="wrap_content" | |
| android:orientation="horizontal"> | |
| <ImageView | |
| android:id="@+id/imageview" | |
| android:layout_width="0dp" | |
| android:layout_height="match_parent" | |
| android:layout_weight="1" | |
| android:scaleType="centerCrop" /> | |
| <TextView | |
| android:id="@+id/textview" | |
| android:layout_marginLeft="4dp" | |
| android:layout_marginRight="4dp" | |
| android:layout_marginStart="4dp" | |
| android:layout_marginEnd="4dp" | |
| android:layout_width="0dp" | |
| android:layout_height="wrap_content" | |
| android:layout_weight="8" | |
| android:textSize="24sp" | |
| tools:text="This is a sample text" /> | |
| </LinearLayout> | |
| </android.support.v7.widget.CardView> | |
| </LinearLayout> |
MyData.kt
| package com.example.farooq.firstappwithkotlin | |
| import android.graphics.Bitmap | |
| /** | |
| * Created by androidtechpoint.blogspot.com on 9/12/2017. | |
| */ | |
| data class MyData(var text:String, var image:Bitmap) |
RecyclerViewAdapter.kt
| package com.example.farooq.firstappwithkotlin | |
| import android.support.v7.widget.RecyclerView | |
| import android.util.Log | |
| import android.view.LayoutInflater | |
| import android.view.View | |
| import android.view.ViewGroup | |
| import android.widget.ImageView | |
| import android.widget.TextView | |
| /** | |
| * Created by farooq on 9/12/2017. | |
| */ | |
| class RecyclerViewAdapter(val list:ArrayList<MyData>):RecyclerView.Adapter<RecyclerViewAdapter.ViewHolder>() { | |
| override fun onCreateViewHolder(parent: ViewGroup, viewType: Int): RecyclerViewAdapter.ViewHolder { | |
| val v = LayoutInflater.from(parent.context).inflate(R.layout.list_item, parent, false) | |
| return ViewHolder(v) | |
| } | |
| //this method is binding the data on the list | |
| override fun onBindViewHolder(holder: RecyclerViewAdapter.ViewHolder, position: Int) { | |
| holder.bindItems(list[position]) | |
| } | |
| //this method is giving the size of the list | |
| override fun getItemCount(): Int { | |
| return list.size | |
| } | |
| class ViewHolder(view: View): RecyclerView.ViewHolder(view) { | |
| fun bindItems(data : MyData){ | |
| val _textView:TextView = itemView.findViewById(R.id.textview) | |
| val _imageView:ImageView = itemView.findViewById(R.id.imageview) | |
| _textView.text = data.text | |
| _imageView.setImageBitmap(data.image) | |
| //set the onclick listener for the singlt list item | |
| itemView.setOnClickListener({ | |
| Log.e("ItemClicked", data.text) | |
| }) | |
| } | |
| } | |
| } |
MainActivity.kt
| package com.example.farooq.firstappwithkotlin | |
| import android.graphics.BitmapFactory | |
| import android.support.v7.app.AppCompatActivity | |
| import android.os.Bundle | |
| import android.support.v7.widget.LinearLayoutManager | |
| import android.support.v7.widget.RecyclerView | |
| import android.widget.LinearLayout | |
| class MainActivity : AppCompatActivity() { | |
| override fun onCreate(savedInstanceState: Bundle?) { | |
| super.onCreate(savedInstanceState) | |
| setContentView(R.layout.activity_main) | |
| val _recyclerView: RecyclerView = findViewById(R.id.recyclerview) | |
| _recyclerView.layoutManager = LinearLayoutManager(this, LinearLayout.VERTICAL, false) | |
| val items = ArrayList<MyData>() | |
| //adding some dummy data to the list | |
| items.add(MyData("text 1", BitmapFactory.decodeResource(resources, R.drawable.icon1))) | |
| items.add(MyData("text 2", BitmapFactory.decodeResource(resources, R.drawable.icon2))) | |
| items.add(MyData("text 3", BitmapFactory.decodeResource(resources, R.drawable.icon3))) | |
| items.add(MyData("text 4", BitmapFactory.decodeResource(resources, R.drawable.icon4))) | |
| items.add(MyData("text 5", BitmapFactory.decodeResource(resources, R.drawable.icon5))) | |
| items.add(MyData("text 6", BitmapFactory.decodeResource(resources, R.drawable.icon1))) | |
| items.add(MyData("text 7", BitmapFactory.decodeResource(resources, R.drawable.icon2))) | |
| items.add(MyData("text 7", BitmapFactory.decodeResource(resources, R.drawable.icon3))) | |
| items.add(MyData("text 8", BitmapFactory.decodeResource(resources, R.drawable.icon4))) | |
| items.add(MyData("text 9", BitmapFactory.decodeResource(resources, R.drawable.icon5))) | |
| items.add(MyData("text 10", BitmapFactory.decodeResource(resources, R.drawable.icon1))) | |
| items.add(MyData("text 11", BitmapFactory.decodeResource(resources, R.drawable.icon2))) | |
| items.add(MyData("text 12", BitmapFactory.decodeResource(resources, R.drawable.icon2))) | |
| items.add(MyData("text 13", BitmapFactory.decodeResource(resources, R.drawable.icon3))) | |
| items.add(MyData("text 14", BitmapFactory.decodeResource(resources, R.drawable.icon4))) | |
| items.add(MyData("text 15", BitmapFactory.decodeResource(resources, R.drawable.icon5))) | |
| items.add(MyData("text 16", BitmapFactory.decodeResource(resources, R.drawable.icon1))) | |
| //creating our adapter | |
| val adapter = RecyclerViewAdapter(items) | |
| //now adding the adapter to recyclerview | |
| _recyclerView.adapter = adapter | |
| } | |
| } |


0 comments: