

Stateless authentication is a great fit for Angular apps. In this post, we talks about implementing it using JSON Web Tokens.
TL;DR: Single page apps--like the ones we build with Angular--present a few challenges when it comes to authentication. In general, traditional session-based authentication isn't a good fit for SPAs that use data APIs because it necessitates state on the server. A better way to do authentication in Angular apps (and SPAs in general) is with JSON Web Tokens (JWTs). Read on to find out more about JWTs, or check out Angular 2 Tour of Secret Heroes to see an example of a full Angular 2 app with user authentication.
Pretty well all non-trivial applications require some way of dealing with user authentication and authorization. This can be fairly straight-forward in round-trip applications because all that is really needed when a user logs in is to check their credentials against a database, save a session for them on the server, and return a cookie to be saved in their browser. The cookie is then sent along in subsequent requests to the server and is checked against the session to verify their identity.
This works well for "traditional" applications, but it isn't a great fit for single page apps that use data APIs. Since SPAs are client-side apps, dealing with the notion of the user's authentication state is also a bit trickier. Essentially what it boils down to is that we need some indication of the user's authentication state even though the backends that we rely on should remain stateless. This isn't a problem in round-trip apps because the HTML and data that get returned to the user is constructed on the backend, which is exactly the place that a stateful check can be done to figure out whether or not the user is currently logged in. When we use REST APIs for data however, a stateful session that tracks authentication is bad practice.
JSON Web Tokens - Stateless Authentication in Angular Apps
A great way to do stateless authentication in an Angular app is to use JSON Web Tokens (JWT). JWT is an open standard (RFC 7519), and likely the most compelling reason to choose it as an authentication mechanism is that it can be used to transmit arbitrary data as a JSON object. Since JWTs are digitally signed with a secret key that lives only on the server, we can rest assured that the information in the token can't be tampered with at any point. If the payload in the JWT were to be tampered with, the token would become invalid, which means it wouldn't be able to get past any checkpoints on the server. This makes JWT the perfect mechanism for transmitting information about a user and it gives us a distinct advantage: we can include everything required for our API to know who the user is and what level of access they should have, and the API doesn't need to know a single thing about them prior to the JWT arriving.
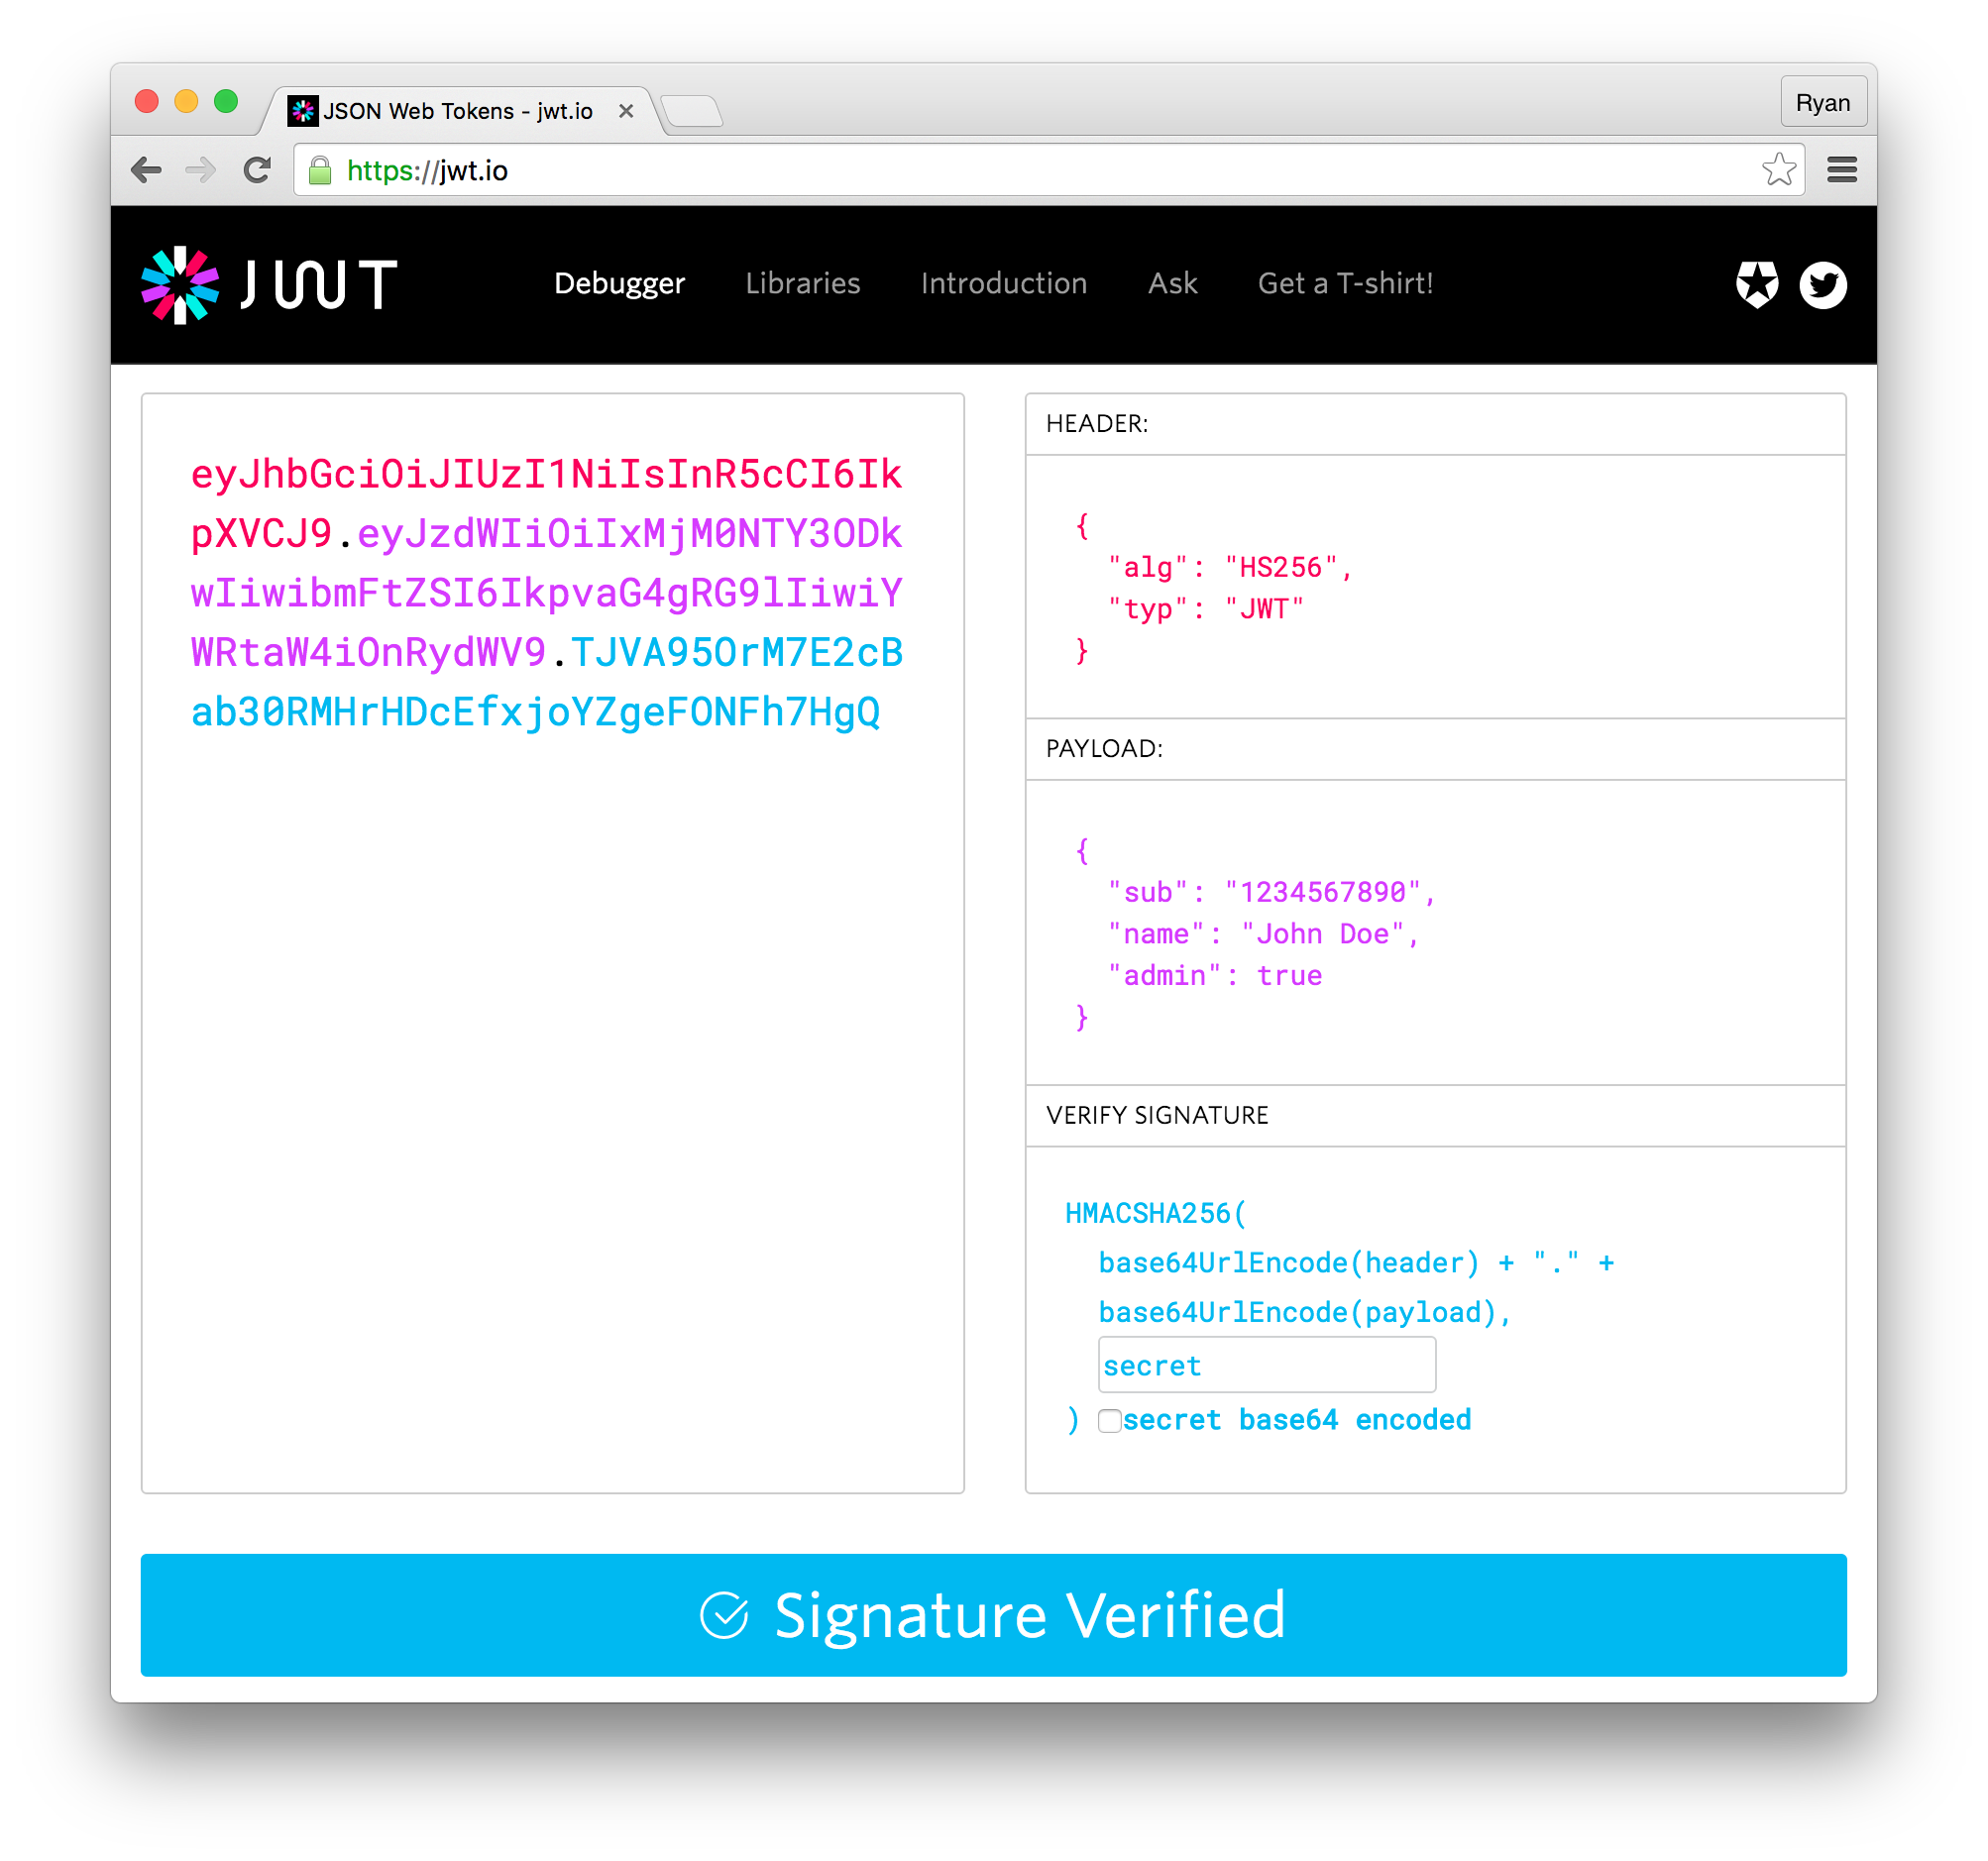
So what does a JWT look like? Here's an example:
eyJhbGciOiJIUzI1NiIsInR5cCI6IkpXVCJ9.eyJzdWIiOiIxMjM0NTY3ODkwIiwibmFtZSI6IkpvaG4gRG9lIiwiYWRtaW4iOnRydWV9.TJVA95OrM7E2cBab30RMHrHDcEfxjoYZgeFONFh7HgQ
JWTs contain three parts, and each of them is tacked together with a dot separator. The three parts are:
Header
Where we define the algorithm used to sign the token, as well as the token type.
Payload
The meat of the JWT. This is where we keep a JSON object of all the claims we want. Claims can include those that are registered in the JWT spec, as well as any arbitrary data we want.
Signature
The signature is where the signing action happens. To get the signature, we take the Base64URL encoded header, tack the Base64URL encoded payload next to it, and run that string along with the secret key through the hashing algorithm we've chosen. For the token to properly decode on the backend, it needs to have exactly this form, which means that if someone tries to change any of the information contained within, they'll be out of luck.
We can see this token decoded with Auth0's open source JWT debugger.
It should be noted that although JWTs are digitally signed, they are not encrypted. While the digital signature ensures that the content of a JWT cannot be tampered with, they should not be used to transmit sensitive information, as the payload can easily be decoded with tools like the jwt.io debugger.
How Are JWTs Used to Authenticate Angular Apps?
For Angular apps that use data APIs, the typical scenario is this:
- Users send their credentials to the server which are verified against a database. If everything checks out, a JWT is sent back to them.
- The JWT is saved in the user's browser somehow--either by holding it in local storage or in a cookie.
- The presence of a JWT saved in the browser is used as an indicator that a user is currently logged in.
- The JWT's expiry time is continually checked to maintain an "authenticated" state in the Angular app, and the user's details are read from the payload to populate views such as the their profile.
- Access to protected client-side routes (such as the profile area) are limited to only authenticated users
- When the user makes XHR requests to the API for protected resources, the JWT gets sent as an
Authorizationheader using theBearerscheme, or as a cookie. - Middleware on the server--which is configured with the app's secret key--checks the incoming JWT for validity and, if valid, returns the requested resources.
Fortunately for us, there are several open source libraries for both Angular 1.x and 2 which help us work with JWTs. These libraries are varied in their functionality, but some of the features we get with them are the ability to:
- Decode the JWT and read its payload
- Attach the JWT as an
Authorizationheader to XHR requests - Have a service which exposes methods for logging in and logging out, and which checks whether the current user's JWT is expired or not
Angular 1.x
Angular 2
There are also hosted authentication solutions that can drastically simplify the process of setting up user login and signup functionality for Angular apps. This basically means that we don't need to worry about any logic for checking the user's credentials and signing tokens for them.
Authentication in Action
So we've got a list of things that our Angular apps should be doing to deal with authentication, but what does this look like in practice? Let's see an example using Angular 2.
Retrieve a JWT for a User and Save it in Local Storage
To retrieve a JWT for a user, we need to verify their credentials against a database. If everything checks out, we sign a JWT and send it back to them in the response. We can use almost any server-side language or framework for this task, and there are JWT libraries available for almost everything.
With the token signing logic set up, we need to expose an endpoint that the app can make a request to for authentication. For this, we just need to send a regular HTTP request. Placing this logic in an injectable service gives us a way to reuse it across our application.
// auth.service.ts

import { Injectable } from '@angular/core';
import { Http } from '@angular/http';
import 'rxjs/add/operator/map';

@Injectable()
export class AuthService {

  constructor(private http: Http) {}

  login(credentials) {
    this.http.post('https://my-app.com/api/authenticate', credentials)
      .map(res => res.json())
      .subscribe(
        // We're assuming the response will be an object
        // with the JWT on an id_token key
        data => localStorage.setItem('id_token', data.id_token),
        error => console.log(error)
      );
  }
}
We can then wire up a form which takes input from the user and calls the
AuthService.// login.component.ts
import { Component } from '@angular/core';
import { AuthService } from './auth.service';
interface Credentials {
username: string,
password: string
}
@Component({
selector: 'login',
template: `
<form #f="ngForm" (ngSubmit)="onLogin(f.value)" *ngIf="!auth.loggedIn()">
<input type="text" placeholder="username" ngControl="username">
<input type="password" placeholder="password" ngControl="password">
<button type="submit">Submit</button>
</form>
`
})
export class LoginComponent {
credentials: Credentials;
constructor(private auth: AuthService) {}
onLogin(credentials) {
this.auth.login(credentials);
}
}
With the login form and the authentication service in place, the user's JWT will be saved in local storage if they successfully authenticate.
You can see that we've got an
*ngIf condition on the form which is looking for a loggedIn method on the AuthService. Let's put that in next.Checking for an Unexpired Token
With stateless authentication, the only real indication for the front end that the user is "authenticated" is if they have an unexpired JWT. Certainly a more robust indication would be a check to make sure their JWT is not only unexpired, but is also still valid. However, to do this kind of check, the front end would need to know the secret key used to sign the JWT, and we really don't want to expose that. Simply checking the expiry is just fine though; if the token is invalid (in other ways than it just being expired), it won't be useful for retrieving protected API resources anyway.
To do this kind of check, we can get some help from angular2-jwt's
tokenNotExpired function.npm install angular2-jwt
// auth.service.ts

import { tokenNotExpired } from 'angular2-jwt';

...

loggedIn() {
  return tokenNotExpired();
}

...
This function simply checks the expiry date of the JWT and returns
true if it is not expired.Limit Routes to Authenticated Users
We've got a way to hide our links and navigation elements if the user either doesn't have a JWT or if their JWT is expired. However, they could still navigate by plugging in URI segments manually, so what we need is a way to limit navigation to private routes altogether. To do this we can set up an
AuthGuard which checks whether the user has an unexpired JWT in local storage. We'll then apply the guard through CanActivate when we set up the routing configuration.// auth-guard.service.ts
import { Injectable } from '@angular/core';
import { Router } from '@angular/router';
import { CanActivate } from '@angular/router';
import { Auth } from './auth.service';
@Injectable()
export class AuthGuard implements CanActivate {
constructor(private auth: Auth, private router: Router) {}
canActivate() {
if(this.auth.loggedIn()) {
return true;
} else {
this.router.navigateByUrl('/unauthorized');
return false;
}
}
}
When route navigation is requested,
AuthGuard will use the AuthService to check for the presence of an unexpired JWT and, if one exists, the user will be allowed to continue to the route. If the user isn't authenticated however, they will be navigated to an "unauthorized" page.
The
AuthGuard needs to be applied to whichever routes should be kept private, and this is done in the RouterConfig setup....
import { AuthGuard } from './auth-guard.service';
export const routes: RouterConfig = [
{ path: 'admin', component: AdminComponent, canActivate: [AuthGuard] },
{ path: 'unauthorized', component: UnauthorizedComponent }
];
...
Send Authenticated HTTP Requests
The last big step for applying authentication to our app is to have the user's JWT sent as an
Authorization header in the HTTP requests they make. Since Angular 2 doesn't have any concept of HTTP interceptors like Angular 1.x does, we need to either send the header in the options object of each request, or we can wrap Http to perform this automatically. The angular2-jwt library provides AuthHttp which does the latter.// secure-stuff.component.ts
import { Component } from '@angular/core';
import { AuthHttp, tokenNotExpired } from 'angular2-jwt';
import 'rxjs/add/operator/map';
@Component({
selector: 'secure-stuff',
template: `
<button (click)="getSecureStuff()">Get Secure Stuff!</button>
`
})
export class SecureStuffComponent {
stuff: [];
constructor(private authHttp: AuthHttp) {}
getSecureStuff() {
this.authHttp.get('https://my-app.com/api/secure-stuff')
.map(res => res.json())
.subscribe(
data => this.stuff = data.stuff,
error => console.log(error)
);
}
}
Note: Any application that uses JWT authentication should always be served over HTTPS to prevent malicious interception of the token.
Log the User Out
With stateless authentication using JWTs, logging the user out is just a matter of removing their token from local storage.
// auth.service.ts

...

@Injectable()
export class AuthService {

  ...

  logout() {
    localStorage.removeItem('id_token');
  }
}
You might be wondering if this is secure or not, given the fact that we're just removing the token from its holding place and it could, in reality, still be used to access the API. We've got two options to address this concern: we can set the token's expiry time to be short and/or we can implement token blacklisting on the server. With a short window of validity, the JWT can't be exploited for very long, and with blacklisting, the token's ability to access secure resources can be revoked altogether.
Full Example: Angular 2 Tour of Secret Heroes
It would be nice to see all of this authentication business in action in a working app. For that, I've put together a fork of John Papa's Tour of Heroes app (used in the Angular 2 Getting Started guide), called Angular 2 Tour of Secret Heroes. In this app, all the original heroes data--plus a set of new 'secret' heroes--has been moved to an Express server. Authentication happens with Auth0, and angular2-jwt is used for protecting routes, conditionally showing UI elements, and sending authenticated HTTP requests.
Wrapping Up
Stateless authentication has distinct advantages over traditional session-based auth. Keeping our APIs stateless makes them more agile and lets us easily port our apps to other platforms like mobile or desktop. With open source libraries, such as angular2-jwt, we can easily check for token validity and send authenticated HTTP requests with just a bit of configuration.
If you're interested in adding authentication to an Angular 1.x app, the things we went through here still apply, but there are a few differences to keep in mind. For instance, Angular 1.x has HTTP interceptors which can be used to attach the
Authorization header to requests, so there's no need to wrap the $http service.
For more on Angular 1.x and 2 authentication, as well as tutorials about Angular in general, be sure to check out the Auth0 blog.

0 comments: